Packing is used to arrange multiple parts in the build space in as little space as possible, while avoiding collisions and interlocking problems. 2D packers are used for processes that require supports. 3D packers are useful for all processes that don't require the part to be supported, for example, Selective Laser Sintering (SLS) for plastics. In these cases, the build space is filled with powder which is heated and supports the weight of the parts.
- 2D Packing by Shape
- Parts that require supports cannot be packed in the 3-dimensional space, so you need to work out how to arrange them in 2D, on the platform.
Note: When working with metal you usually have to position the parts yourself, since positioning and also orientation are crucial for build success.
- Packing by Outbox
- Packing by Simple Outbox, arranges parts automatically in the build space to avoid collisions, using the part outbox as a reference. You can select 2D or 3D packing, to see if the parts fit on the tray. This method is generally the fastest, because it simply packs part outboxes. To maximize the part density, make sure you minimize the outbox for each part.
- 3D Packing - Scanline
-
The Scanline packer is best suited to packing a collection of parts that exhibit a wide range of shapes and sizes, such as skeleton bones. During the packing process, the parts rotate as necessary, and according to user-defined settings, in order to find the best orientation to enable more dense packing. With this packer, once you start packing, the calculations continue until they are finished. You either wait until the end, or cancel the process.
Note: The Scanline packer is optimized for maximum density, rather than lowest height in the build space.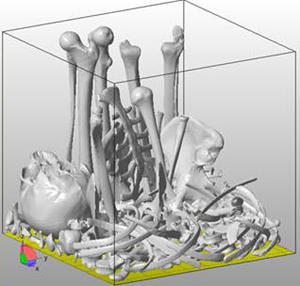
When parts are packed, it is possible for parts to become interlocked, with no collision warnings if the parts don't touch. While the parts can be moved apart in the software, once the parts are sintered they can not be separated. Interlocking protection should be turned on if the shapes are such that interlocking is possible.
- 3D Packing - Monte Carlo
-
The Monte Carlo packer is best suited to cases that include one or two vital and potentially expensive part(s) that are aligned carefully in the build space, surrounded by many small, less important parts. During the packing process, if allowed by the settings, the parts are rotated at the start, but then not again. The process is then likened to random shaking, where parts move into gaps as they find them. The goal of Monte Carlo packing is to move the parts as low as possible in the build space, to minimize the Packed Platform Height.
Place the main part(s) as low to the platform as possible to avoid wasting powder, then lock them in place with the Lock Positions of selected items option. Select all the small parts for packing and start the packer. With the Monte Carlo packer, you can stop packing as soon as you are happy with the result. Or you can resume packing if you want the packer to try again.
Note: The Monte Carlo packer is optimized for minimum platform height, rather than for packing density.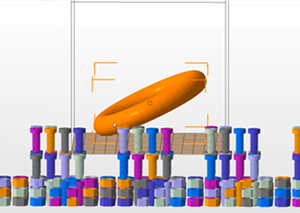
Main part locked in build space, with smaller nuts and bolts to be packed around it
The Monte Carlo packer eliminates interlocking problems, because the parts can't interlock; during the shaking process the parts bounce off each other rather than packing more densely.
 To further customize the Monte Carlo packer, no-build zones can be defined, as well as a packing priority be set individually for each part, if required.