To create a toolbar:
- Click . The Customize dialog is displayed.
- On the Toolbars tab, specify your toolbar and select the items you want to add.
- Click Add to add each new item to the toolbar.
- Use the buttons on the dialog to order and organize the toolbar items.
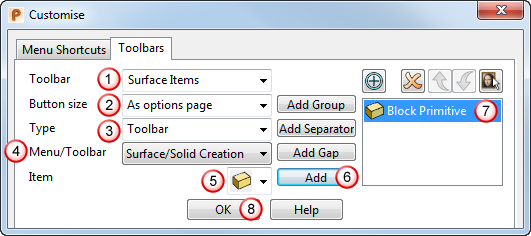
The example below describes adding a block primitive from the Surface tab to a new custom toolbar:
- Select a toolbar
 and enter a new name, such as
Surface items.
and enter a new name, such as
Surface items.
- Select the
Button Size
 from:
from:
- Large
- Small
- As Options Page
- For the
Type
 , select
Menu.
, select
Menu.
- Select the Menu/Toolbar that contains the item you want to add to your toolbar, such as Object to show all the object creation options.
- Select the
Item
 to add, such as Surface > Block.
- Click
Add
 to add the Surface Block button to your toolbar.
Added items are displayed in the added items list
 .
.
- Click
OK
 .
.