Generic files include a “family table” of file or assembly “instances.”
There are specific behaviors associated with generic files when working through Vault
To generate accurate Where Used and Uses information as well as provide a full Bill of Materials, the Vault add-in for Pro/Engineer and Creo creates instance files on the first check-in. These "dummy files" are generated on disk and are tiny in size (only a few bytes).
Add a Generic File to Vault
- From Pro/ENGINEER, open a generic file and check it into Vault.
Check-in shows Generic files and Instances.
Open a Generic File from Vault
Instance files associated with a generic file cannot be opened directly in Pro E. You must always open them through the generic file.
- From Pro/ENGINEER, select Open from Vault.
- Select an instance of the generic file.
A view of the instance is opened from the generic file with Vault relationships.
Place an Instance from Vault
- From Pro/ENGINEER, select Assemble.
- Browse to the generic file on your local disk.
- Insert the generic and select the instance that you want from the Select Instance dialog.
Resolve Check-In Errors for Instances
In some cases, you might receive a message that some files are preventing the check-in of an assembly to Vault. This could be due to modified instances of a generic.
- Go the Pro/ENGINEER Options dialog box and make sure the following are set:
- Allow DLS Update: True
- Retrieve all Family Table Instances: False
- From Pro/ENGINEER, open the Vault browser.
- Right-click the affected files and select
Download Selected.

The instances should resolve with the latest versions from Vault, enabling you to check in the assembly.
- Find the
config.pro file in the Pro/ENGINEER install folder; for example,
C:\Program Files\PTC\Creo 2.0\Common Files\M130\text\.
Note: The config.pro file might not exist unless you have changed a default Pro/ENGINEER option. If you need to create the config.pro file, change an option and then restart Pro/ENGINEER.
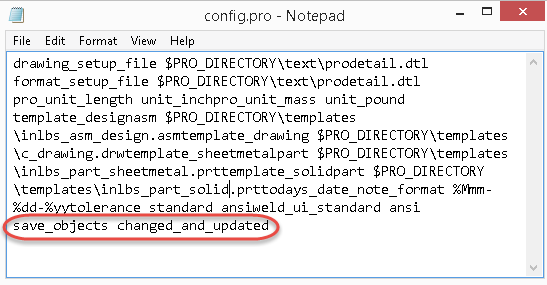
- Open config.pro with a text editor.
- Find the save_objects switch, or add it if it is not already there.
- Set the value of
save_objects to
changed_and_updated.
- Save the file.
Instance files should no longer incorrectly appear as modified.
Save_Objects Options
|
Option |
Impact on Vault Statuses |
|---|---|
|
all |
All files of assembly are labeled as modified. |
|
change_and_specified |
The set of files is labeled as modified. |
|
changed |
Some last level parts are labeled as modified. |
|
changed_and_updated |
No files are labeled as modified. If you change an assembly or part, it is labeled correctly. |
|
no "save_objects" specified |
Only top level assembly is labeled as modified. |