Flame Family 2019.1 Update Highlights
 |
 |
 |
|
Colour:
|
Conform, Timeline and Effects:
|
Python scripting:
|
Navigation tips:
- Make sure to check out https://area.autodesk.com/flame-central/, a new hub for all your Flame Family links in one convenient tabbed page.
- Looking for the Release Notes for Flame Family 2019.1 Update? Click here: Flame Family 2019.1 Update Release Notes.
- Many new feature videos (as well as other workflow videos) are available at https://www.youtube.com/user/FlameHowTos. This Learning Channel is updated frequently, so be sure to subscribe or bookmark the page.
- In this What's New topic,
 indicates a new feature or enhancement that was suggested and voted up by Flame users on the Flame Feedback portal:
http://flamefeedback.autodesk.com (also accessible directly from the
menu).
indicates a new feature or enhancement that was suggested and voted up by Flame users on the Flame Feedback portal:
http://flamefeedback.autodesk.com (also accessible directly from the
menu).
For details on all the new features and enhancements in this release, follow the links to navigate to the sections below:
- Action
- AVIO
- Batch and Batch FX
- Batch
- Colour Science
- Conform
- Effects Tab
- Image
- Matchbox
- MediaHub
- Media Export
- Media Import
- Python API
- Tangent Panels Support
- Timeline
- Smaller But Still Nice Improvements
Action
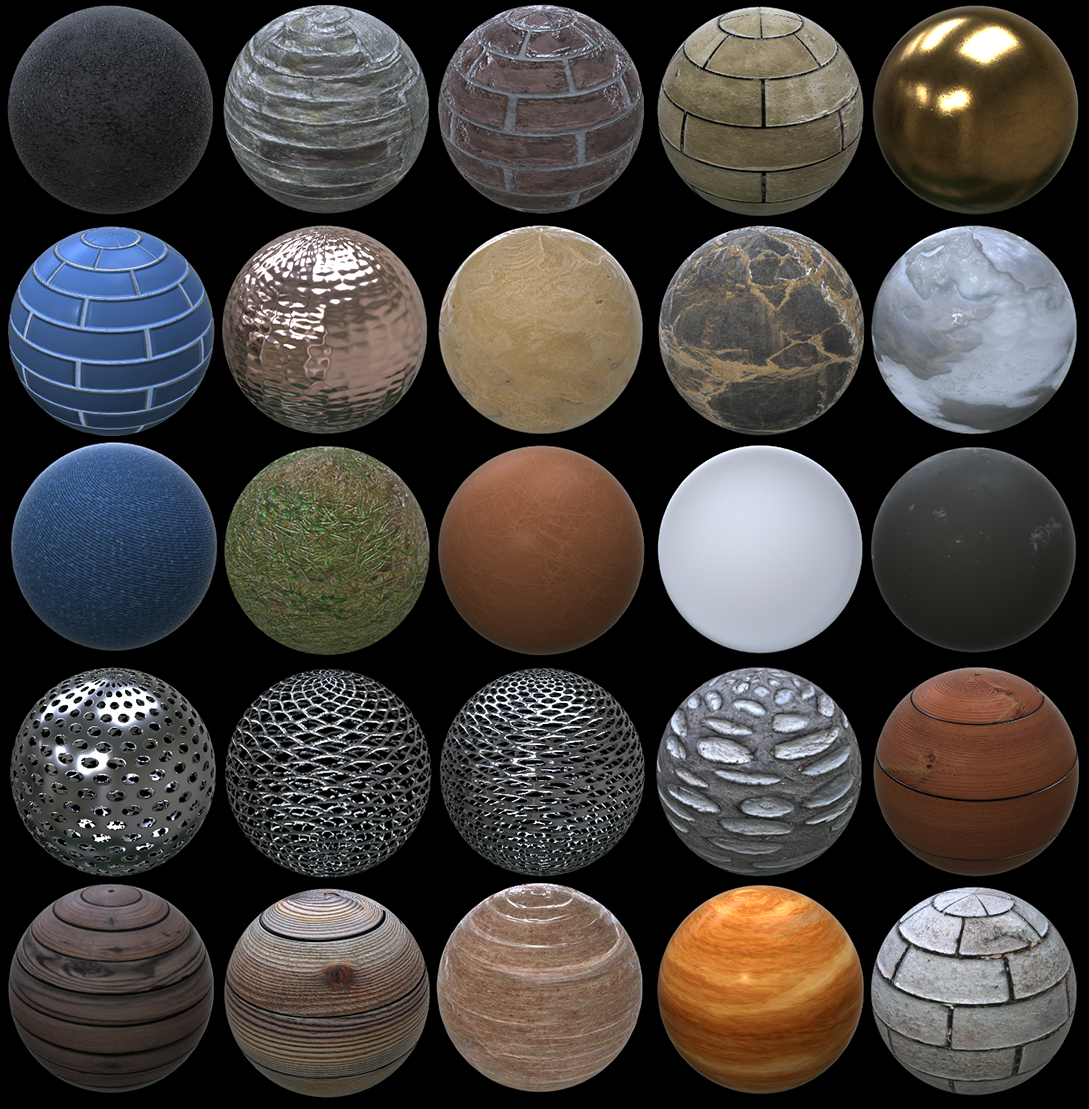
New PBR Assets
The following 25 new assets are available through Action's Substance PBR node
|
Ceramic
Fabric
Ground
Leather
Manmade
Metal
|
Stone
Wood
 |
Faster Blurring and Smoothing
The Blur and Smoothing used in a GMask, and the GMask Blur used in a Selective, are now all faster. This change should have very little impact on the results of existing setups.
One exception is with regard to the GMask Blur of the Selective: the blur is now applied only to the GMask result, and no longer blurs the Selective's keyer. This allows you to use the Selective's blur to soften every connected GMask, instead of having to independently blur each GMask.
Additional Action Improvements
- Display Icons menu: The new Selective mode displays only the icons of the children nodes connected to the selected Selective.
- Object View: The F8 Object view now clearly identifies, in the top left corner, the object being displayed. And if you F8 a Selective node, its ID and Custom Name are also displayed.
- Object View: You can now open an object's Contextual Menu from the Object view.
- Selective: In the Selective HUD, you can now Alt+click to delete a selective.
- Selective: The Selective node's Diamond Keyer is now GPU-powered for increased performance in Action and Image.
AVIO
For your SDI preview, you can now choose between a Level A or a Level B 3G signal. Level A is required by some 4K projectors from Christie. In , enable 3G Level A (default) to use a Level A 3G signal. Disable it to use Level B.
Also in the Broadcast Monitor Preferences, there is a new Force RGB Readback option. When disabled, the content sent to the AJA card is YUV; this is the default. But enable Force RGB Readback to run Flame and Lustre simultaneously on the same workstation: this keeps the SDI output from being reprogrammed every time you switch application.
The Quad-Link (4 x 1.5G) found on the Blackmagic Design Ultra Studio 4K Extreme is now supported.
Batch and Batch FX
The Broadcast Monitor (when available) now defaults to displaying an image. That way, you can have a 2-Up layout by default, with the Batch Schematic displayed in the left viewport, and the image from the right viewport is always displayed in the Broadcast Monitor.
You can now define a default name for new
Gap
Batch FX:
. By defining a default Gap BFX name, you prevent backup setup files saved for Gap
Batch FX from overwriting each other when preference
Save Backup on Exit also is enabled. A Python Hook is available in case you would like everybody in your facility to use the same naming schema, or if you want to have different naming schemas per project (
/opt/Autodesk/<flame_version>/python/hook.py).
Batch
Batch's Write File node has been modified to simplify timecode and frame index management:
- The Source Timecode and Record Timecode settings are now merged into a single Timecode setting. This timecode value is written to the exported file's header, when supported by the selected export format.
- A new Frame Index option is now also available. With it you can use either the Batch Start Frame or the node's timecode to define the exported files' frame index.
Colour Science
Colour Management
The three basic viewing transforms (Log, Linear, Video) are now always available when using the Legacy colour policy, regardless of how media is tagged. They are available as 6 new viewing transforms:
- Video (on Log)
- Video (on Linear)
- Log (on Linear)
- Log (on Video)
- Linear (on Log)
- Linear (on Video)
Additional colour management and media export improvements:
- Exporting with Use LUT enabled is now faster.
- When exporting floating-point media as movie files such as QuickTime ProRes, values outside [0,1] are now clamped. This prevents illegal values outside [64,940] in the exported movie file when the Headroom option is disabled.
Colour Sampler
The Colour Sampler (Ctrl+Space+C) can now measure an area's average pixel value. This area is defined by the colour sampler's red resizable box. The Measurement button switches between precise pixel (in the colour sampler's crosshairs) and average measurements (within the red sampling box).
You can now display or hide the Colour Sampler using + and - in the title bar. This allows you to hide the Colour Sampler, but still display pixel information in the Scopes.
Scopes
You can now display and hide the scopes with a new button below the viewport.
You can now set the following Vectorscope guides in the Scope Settings > Preset Widgets:
- Skin Tone Line: The skin tone line indicates on a vectorscope the hue where skin colours are typically located.
- 75% boxes: You can now display the 75% boxes in addition to the already present 100% boxes.
You can now assign the Scopes to appear in a specific viewport in any new Batch Group or Batch FX. Use the Scopes preference in
.
Additional Scopes Improvements
- You can now change the displayed widget from the Scopes Settings' Presets Widgets tab.
- A widget's settings no longer reset when you change widget mode within the same widget family.
-
You can now easily cycle through the different scope widgets: with the cursor hovering over a scope,
Space+J displays the previous widget,
Space+K displays the next widget.
-
Space+F8 toggles the Scopes in the viewport under the cursor.
Colour Sampler & Scopes Integration
The Colour Sampler now displays in the scopes the RGB & Luminance values of the pixels sampled in a viewport. The scopes display the following information:
- The sampled Pixel: A coloured disk centered on the sampled pixel, with the colour of the disk matching the colour of the sampled in the Colour Samplers crosshairs. If the Colour Sampler's measurement is set to Average, the disk centers on the average measurement.
- The sampled Line: A yellow curve that highlights the line of the pixel selected by the Colour Sampler in yellow. This curve appears on waveforms, but not on vectorscopes or histograms.
- The sampled Region: A cyan overlay that highlights the pixels contained within the red sampling box of the Colour Sampler.
You disable or enable each option from the Scopes Settings' Preferences.
Conform
Connected Conform
You can now sort the segments in the Source Sequence by source frame / timecode (C-Mode) or by record frame / timecode (A-Mode). Select the type of sorting by selecting an option in the
Options menu. To apply the selected sort, select
Update Sources Sequence from the
Create Sequence drop-down button.
You can now convert Timeline FX from the Timeline segments into Batch nodes when using Create Batch Group: enable Convert Timeline FXs when using Create Batch Group in the Options menu. But note that if there are Resize or Timewarp effects present on the segment, the resulting segment on the Shots Track has unlinked media that matches the record duration, instead of a copy of the source media.
Create Batch Group is now available to any sequence located in a Reel Group, even if the sequence is not connected to a Shots sequence.
Additional Connected Conform Improvements:
- The creation of the Sources Sequence now handles better contents with mix of video and audio media.
- Shots are now ordered better than before in the Shots Sequence.
- Timewarps are handled better by the Sources Sequence with Sources Segment Connections and BFX.
- The algorithm used for Shots detection of content with Timewarps has been revisited to remove duplicated Shots in cases where the content doesn't have the same start/end or duration.
- A new column, Open Clip Location, now displays the Open Clip or the browsing pattern used to import the media.
Conform Preferences
The Ignore on Publish/Conform setting located in has been split in two:
- Use in Create Batch Group: Enable this option to use the Start Frame defined in the Preferences when a new Batch Group is created. The Batch Group can be created from the contextual menu's New > Batch Group in the Media Panel, or using Create Batch Group in Conform or the Timeline.
- Use in Publish / Export: Enable this option to use the Start Frame setting in a sequence Publish or Export.
Effects Tab
Effects Search
Now you can search for segments with multi-channel media.
In the Timeline Search window, you can now create, save, and delete search presets with the new Add Presets button.
Search presets are available from:
- The Timeline Search window
- The Timeline Search button in Effects
- The Storyboard Clip's contextual menu, in which case the presets are filtered to display only those that apply to the currently selected clip.
To accommodate the new Search presets, the Filter was modified:
- The currently selected clip is no longer kept in the selection if it doesn't match the search criteria. The first clip of the new selection becomes the current clip when this happens.
- Changing the search criteria while Filter is enabled no longer searches only the filtered clips: it searches all the clips and then filters for only the clips that matched the search.
Image
Some object-specific operations can now be performed using a Contextual menu opened on an object tab in the Object menu: Reset, Delete, Show/Hide, Add to Output, and Remove from Output.
You can now add a Matchbox or a Lightbox with the + button in the Object menu. The + button appears when a Camera, Image, Map, or Selective is selected.
You can now reorder Matchbox and Lightbox tabs within the Object menu by drag & drop: this also updates the Priority Editor.
The following are now the defaults for any new Image Timeline FX or tool:
- A MasterGrade node is now parented to the surface of the image, allowing you to grade an image's Output.
- The Primary image output is now selected by default when you access Image, allowing you to jump start a primary grade.
Selectives Management
The contextual menu for the Selectives manager contains new options to make it easier to manage Selectives. See Navigating with the Selectives Manager.
A new option, Change Selective Custom Name, is now available from a Selective's contextual menu. Use it to change the Selective custom name directly from the Schematic, removing the need to go to the Selective object Controls submenu.
Matchbox
A2Beauty, Convolve, PhysicalBokeh (3D and SFX) and PhysicalGlareSFX were updated in this release.
A2Beauty
- New options allow you to use alternative details search area instead of using the default Selective region. Unconstrained Details Search (Batch, Batch FX and Image) ignores the selective and uses the whole image to identify details.
- In Batch and Batch FX, attach a custom image area to the third input and enable Use Custom Details Search: the required details are lifted from the third input instead of using the selective.
- In both cases, the Selective still defines the region being fixed: only that region is modified. The above options modify the image data used to fix that area.
Convolve
- CPU Convolution in the Processing tab allows you to use the CPU to compute the convolution. Use this option to switch to the CPU when you're processing large images on GPU lacking enough memory to perform the convolution. You can also use this option when interactivity takes a hit: in some cases, the CPU option might deliver better performance.
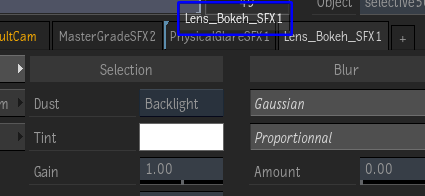
PhysicalBokeh
- The new Working Space option allows you to set a colour space. In most cases, you want to set it to Input to simply use the colour space of the Front. But some log formats, such as LogC / AlexaWideGamut, give better results if you select Log. Applies to both 3DSelective and SFX versions.
- In the Bokeh Shape tab, Anamorphic applies a 2:1 ratio to the Bokeh result. Lens Noise adds to the bokeh a noise pattern, from subtle to quite extreme. PhysicalBokehSFX only.
- CPU Convolution in the Processing tab allows you to use the CPU to compute the convolution. Use this option to switch to the CPU when you're processing large images on GPU lacking enough memory to perform the convolution. You can also use this option when interactivity takes a hit: in some cases, the CPU option might deliver better performance. Applies to both 3DSelective and SFX versions.
PhysicalGlareSFX
- The new Creative Presets option allows you to push the physical limits of the tool. Select a preset to drastically change the look of the starburst, ranging from streaks to rainbow spikes.
- The new Working Space option allows you to set a colour space. In most cases, you want to set it to Input to simply use the colour space of the Front. But some log formats, such as LogC / AlexaWideGamut, give better results if you select Log.
- CPU Convolution in the Processing tab allows you to use the CPU to compute the convolution. Use this option to switch to the CPU when you're processing large images on GPU lacking enough memory to perform the convolution. You can also use this option when interactivity takes a hit: in some cases, the CPU option might deliver better performance.
This release includes new Matchbox shaders, derived from LensBokeh, LensOptic and LensRefraction shaders:
- LensBokehSFX
- LensOpticSFX
- LensRefractionSFX
The original shaders were created for use with Action's Lens Flare texture map. The new, SFX-flavoured Matchboxes, are for use with Action's Selective node and Image, and provide you the ability to add lens aberration to images.
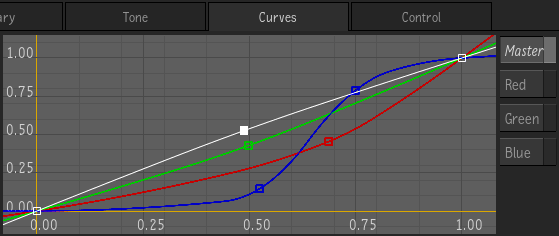
MasterGrade Colour Curves
MasterGrade now has a Curves tab that provides spline-based RGB curve adjustments. See Curves in MasterGrade.
MediaHub
Pattern Browsing
Pattern Browsing is now enabled by default. You can still browse your media as before: clips that do not match the pattern are still visible. But with the default pattern, you can now more easily leverage media versions.
The {frame} token is always implicit if not defined explicitly. This makes the default {name}_v{version}.{extension} compatible with frame sequences and movie files with versions. There is a basic assumption that the frame data is located before the extension and separated with a period (.).
The Open Clip Location column in MediaHub now shows the Pattern Browsing used for to import the media or the name of the Open Clip. The name of the Open Clip is also shown in MediaHub's Preview (Metadata tab), and in Pre-processing's Metadata tab.
You can now define custom tokens for Pattern Browsing by adding them to the file /opt/Autodesk/flame_2019.1/python/tokensHook.py.
Additional Pattern Browsing Improvements:
- When using Pattern Browsing, content with a single version is shown with the Version icon on its MediaHub thumbnail.
- The Version token is now only numerical, avoiding some issues with token resolution.
- You are now warned if your pattern contains the following errors: missing name token, no separator between tokens, or a single token for folders.
Media Export
You can now export an OpenEXR sequence with a drop frame timecode.
The Use Timecode button available in the Video Options is now a popup button with three options: Use Timecode, Use Start Frame, and Use Preferences (default).
- Use Start Frame: Define the start frame with the Start Frame field.
- Use Timecode: Use the Source Timecode of the clip and convert it into a frame value to populate the files' frame index.
- Use Preferences: Define the file frame index with the option selected in the preference
Use in Publish / Export. This preference is located in
:
- Use in Publish / Export enabled: The Start Frame value defined by the Preferences is used.
- Use in Publish / Export disabled: The Source Timecode of the clip is converted into a frame value to populate the file's frame index.
Media Import
New RED SDK 7.0.7. and IPP2 Support
Support for the RED SDK 7 includes RED's new Image Processing Pipeline (IPP2). IPP2 is the recommended setting, and introduces the following changes:
- IPP2 uses the RedWideGamut RGB colour space and Log3G10 gamma curve, and can be used with any R3D media files. With IPP2 selected, Colour Space and Gamma Curves can't be edited. The colour space is tagged as Log3G10/REDWideGamutRGB.
- Legacy options are still available. IPP2 can also be used on older footage.
- IPP2 can be defined in camera or with the REDCine X application that produces RMD sidecar files. Extra colour information can be defined:
- White Balance
- CDL
- Creative LUT
New R3D options for :
- User/Camera (User in previous releases): Allows you to edit options but also fall back to camera settings by using "From File" for the following settings:
- Colour Science
- Colour Space
- Gamma Curve
- Image Settings
- Advanced Settings
- Colour Science
- User/RMD: Allows you to edit options but also fall back to RMD settings (if available) by using "From File" for the following settings:
- Colour Science
- Colour Space
- Gamma Curve
- Image Settings
- Advanced Settings
MediaReactor
MediaReactor version 6.0 (160) adds support for the following media formats:
- Canon Cinema RAW Light (.crm)
- H.265 (HEVC)
- Phantom VEO 4K
- Kinefinity Compressed RAW format (KRW streaming support, previous releases only supported KRW file sequences)
- Faster loading of large MOV/MP4 file (over 4Gb)
See Drastic Technology's web page.
Additional Import Improvements
- ARRIRAW in MXF files from ARRI AMIRA cameras are now supported.
- OpenEXR Timecode option is now set to From Header by default. In the case where the file header doesn't contain valid timecode data, the file index is used.
- Pixspan 3.4.1 is now supported.
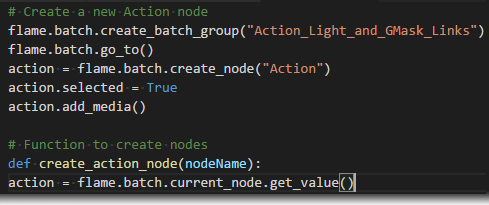
Python API
You can now script Action with the Python API. You can:
- Creates nodes
- Manage the Action schematic
- Assign media
- Manage render passes
- Manage PBR parameters of shaders nodes
- Manage Transform parameters of an axis node
- Manage Light, Projector, and Camera
- Trigger motion vectors caching
In addition to the scriptability of Action, the Python API has been augmented in the following areas:
- Batch
- Media Panel, including the creation of sequences
- Media Import and Export
For additional details, see the Python API documentation.
Tangent Panels Support
Flame Family products now support the Tangent Arc control surface.
You can now modify any parameter displayed by the panel during playback.
Updated mappings for the following features:
- Effects tab
- Image
- MasterGrade (from within an Image Timeline FX)
- Timeline FX
The above functions are also available from the Tangent Mapper application.
If the application is not available to the connected Tangent panel, even after you've created a new Flame user, you probably need to configure the Tangent Mapper application.
To configure the Tangent Mapper:
- Exit Flame.
- Start the Tangent Mapper.
- On Linux: If there's no icon on the Desktop, you can find the application in /opt/Tangent/bin/TangentMapper.
- On macOS: The application is in /Application/Tangent/TangentMapper.
- In , click Edit.
- Click + to add the missing panel.
- Click Apply .
- Exit the Tangent Mapper application.
- Start Flame.
For more information, see the Tangent panel documentation.
Timeline
The
Create Batch Group and
Create Batch Group (Convert TL FX) options are now available to any sequence located in a Reel Group, even if the sequence is not connected to a Shots sequence. It only requires that the segments used to create the Batch Group all have a shot name.
Open As Sequence,
Rename, and
Reveal are commands now available from a timeline tab's contextual menu.
Timeline Search
In the Timeline Search window, you can now create, save, and delete search presets with the new Add Presets button.
Presets are available from the Timeline Search window, and also from the Timeline Search button in Timeline.
Now you can search for segments with multi-channel media.
Timeline FX
Two new keyboard shortcuts are available from the Timeline and the Effects tab: Remove All Timeline FX and Remove Current Timeline FX. Both shortcuts are unassigned by default.
Smaller But Still Nice Improvements
Batch Render node:
- The Offset Timecode button has been renamed Range Offset and is now enabled by default.
Burn-In Metadata
- A Burn-In Metadata Timeline FX applied on a Gap now shows the content's Source Timecode during a Transition.
Playback
- LongGOP media plays back and jogs faster.
- OpenEXR (single and multi-parts) media and intermediates play back faster.
Project Management
- When you start a project that has no workspace for the selected software-Host computer combination, the last workspace used is selected. This improvement is useful when a project is used between multiple Flame Family products.
Pybox
-
Pybox now loads faster when applied over a gap located above a sequence with more than a few segments.
-
When applying a Pybox on a timeline segment before and after a transition, the content timecode is now correctly provided to the Pybox.
Tangent Panel
- Keyboard Shortcuts labelled as "General" in the Keyboard Shortcuts editor are now available in the Tangent Mapper.
Tools
-
You can now generate X and Y position data using Draw Motion Curve available in the contextual menu of the Player or any viewport.
Once the option is selected, draw a path over the image. With a path drawn, right-click any numeric field with an animation channel and select options Apply Motion X or Apply Motion Y.
Viewing
- You can now manipulate widgets inside a player or viewport during playback. You can always disable the widgets with the Display Widgets During Playback option, located in the Player's Options dropdown or in .
- Three new viewport layout options are available under the new 3-Up Split submenu: Left, Right and Top.
- The previously available 3-Up Split option has been renamed Bottom.
- These new options are set in .