Styling the hair is usually performed on the Start or Rest Position NURBS curves. The simplest way is to edit the Start Position curves. For example, play the simulation to let the hair fall and when it stabilizes, select . For more refined editing of the Start Position, switch the display to the Start Position and use the curve editing tools. See Hair curve editing tools.
You can display both the Paint Effects “hair clumps” at the same time as the Start Position of the NURBS curves (). If you are at or near the start simulation frame, the Paint Effects display will update as you update the Start Position curves.
If the hair is fairly stiff and you want it to assume a non-straight shape (in the absence of external forces like gravity), then you can create and edit Rest Position curves. To create Rest curves, select the desired hairs and select nHair > > From Current (or From Start). You can then display the Rest Position and edit those curves. You can only see the effects when you play the simulation.
Hair curve editing tools
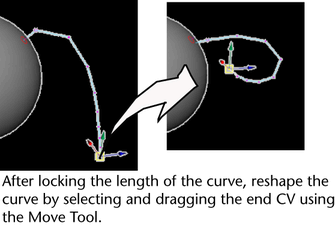
You can lock curve length and reshape the curve(s) by selecting and moving the end CV(s). In addition to locking length, you can reshape curves using other items in the Modify Curves menu, including Straighten, Smooth, Curl, Bend, and Scale Curvature.
These same tools are available for editing NURBS curves. For descriptions on NURBS curves editing, see Curves menu.

To use Lock Length while editing curves
- Switch to Start or Rest Position ()
- Select the curve(s) and then convert the selection to end CVs (see nHair menu).
- Press the l (letter) key to turn Lock Length on while editing curves.
- Release the l (letter) key to turn Lock Length off.
To straighten, smooth, curl or bend hair curves
- Switch to Start or Rest Position. ( )
- Select the curve(s) or CV(s).
- Select , and then select the desired option (Straighten, Smooth, Curl, Bend, Scale Curvature).
- Repeat step 3 until you’ve achieved the desired look.