You can identify a hole to be filled, based on either the nodes, or the triangles, around the hole. Use the appropriate tool listed below, based on your preference.
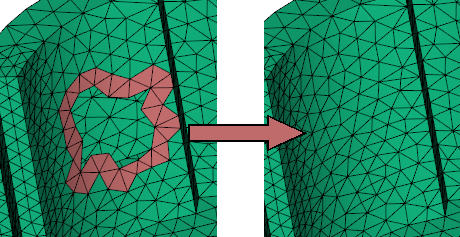
To improve detection of the bend angle and to improve the quality of the patch, use the Ctrl key to select a second, or even third row, of elements directly connected to the first row surrounding the hole. This additional information is especially useful for curved surfaces.
Note: The software automatically assigns the properties of the surrounding elements to the new elements that are created.
Example
- Ensure that the nodes in the part are visible and selectable by activating the required layers in the Layers pane.
- Click
 ().
().
- To fill the hole based on nodes around the hole, click Select by nodes (legacy) and select a node on the border of the hole. Click Search to find a sequence of connected nodes. The nodes form the boundary to be filled with triangles.
- To fill the hole based on triangles around the hole, click Select by triangles and select a triangle with an edge on the hole. Click Search to detect the hole.
- Click Apply.