Reduce a mesh to a surface formed by only its outermost shells and discard any internal structures
When you have a part with multiple interior shells, it can be useful to wrap the exterior surface with a shell and delete the mesh inside the part to eliminate unnecessary complexity. For example, if you want to print a model of a house, but don't want to produce the details inside the house, you can wrap the part and simply print the outer walls and roof. This can help to same material and simplify the production process and eliminate errors in the process.
- If not already opened, click
Prepare >
 Repair Part to enter the repair module.
- In the context view, switch to the Actions tab.
- Click
Wrap Part Surface.
Tip: You can also access this command in the Repair menu or right-click in the display and choose
 Wrap Part Surface.
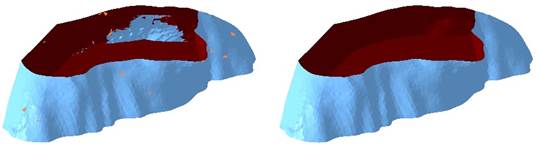
Left: Part with interior shells. Right: After the wrapping operation, only the outer shells remain.
Note: In some cases, the wrap operation can take a long time to complete, or it may not even complete at all. One common cause is when several self-intersecting triangles are present in a small area. If this occurs, it is recommended to use the
 Remove Problem Areas command to scan the part for these areas and remove the intersecting triangles. You may then have to repair holes left behind before continuing with the wrap operation.
Remove Problem Areas command to scan the part for these areas and remove the intersecting triangles. You may then have to repair holes left behind before continuing with the wrap operation.