In Inventor 2012, the Realistic Appearance option was checked as a default. This option setting has migration ramifications. Notably, any color style that has been touched at one time is considered different from the standard Inventor color style, and is migrated as a custom appearance. Custom appearances populate the document and are displayed in the Appearance Browser, Document Appearances section.
Let's consider the four most common ways customers have interacted with material and color styles in previous releases:
"As is"
|
|
Style Libraries
If you maintain custom Style Libraries or modify those delivered with Inventor and want to retain the changes, you can do so by modifying the 2012 color style use of the Realistic Appearance option. The following table assists in determining the setting you would want to use in Inventor 2012 Color Styles.
|
|
|
|
Step 1: Migrate the colors and materials.xml styles to a new custom material or appearance library. Note: it is not required to have separate libraries, but they may be easier to manage by doing so.
- Start a new part.
- In the QAT, click Material Browser
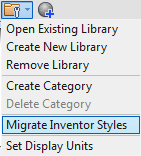
 - In the browser toolbar, click Manage > Migrate Inventor Styles.
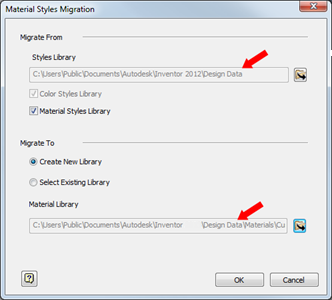
- In the Migrate Styles dialog box specify the Migrate From location which where the 2012 or earlier Materials.xml and Colors.xml files reside. By default the path is C:\Users\Public\Documents\Autodesk\Inventor 2012\Design Data in Windows 7.

- Click Create New Library.
- Specify the Migrate To location, typically the same location as the InventorMaterialsLibrary.adsk file. By default the path is C:\Users\Public\Documents\Autodesk\Inventor 2014\Design Data\Materials.
- Click OK. The library is created and populates the library section of the Material/Appearance Browser.
- Drag and drop custom appearances or materials from the Document section or from other libraries into your custom library.
- Close the Browser.
Step 2: Add the custom library to the active and appropriate projects file.
- Select the project to which you will add the library.
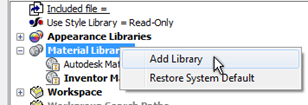
- Right-click the Material Libraries node and click Add Library.

- Navigate to and select the custom library you want to add to the project. Click OK.
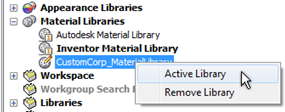
- To make the added library the active library, the first one searched or referenced, right click the library node and click Active Library.

Reminder: The migration process uses the Realistic Appearance color style setting to determine which definition is migrated and associated with the appearance name. Take appropriate action as described previously to ensure the correct definition is migrated.
Important:
- Inventor 2013 and Inventor 2014 require a document, new or existing, to be open to get access to the Material and Appearance libraries, content, and user interface. You cannot work on the libraries outside of an open document.
- Materials and Appearances are no longer styles. They are no longer managed using the Style Library Manager. You still use the Style Manager to transfer other Styles content, such as Drafting Standards, between Style libraries.
- The Style Management Wizard is no longer available.
- Though materials and appearances are not considered styles, some style commands are used for library tasks. For example, Purge is used to remove unused materials and appearances from documents. Update is used to modify document materials and appearances so they match library definitions.
Document Templates
For customers who did not use style libraries and preferred to retain styles in document templates and managed these according to each template, we strongly urge you to migrate template based styles to custom libraries in order to retain custom appearances. It is neither recommended nor advisable to maintain appearances in a document.
The following message is associated with the move from templates to styles and has been in Inventor for a couple of releases.
