As an alternative to the working natively with CAD files, you may use Netfabb's classic CAD import which converts CAD models directly and permanently into triangle meshes.
The classic CAD import is a module.
Using the classic CAD import you can:
- Select multiple files, as well as individual parts of assemblies, even across multiple assemblies.
- Split assemblies into individual parts during loading (parts are placed in groups).
- Preview file contents and selection state of assembly parts.
- Specify resolution and precision for converting CAD to mesh.
- Specify the unit of length for conversion.
- Visualize assemblies using different colors.
To import CAD files
- Choose
File >
 Import CAD File as Mesh.
This loads the controls into the context view.
Note: This will still prompt you whether to use the new functionality of handling parametric parts natively. Clicking Yes will use it, clicking No will not use it this time, and clicking Ignore will never use it again. - Click
Open to navigate to and load one or multiple files into the drop-down selection.
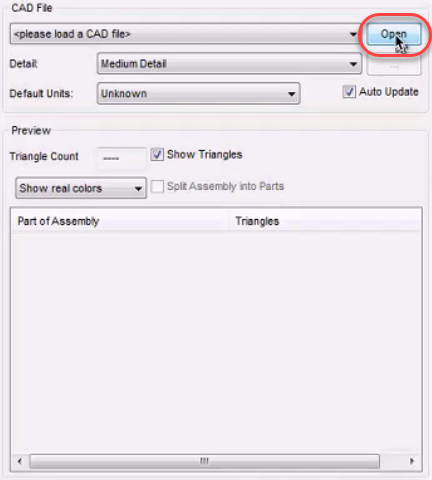
Loaded files are previewed in the display.
- If you selected multiple files, you can switch between them using the drop-down menu at the top of the context view.
- Select
Auto Update to update the preview image whenever you make changes to import settings.
Tip: Disable this temporarily if you want to change multiple settings that may both result in a large amount of triangles, such as high detail levels and bigger units.
- Select the
Detail level for converting CAD information into mesh.
When you change the detail level, Netfabb reloads and reconverts any files already loaded, and changes the number of triangles shown, provided Auto Update is selected. The number of triangles used is shown in the Triangle Count box under Preview.
- If you know the unit of the source file, set it in Default Units.
- Select Show Triangles to highlight thetriangle mesh in the preview image.
- Use the color box to switch between the part's actual color or the default display colors that Netfabb assigns to parts.
- Select Split Assembly Into Parts if you do not want to load the assemblies as one part.
- To import only the selected parts and assemblies, select them in the list below and click Import; otherwise, click Import All.