Package the project for Windows
To package a project for Windows:
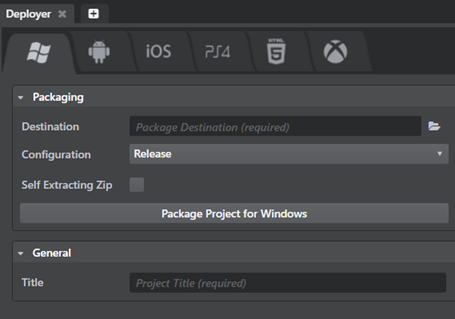
- In the interactive editor, open the Deployer panel to the Windows tab and enter the required information. (See below.)
- Click Package Project for Windows.
The deployer creates an executable file for your app, named according to the title you set in the Title field. It creates a self-extracting zip file containing this .exe file, along with all required .dll files and bundled data, and saves to the location on your computer that you specify in the Destination field.
If Self Extracting Zip is unchecked, you can test or distribute your app by simply copying or zipping up the folder with the .exe file and the bundled data, or by packaging the folder contents into an installer.
To run on Windows, the interactive engine requires:
The DirectX End-User Runtimes (June 2010) from Microsoft, available at https://www.microsoft.com/en-us/download/details.aspx?id=8109.
The Visual C++ Redistributable for Visual Studio 2015 from Microsoft, available at https://www.microsoft.com/en-ca/download/details.aspx?id=48145.
Recent systems are likely to have these runtime requirements installed already. However, if you distribute your deployed project to a customer that does not already have these requirements installed, your customer will need to install them in order to successfully run your project.
If you create an installer for your project, you should package these redistributable libraries into your installer.

You can set the following options in the Deployer panel for Windows devices.
The Destination and Configuration settings are common for all tabs. See Using the Deployer panel.
- Self Extracting Zip
- When checked, the deployer packages the project as a self-extracting installer file.
- Title
- The title of your project. This sets the name of the executable file for the application.