Put support actions with custom values together into a list for consecutive execution and store it for one-click repair
Available in subscription tier Premium and up.
- Select any part.
- From the main menu,
Home >
 Generate Support.
- In the context view, select the tab Support scripts.
- Use the
 New Script button to create a new, empty script.
- Add support actions from the dropdown menu at the bottom.
Tip: If you want to remove an action you don't need anymore, right-click it and choose Delete Action from its context menu.
- Modify the settings for selected support actions as needed.
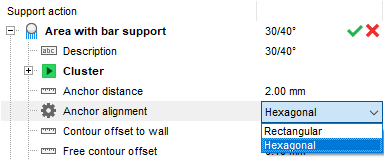
Modifying a support action
- Click Save.
The support script is now available and can be used in such places as the
support module, the
extended part loading dialog, or from
Home >  Run Script >
  Run Support Script.
 More Options
> Duplicate script to make a copy of an existing script and then adapt it to your requirements.
More Options
> Duplicate script to make a copy of an existing script and then adapt it to your requirements.
Working with support actions in a support script
Apart from adjusting the actual parameters of support actions, there are ways to manage support actions within a script.
| Task | Steps |
|---|---|
|
Insert a new action |
Select an action from the dropdown menu and click Add. |
|
Delete an action |
Right-click the action and choose
|
|
Reorder actions |
Click the action you want to move and drag it onto the action you want it to come after. Note: To move an action to the top, drag it onto the topmost action, putting it in second place. Then drag the topmost action onto the second one.
|
|
Duplicate an action |
Right-click the action, then select
|
|
Execute an individual action in a script |
Double-click its green checkmark,
|
|
Export an action in its current configuration |
Right-click the action, then choose
Note: The file suffix for both individual actions and entire support scripts is SUPPORT.
|
|
Import an action |
Right-click anywhere in the Support scripts view and choose
Note: You can import SUPPORT files holding individual actions as well as entire scripts. When a SUPPORT file contains an entire script, ALL of its actions are imported.
|
|
|
Right-click an action and choose
This function is useful to compare the effect of similar support actions with many changes. |
|
Rename an action |
Expand the action and click on the text field next to
|
 Delete action
 .
.
 Copy action
 .
.
 Export action
 Import action
 Disable/enable an action
 Disable action
 Description