When using the Profile Group Parameters dialog for a General Grooving strategy, the following settings are available:
Strategy — Select the type of strategy to be performed.
Profile Shape — Select the shape of the groove:
- Rectangular — Select to create a groove shape that can contain only horizontal and vertical lines. A minimum of three lines is required.
- General — Select to create a groove shape that can contain circular arcs and inclined lines, as well as horizontal and vertical lines.
When using a flat-end grooving tool, the bottom of the groove must also be flat. Make sure the width of this flat section is not smaller than the width of the grooving tool.
When using a button-end grooving tool, the bottom of the groove must be a circular arc. Make sure the diameter of the circular arc is not smaller than the width of the grooving tool.
Tool Location — Select the location of the tool (In, Out or Face).
Roughing Style — Select the style of roughing:
- From Inside to Sides — Select so the tool makes an initial cut inside the groove, then cuts towards each side of the groove.
- From Side to Side — Select so the tool cuts from one side of the groove to another.
X-Finish (Fx) — Enter the width of finishing cut in X.
Z Finish (Fz) — Enter the width of finishing cut in Z.
Depth of Cut (d) —Enter the amount of material to be removed on each tool pass.
Return Length (l) — Enter the distance (above the previous cut that was made) at which the tool retracts.
Clearance (C) — Enter the X distance from the stock at which the tool retracts after the initial cutting pass.
Axial Step — Enter the amount of material to be removed during each linear plunge of the tool.
Surface Roughness — Enter the surface roughness factor. Specify this in  in when working in inches, or in m when working in metric.
Operations — Select the type of operations to be performed:
- Roughing — Select the Roughing option to include a roughing pass operation.
- Finishing — Select the Finishing option to include a finishing pass operation.
Tool ID — Enter the ID of the tool you want to use for the selected operation or click Select Tools to choose a tool from the Select Tool dialog.
When a tool has been selected, you can click the icon that shows a representation of the tool to display the Edit Tool dialog, where you can view, or modify, details of the tool.
Leads — Click  to display the Leads dialog, where you can control the movement of the tool as it:
- Approaches the stock before starting a cutting move (Leads In). Leads In consist of an arc that is tangential to the start of the profile and a line tangential to this arc.
- Leaves the stock at the end of a cutting move (Leads Out). Leads Out consist of an arc that is tangential to the end of the profile and a line tangential to this arc.
PartMaker creates Lead In and Lead Out moves when a profile group is created.
Groove Options — Click to display the Groove Options dialog.
Cutting Point — Click to display the Cutting Point dialog. For grooves, the Cutting Point can be used as an optional start/end point for the toolpath.
Finishing Path Method — Select the method you want to use for finishing the general groove:
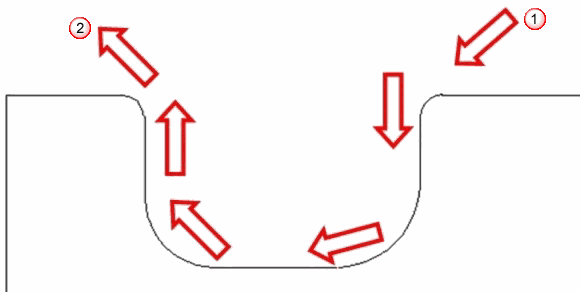
- Sides Top to Bottom — Select so the finishing tool starts cutting from the first side of the groove, according to the direction of the profile. The tool follows the profile up to the center of the groove and then retracts out of the groove. Afterwards the tool enters from the second side of the groove, follows the profile up to the center and then retracts out of the groove.

 Start points
 End pointNote: During Sides Top to Bottom finishing the Lead In controls the lead in on the first side according to the direction of the profile. The Lead Out controls the lead in on the opposite side of the profile.
 - Follow Groove Shape — Select so the finishing tool starts cutting from the first side of the groove, according to the direction of the profile and continually follows the shape of the groove until the end of the profile is reached.
 Start point End point
Pinch Turning — Select to specify that this group supports Pinch Turning (or balance turning). Pinch Turning (balance turning) involves the use of two turning tools, each mounted on separate tool post. Both tools machine the same part profile simultaneously, where one tool leads while the other tool follows its path at a specified depth of cut. Pinch Turning helps to reduce the cycle time when performing multiple pass turning operations.
Tip Size Compensation for Grooving Tool — Select whether you want to use tip size compensation for the grooving tool:
- None — Select this option so PartMaker does not compensate for the width of the grooving tool. When this option is selected, you need to compensate for the width of the grooving tool when defining the grooving profile.
- Add Tool Width — Select this option so PartMaker compensates for the width of the grooving tool without using a second offset. PartMaker adds the width of the grooving tool to either the Z-coordinates of the toolpath for ID and OD grooving or to the X-coordinates of the toolpath for Face grooving.
- Output Second Offset — Select this option so PartMaker compensates for the width of the grooving tool by outputting an offset for each side of the groove using the Second Offset No specified for the tool in the Tool Data dialog. PartMaker outputs offset changes according to the side of the tool being used. The Output Second Offset option is not available if the Second Offset No is zero or if the current Post Configuration (.pst) file does not support this style of output.
Group Name — Enter a name for the profile group.
Select Tools — Click to display the Select Tool dialog, where you can select the tool to use for machining.