實施用於最佳化 SSL 連線的新 SSL 設定後,基於舊式規劃所做的任何修改都不受支援。如果您要在使用增強的 SSL 功能時修改 SSL 連線,則必須手動重置舊式 SSL 設定。
重置 IIS 繫結
- 啟動 Internet Information Services (如果尚未執行)。
- 展開「網站」樹狀目錄,然後選取託管 AutodesDM 虛擬目錄的網站。在下面的影像中,該網站為「預設的網站」。選取「預設的網站」,然後從「動作」窗格中按一下「繫結」。
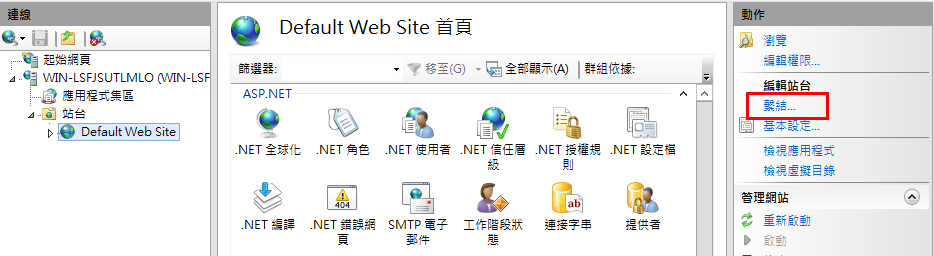
- 移除 https 繫結。
- 如果已移除預設 http 繫結,請按一下「新增」並確認類型為 http,連接埠為 80,然後按一下「確定」。
- 選取「AutodeskDM」
 「服務」虛擬目錄,然後按兩下「SSL 設定」按鈕。
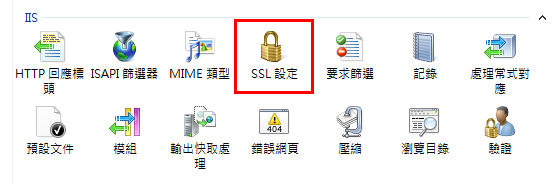
- 在「SSL 設定」頁面上,取消勾選「需要 SSL」選項。
- 在「動作」窗格中,按一下「套用」。
- 針對「AutodeskDM」「服務」「檔案倉庫」,重複步驟 5-7。
- 如果您要規劃 Vault 精簡型用戶端,請針對「AutodeskTC」重複執行步驟 5-7。
重置 Vault 伺服器規劃
Connectivity.ADMSConsole.exe.config
- 複製「<安裝路徑>\Autodesk\ADMS Professional 20##\ADMS Console\」目錄中的「Connectivity.ADMSConsole.exe.config」。
- 使用「記事本」開啟「Connectivity.ADMSConsole.exe.config」檔案。
- 找到「<system.serviceModel><client>」區段,然後將端點編輯為「http://localhost」。需要編輯三行內容。 以下是編輯後的外觀。
<endpoint address="http://localhost/AutodeskDM/Services/_impl/SiteService.svc" binding="basicHttpBinding" bindingConfiguration="RemoteCalls" contract="SiteService"/>
<endpoint name="ADMS-notification" address="http://localhost/AutodeskDM/Services/_impl/NotificationService.svc" binding="basicHttpBinding" bindingConfiguration="RemoteCalls" contract="NotificationContract"/>
<endpoint name="AVFS-notification" address="http://localhost/AutodeskDM/Services/Filestore/_impl/NotificationService.svc" binding="basicHttpBinding" bindingConfiguration="RemoteCalls" contract="NotificationContract"/>
- 在「<connectivity.vaultmanager>」區段中,變更 <webServer> 區段中的值。以下是編輯後的外觀:
<webServer>
<add key="IPAddress" value="127.0.0.1"/>
<add key="SSL" value="0"/>
<add key="PORT" value="80"/>
</webServer>
- 儲存規劃檔案。
Connectivity.AVFSConsole.exe.config
- 複製「<安裝路徑>\Autodesk\Vault File Server 20##\AVFS Console」目錄中的「Connectivity.AVFSConsole.exe.config」。
- 使用「記事本」開啟「Connectivity.AVFSConsole.exe.config」檔案。
- 找到「<system.serviceModel><client>」區段,然後將端點編輯為「http://localhost」。需要編輯兩行內容。以下是編輯後的外觀:
<endpoint address="http://localhost/AutodeskDM/Services/_impl/SiteService.svc" binding="basicHttpBinding" bindingConfiguration="RemoteCalls" contract="SiteService"/>
<endpoint name="AVFS-notification" address="http://localhost/AutodeskDM/Services/Filestore/_impl/NotificationService.svc" binding="basicHttpBinding" bindingConfiguration="RemoteCalls" contract="NotificationContract"/>
- 儲存規劃檔案。
以下規劃適用於 Autodesk Vault File Server(AVFS)。
web.config
- 複製 <安裝路徑>\Autodesk\ADMS Professional 20##\server\web\services\ 目錄中的 web.config 檔案。
- 使用「記事本」開啟 web.config 檔案。
- 找到 <system.serviceModel><client> 區段,然後將端點編輯為「https://<FQDN>」。需要編輯四行內容。
-
(從 Vault 2019 和更高版本開始) 如果伺服器主電腦\電腦名稱與認證名稱不同,請將「fullyQualifiedDomainName」參數加入至下行:
「<connectivity.web>
<server port="80" sslPort="443" sslRequired="true" website="Default Web Site" fullyQualifiedDomainName="
<FQDN>" />
</connectivity.web>」
- 儲存規劃檔案。
- 重新啟動 IIS。
Connectivity.WindowService.JobDispatch.exe.config
- 複製「<安裝路徑>\Autodesk\ADMS Professional 20##\server\dispatch」目錄中的「Connectivity.WindowsServer.JobDispatch.exe.config」檔案。
- 使用「記事本」開啟「Connectivity.WindowsServer.JobDispatch.exe.config」檔案。
- 在「<System.servicemodel><client>」區段中,將位址值變更為「http://localhost」。以下是編輯後的外觀:
<endpoint name="ADMS-notification" address="http://localhost/AutodeskDM/Services/_impl/NotificationService.svc" binding="basicHttpBinding" bindingConfiguration="RemoteCalls" contract="NotificationContract" />
<endpoint name="AVFS-notification" address="http://localhost/AutodeskDM/Services/Filestore/_impl/NotificationService.svc" binding="basicHttpBinding" bindingConfiguration="RemoteCalls" contract="NotificationContract" />
- 儲存規劃檔案。
- 透過「控制台」->「系統管理工具」->「Services.msc」,重新啟動服務。
確認 SiteConfiguration.xml
- 使用「記事本」開啟「C:\ProgramData\Autodesk\VaultServer\Configuration\SiteConfiguration.xml」檔案。
- 在「<SiteConfiguration>」區段中,
- 如果它是 ADMS 伺服器,請確認 DataManager 和 Filestore 的「generateUri」值為「true」,且「Uri」值為「http://<電腦名稱>」。
- 如果它是 AVFS 伺服器,請確認 Filestore 的「generateUri」值為「true」、DataManager 的「generateUri」值為「false」,且 Filestore 的「Uri」值為「http://<電腦名稱>」。
- 關閉或儲存規劃檔案。