A limb (arm or leg) can be made up of between 1 and 20 arm bones, each of which can contain up to 20 segments for creating twist effects.
Interface
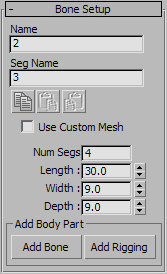
The interface for editing limb bones comprises two rollouts: Bone Setup and Bone Twist Weight.
Bone Setup rollout
Access the setup parameters for a particular bone or segment by selecting it in the viewport.

- Name
- View and edit the name of the bone. See Naming Limbs.
- Seg Name
- View and edit the name of the bone segment. This applies only to bones with more than one segment (Num Segs; see following). See Naming Limbs.
-
 Copy/Paste/Paste Mirrored
 - Buttons for copying and pasting the bone settings to or from other bones. See Copying and Pasting Rig Parts.
- Use Custom Mesh
- Use this when you’ve baked bone mesh edits into the bone (see Customizing the Geometry on CATBones). When on, the bone displays as the edited mesh. When off, the bone displays in its original, unedited form, as a simple box.
- Num Segs
- The number of bone segments in the bone.
Segments are useful for effects such as twisting forearms.
- Length/Width/Depth
- The size of the bone in three dimensions.
Add Body Part group
- Add Bone
- Adds an extra bone, linked to the selected bone. The extra bone is created at the origin of the bone, at its endpoint.
- Add Rigging
- Adds special rigging objects, such as props, to the limb. For details, see To add rigging objects:.
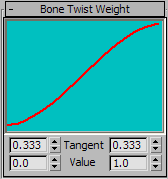
Bone Twist Weight rollout
This graph controls the amount each segment twists relative to those around it.

You edit the spline by adjusting the Tangent and Value settings at the bottom of the rollout. For more information, see Spine Curvature Graph rollout.
- Tangent
- The Tangent settings control the shape of the curve at its left and right ends, respectively.
- Value
- The Value settings control the start and end values of the rotation weights.