The Substance interface consists of several rollouts that appear in the Material Editor by double-clicking the map node. In addition, most Substance maps include several outputs for connecting to different material map inputs.
Substance and Displacement
Substance maps are unique in that they provide three different displacement outputs: Bump provides high-frequency, detailed displacement; Displacement provides low-frequency output with broader displacement; and Height combines the two into a single output. For example, with a sand-dunes map, Displacement would be the dunes whereas Bump would be the grains of sand.
This feature lets you use the outputs to minimize memory usage and rendering time, when appropriate. You could use the Displacement output to displace the mesh, while using the Bump (or Normal) output as a bump map. Or, if memory allowances are liberal, you could simply use the Height output as a displacement map.
When using the Bump and Displacement outputs separately, specify the balance between the two with the Relief Balance setting available on the Substance map’s Parameters rollout. The available Relief Balance value range is 0.0 to 32.0, with the latter being the default. Higher Relief Balance values favor the Bump output, while lower values place greater emphasis on the Displacement output.
In the following illustration, a Plane primitive was displaced with different outputs from the Desert_Sand_01 substance with two different Relief Balance settings. The first row shows the Bump, Displacement, and Height outputs, respectively, with Relief Balance set to 18.0, a relatively high value. The second row shows the displacement from the Bump, Displacement, and Height outputs, respectively, at Relief Balance=2.0, near the low end of the value range.
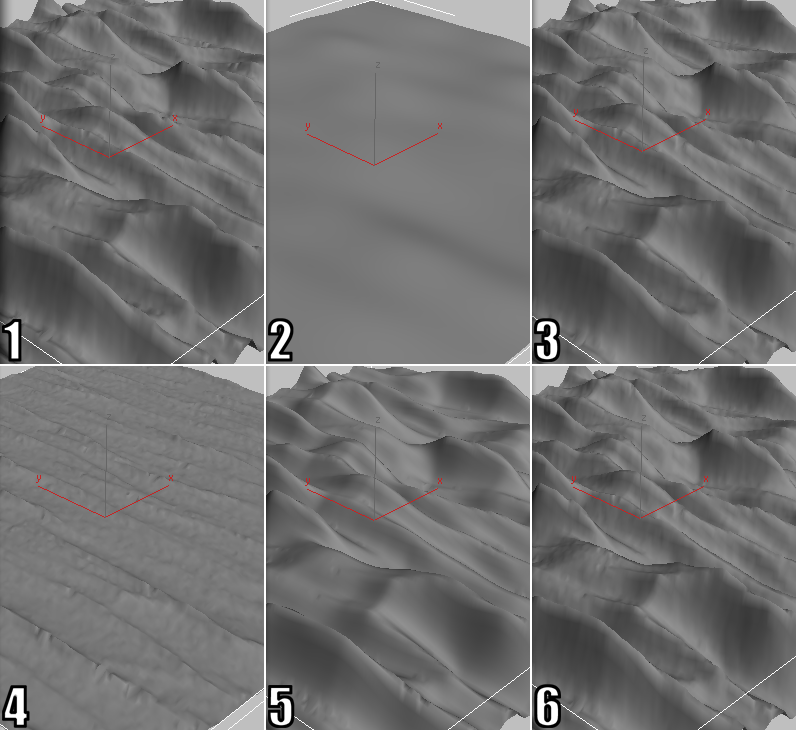
1. Bump output, Relief Balance=18.0
2. Displacement output, Relief Balance=18.0
3. Height output, Relief Balance=18.0
4. Bump output, Relief Balance=2.0
5. Displacement output, Relief Balance=2.0
6. Height output, Relief Balance=2.0
Note that the two Height displacements (3 and 6) are identical; Relief Balance has no effect on the Height output.
Interface
The best way to use the Substance map is with the Slate Material Editor. Here you can connect the various map outputs to material map inputs, and double-click the map node to access its parameters. For specific procedures, see Substance Map.
Substance Map Outputs
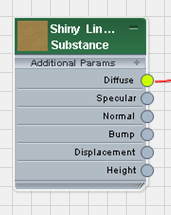
Substance map node showing multiple outputs
Unlike most other maps in 3ds Max, Substance maps often have multiple outputs. This means that you can connect different outputs from a single Substance to different inputs in a material, with different results based on the connections you make.
If you apply a new Substance to a material by dragging it directly from the Material/Map Browser to an input connector on the material (using the Slate Material Editor) and then specify a Substance file with the button on the Package Browser rollout, 3ds Max defaults to the Diffuse output of the map. You can change this directly by dragging between a different output connector on the map node and the Map Output Selector node, or indirectly by changing the Channel Name setting of the Map Output Selector.
The available Substance map outputs are as follows (not all Substances have all of these):
- Diffuse
-
The overall coloring provided by the map. Usually connected to the material’s Diffuse map.
- Specular
-
A realistic specular component based on light and viewer angles and the map content, regardless of the actual object surface. Usually connected to the material’s Specular Level map.
The following illustration depicts the Coal substance applied to a Plane primitive as a Diffuse map using the Standard material, as seen in the Perspective viewport:
- The first image shows the map with default scene lighting. The visible specular highlights come directly from the Diffuse map and do not vary.
- In the second image, a single Omni light is positioned overhead, and the specular highlighting is specified by the material; it shows the standard result of using a point light source over a planar surface, disregarding the Diffuse-map image content.
- The third image uses the same lighting and material Glossiness value (48), but the specular highlighting comes from the Substance map’s Specular output applied to the material’s Specular Level map. Here the specular highlighting is realistic, as if the coal is a 3D object, not a 2D image. Moving the light source or the viewing angle causes the highlighting to shift to other coals.
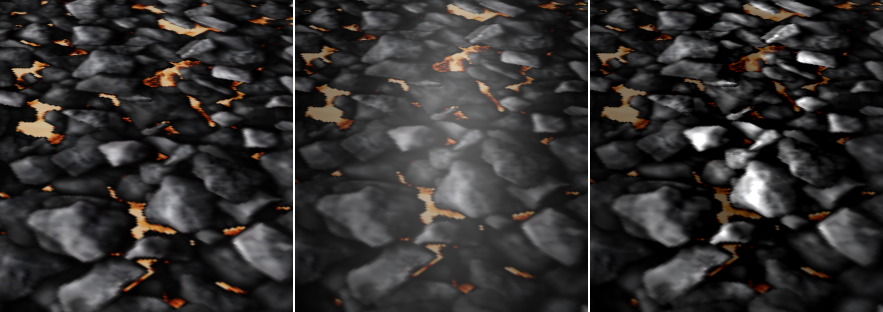
Left: Specular from Diffuse map
Center: Specular from material
Right: Specular from Substance map
- Normal
-
A normal bump map, which uses full-spectrum coloring to simulate high-frequency surface displacement in a highly accurate way. Usually connected to the material’s Bump map through a Normal Bump map.
- Bump
-
A standard bump map, which uses a grayscale image to simulate high-frequency surface displacement. Usually connected directly to the material’s Bump map or Displacement map.
For more information, see Substance and Displacement.
- Displacement
-
A standard displacement map, which uses a grayscale image to simulate low-frequency surface displacement. Usually connected directly to the material’s Displacement map.
For more information, see Substance and Displacement.
- Height
-
Combines the Bump and Displacement data into a single output. Usually connected directly to the material’s Displacement map.
For more information, see Substance and Displacement.
- Opacity
-
When active, makes “background” areas in the map transparent. Typically applied to the material’s Opacity map. Available only with applicable Substances, including Fencing and Autumn Leaves.
Applying the Opacity output to the material’s Opacity map lets you, for example, replace the background with custom content (from an underlying object with a different texture map).
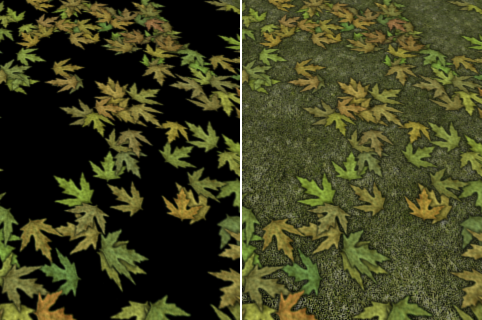
Left: Autumn Leaves with default background; Diffuse output only
Right: Autumn Leaves with Opacity output applied to material Opacity map input, showing underlying Substance map (Lawn)
- Emissive
-
The “glowing” component of a material, typically applied to the material’s Self-Illumination map. Available only with Substances that contain glowing elements, such as Volcano Rock and Coal.
For an example, see Specular, preceding.
- Glossiness
-
The breadth of the specular highlights as defined by the Substance map. Typically applied to the material’s Glossiness map. Available only with applicable Substances including Volcano Rock and Marble_02.
Global Substance Settings rollout
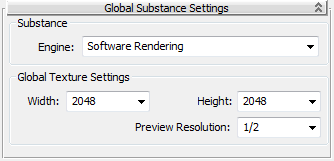
Global settings include the engine (software subsystem) that renders Substance maps as well as texture size.
- Engine
- The current in-viewport rendering engine for Substance textures. Choose the engine from the drop-down list; the choices are Software Rendering and Hardware Rendering. If your machine supports hardware rendering, you'll get much faster response when changing Substance parameters such as Random Seed. Note: This option is not affected by the Material Editor setting for Show Software/Hardware Map In Viewport.
When you change the Engine setting, you're prompted to restart 3ds Max. Thereafter, that engine remains in effect for all Substance textures until the next time you change the engine and restart the software.
Global Texture Settings group
- Width/Height
-
The basic output resolution of all Substance textures in the scene, subject to changes for each individual texture depending on its Texture Size (local) settings. Changing the global settings for any Substance also changes them for all other Substances in the scene.
- Preview Resolution
- A multiplier applied to the Substance map for rendering the map in Material Editor and the viewports only. This multiplier does not apply to final rendered output.
For faster feedback when editing the scene and materials, use a lower value here.
Substance Package Browser rollout
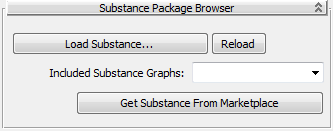
A Substance file is sometimes called a “package” because it can contain multiple texture definitions. Use these settings to open and reload Substance files, and, when a file contains more than one definition, to choose the definition to use.
- Load Substance
-
Opens the Browse For Substances file browser dialog. Use the dialog to open a Substance file.
For a list of all Substance maps with sample images, see Substance Samples.
After you open a file, its file name and the name of the active Substance appear on this button. Also, if you position the mouse cursor over the button, a tooltip opens showing the file path.
Note: Opening a new Substance file resets the Parameters panel for the Substance map, but it does not change the other rollout settings. For example, if you change the texture size or tiling amounts, these changes are retained upon loading another Substance.Note: If a particular Substance output is wired to a material output, and then you open a different Substance file in the same map that does not have that output, the previous connection is broken. However, the Map Output Selector map from that connection remains connected to the material input.The exception to this is if you load a single-output Substance, such as Space or one of the Noise maps, into a map that has multiple outputs connected to a material. In such a case, the single output is connected to all of the material inputs that were connected previously.
- Reload
-
Loads the Substance again from its definition file.
Note: Reloading a Substance does not change the parameter values. To reset a Substance to its default values, reopen the file with the Click To Browse button. - Include Substance Graphs
-
Use this drop-down list to choose the Substance definition to use from a package that contains multiple definitions.
Note: None of the packages included in this version of Substance contain multiple graphs. - Get Substance From Marketplace
- Opens the Allegorithmic Web site in the default browser. Browse the Web site to find useful products and add-ons.
Texture Size rollout
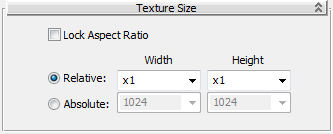
These settings affect the output resolution of the current texture only. You can base the resolution of the current texture on the global size (Relative) or set it independent of the global size. Use this rollout to choose either option and set the dimensions of the current individual Substance. Higher Texture Size settings produce better-looking textures, but take longer to render.
- Lock Aspect Ratio
-
When on, only the Width settings on this rollout are available, and changing the Width setting also changes the Height value to maintain the current aspect ratio.
Note: This switch does not affect the global size; you can change the aspect ratio by choosing different Global Texture Width/Height settings. - Relative/Absolute
-
When Relative is chosen, the Width and Height settings act as multipliers of the global dimensions. For example, if Global Texture Width and Global Texture Height are both set to 512 and you set both Relative Width and Relative Height to x2, the output resolution for rendering is 1024 x 1024 for that texture. This way you can set a baseline resolution at the global level and then vary it with the Relative multipliers for each individual Substance map.
When Absolute is chosen, the Width and Height settings determine the output resolution without regard to the global settings.
For either option, choose the Width and Height settings from the drop-down lists.
- Current texture resolution
-
This read-only field shows the actual output resolution, as calculated from the global and local Texture Size settings.
Information rollout
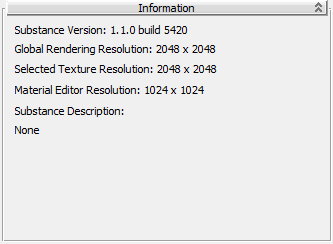
This read-only rollout displays the current version of the Substance software, resolution settings, and the description of the current package, if supplied by the author.
Coordinates rollout
This is the standard Coordinates rollout for 2D textures in 3ds Max; for details, see Coordinates Rollout (2D).
Noise rollout
This is the standard Noise rollout for 2D textures in 3ds Max; for details, see Noise Rollout (2D).
[texture] Parameters rollout
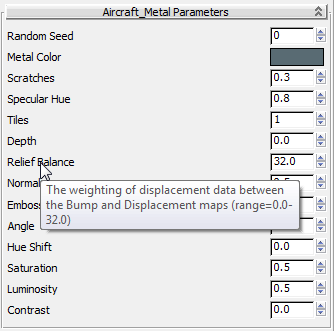
Each Substance texture has its own set of parameters, some of which are common to most of the textures, such as Random Seed. Most parameters provide a name and brief explanation in a tool tip, as shown in the preceding illustration. Unless otherwise specified, the available value range for most parameters is 0.0 – 1.0.
Of particular note on this rollout is the Relief Balance setting, available with all Substance maps that can displace the mesh. Relief Balance lets you adjust the weighting between the Bump and Displacement outputs. For details, see Substance and Displacement.
Another important setting, also common to most Substances, is the aforementioned Random Seed parameter. Changing this value alters the details of the texture completely while keeping the same overall look. By using different Random Seed values, you can apply the same texture to different parts of your scene while producing natural variation of the materials.
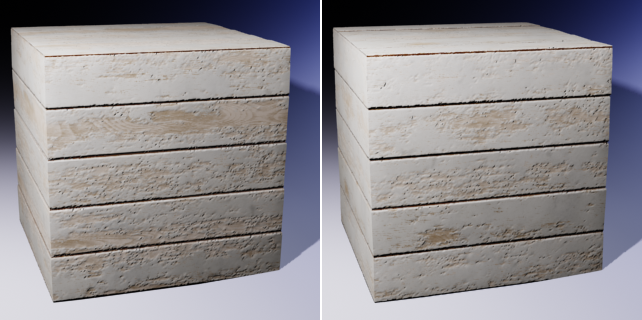
Left: Old_Painted_Planks texture with Random Seed=0
Right: Old_Painted_Planks texture with Random Seed=1