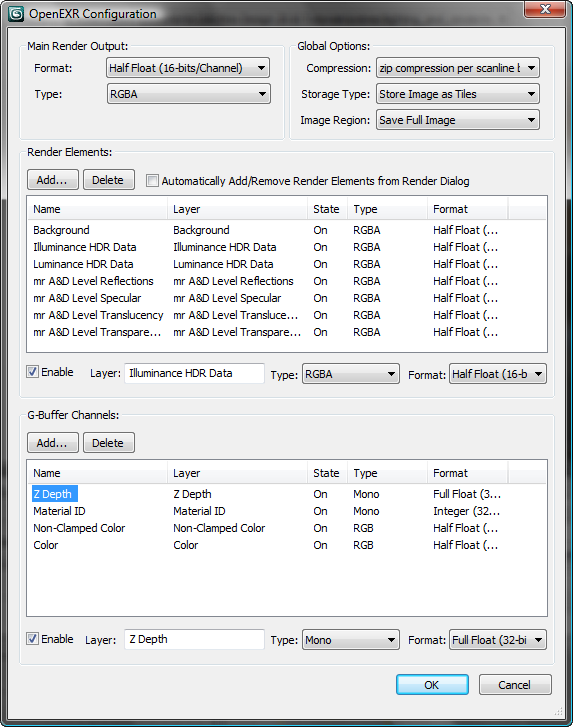
Use the OpenEXR Configuration dialog to set output parameters for OpenEXR files. You can specify the format for saving the RGBA data, as well as which of the four standard channels should be saved.
Interface

Main Render Output group
- Format
- Specifies the bit depth for the pixels of the Main layer in the output file. In general, floating-point precision allows for more flexibility in post-processing applications, at a cost of disk space.
- Full Float (32-bits/Channel) Pixel values are saved as 32-bit floating-point values.
- Half Float (16-bits/Channel) (The default.) Pixel values are saved as 16-bit floating-point values. Note: Some consider this option to be “standard” OpenEXR. Many post-processing applications support only this option, and cannot read an EXR file with 32-bit floating-point values.
- Integer (32-bits/Channel) Pixel values are saved as 32-bit integers.
- Type
- Determines whether the image saved on disk will contain Red, Green, Blue, and Alpha channels, or be saved as a grayscale image only.
This option affects the Main output layer only.
- RGBA (The default.) Saves Red, Green, Blue, and Alpha channels.
- Mono Saves each pixel as a grayscale value only.
Global Options group
- Compression
- Lets you choose the compression method to use in the output file. Pixels can be stored in compressed or uncompressed form. Tip: With fast file systems, uncompressed files can be read significantly faster than compressed files.
Compressing an image with a lossless method preserves the image exactly: The pixel data are not altered. Compressing an image with a lossy method preserves the image only approximately: Image quality can degrade with multiple saves.
- no compression The output file is not compressed.
- run length encoding (RLE) The output file is compressed using the RLE method. This is a lossless method.
- zip compression per scanline (ZIPS) (The default.) The output file is compressed one scanline at a time. This is a lossless method.
- zip compression per scanline band (ZIP) The output file is compressed in blocks of 16 scanlines. This is a lossless method.
- piz-based wavelet compression (PIZ) This is a lossless method.
- lossy 24-bit float compression (PXR24)
- lossy 4-by-4 block compression (fixed rate) (B44)
- lossy 4-by-4 block compression (B44A)
- Storage Types
- Lets you choose the storage method. Pixels in an OpenEXR file can be stored either as scan lines or as tiles. Tiled image files allow fast zooming and panning in programs that interactively display very large images.
- Store Image as Scanlines Stores the image as scanlines.
- Store Image as Tiles (The default.) Stores the image as tiles.
- Image Region
- Lets you choose whether to save the file image, or a cropped version based on significant information in the image.
- Save Full Image (The default.) Saves the full resolution of the image.
- Save Region Saves a cropped image based on significant pixel information. 3ds Max automatically chooses the cropping.

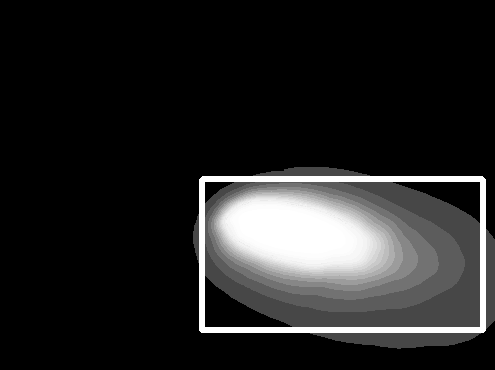
Automatic cropping:
Outer border: Full image resolution
Inset rectangle: “Data window” based on significant pixel information
In this sample image, the “data window” encloses the area where pixels vary significantly. When you choose Save Region, only this portion of the image is saved.
Note: Some compositing applications, such as Nuke, can use cropped regions. This saves disk space, memory space, and processing time.
Render Elements group
Controls in this group let you choose and manage elements to save in the EXR file. Each rendered element is saved as a separate OpenEXR layer.
- Add
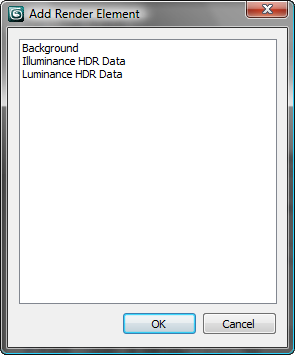
- Click to open an Add Render Element dialog that lets you choose which elements to include in the OpenEXR output.

Highlight one or more elements in the list, and then click OK.
The dialog lists only elements that you have already set up for rendering by using the Render Elements tab of the Render Setup dialog. If an element has already been added to the OpenEXR list, it doesn’t appear in this dialog.
After you choose render elements to output, 3ds Max displays their names in the list below this button.
- Delete
- Click to delete the element you have highlighted in the list.
- Automatically Add/Remove Render Elements from Render Dialog
- When on, the list of elements to save in the EXR file is automatically synchronized with the list maintained by the Render Setup dialog. Default=off.
- [list of Render Elements]
- Lists the render elements you have chosen to output; the layer name that corresponds to each; whether the layer will be included in the EXR file (“State”); and the type and format of the layer.
The controls below the list become available when you have highlighted a particular element in the list:
- Enable
- When on, the render element is included as a layer in the OpenEXR file. When off, it is not. Default=on.
The State column in the layer list shows whether output is enabled (“On”) or not (“Off”).
- Layer
- Displays the layer name for the element you have highlighted.
- Type
- Lets you choose the output type. These options are the same as for the EXR file as a whole: See Type.
- Format
- Lets you choose the output format. These options are the same as for the EXR file as a whole: See Format.
G-Buffer Channels group
Controls in this group let you choose and manage G-buffer channels to save in the EXR file. Each channel is saved as a separate OpenEXR layer.
- Add
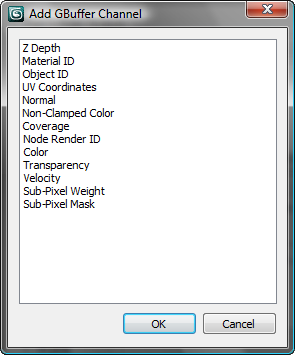
- Click to open an Add Render Element dialog that lets you choose which elements to include in the OpenEXR output.

Highlight one or more channels in the list, and then click OK.
Note: The Material ID and Object ID channels are channels you set up in the scene itself. Other G-buffer channels are generated automatically, based on the scene geometry, animation, and rendering settings.After you choose channels to output, 3ds Max displays their names in the list below this button.
- Delete
- Click to delete the channel you have highlighted in the list.
- [list of G-buffer Channels]
- Lists the G-buffer channels you have chosen to output; the layer name that corresponds to each; whether the layer will be included in the EXR file (“State”); and the type and format of the layer.
The controls below the list become available when you have highlighted a particular element in the list:
- Enable
- When on, the G-buffer channel is included as a layer in the OpenEXR file. When off, it is not. Default=on.
The State column in the layer list shows whether output is enabled (“On”) or not (“Off”).
- Layer
- Displays the layer name for the G-buffer channel you have highlighted.
- Type
- Lets you choose the output type. Most of these options are the same as for the EXR file as a whole (see Type), but G-buffer channel types can also store coordinate data: XY, XYZ, or UV.
- Format
- Lets you choose the output format. These options are the same as for the EXR file as a whole: See Format.