 Scene Explorer provides a modeless dialog for viewing, sorting, filtering, and selecting objects in
3ds Max, as well as additional functionality for renaming, deleting, hiding, and freezing objects, creating and modifying object hierarchies, and editing object properties en masse.
The Scene Explorer interface consists of a menu bar, toolbars, and a table view of objects in the scene, with a row for each object and a column for each displayed object property. The default layout in 3ds Max displays only object names and the Frozen property. You can customize the layout to show additional properties. You can create local Scene Explorer setups that save and load with the current scene, and global ones that are available in all scenes.
Scene Explorer Modes
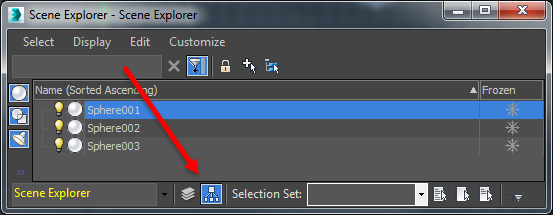
Scene Explorer can switch between two different sorting modes using the buttons on the Selection toolbar:

-
 Sets Scene Explorer to Sort By Layer mode, providing drag-and-drop functionality for editing layers. Additional features are covered in this section and in the To Work With Layer Explorer section.
-
 Sets Scene Explorer to Sort By Hierarchy mode, providing drag-and-drop functionality for editing hierarchies. Additional features are covered in this section.
Workspace Scene Explorers
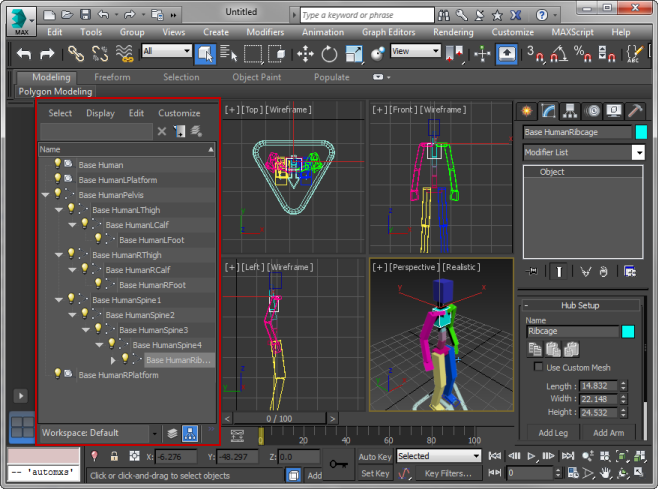
Each workspace in 3ds Max includes a different Scene Explorer, with the same name as its workspace, docked to the left of the viewports. For specific information about its operation, see the Workspace Scene Explorers section of the Workspaces topic.

Workspace Scene Explorer (red outline) docked in 3ds Max interface
Multiple Scene Explorers
For many workflows, the single workspace Explorer docked on the left side of the interface will suffice. However, you can open as many unique explorers as you like, including Layer Explorer, Revit Explorer, and so on. To make a copy of a unique explorer, use the methods described in the topic To Work With Local And Global Scene Explorers
Scene Explorer Features
Following are further noteworthy features of Scene Explorer:
- Customize the dialog by setting any configuration of columns, hidden and displayed categories (via the left-hand toolbar), and so on.
- Selection is automatically synchronized between Scene Explorer and the scene: Select an object in the viewport and it automatically highlights in Scene Explorer, and vice-versa.
- Use local Scene Explorers that are specific to the current scene, and global Scene Explorers, which are available in all scenes.
- Switch the sorting and listing mode between hierarchy and layer.
- Nest layers to any depth.
- Dock the dialog right or left by dragging and dropping or by right-clicking the title bar and choosing the Dock location.
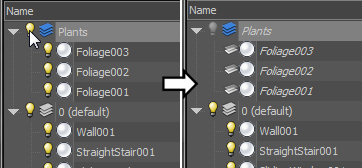
- Toggle object and layer visibility by clicking the light bulb icon. In the following illustration, hiding the Plants layer also makes all of its children (Foliage003, etc.) invisible.
 Note: The light bulb icon has no connection with scene lighting; it merely indicates whether an object or layer is visible (yellow) or not (gray).
 - View group members in Scene Explorer (Sort By Hierarchy mode only) without having to open the group. As with hierarchies and layers, you expand and collapse each group by clicking the arrow next to its name.
- Save and load different configurations. See Manage Scene Explorer.
- Create and edit object hierarchies and layer groups by dragging and dropping.
- Sort on single or multiple columns.
- Change object settings singly or as a batch.
- Powerful, sophisticated search and filtering features.
Scene Explorer Variants
Several additional custom global Scene Explorer setups are available from the drop-down list at the bottom of the explorer. These include explorers designed for working with lights, objects with missing plug-ins, and more. Last, the Select From Scene command and its variants use a modal dialog dedicated to selecting from a text-based list, with no editing functions.
Dragging a selection containing layers and nodes
- Ensure that select Children is not checked in the layer explorer toolbar (should be OFF by default).
- Create Layer A and create a sphere on that layer.
- Create Layer B and create a box on that layer.
- Now select Layer B only.
- Drag Layer B onto Layer A.
Layer A will then be the Top parent of that structure
- Select Layer A and drag it onto Layer 0.
the structure of Layer A remains.
- Create Layer C and make it active.
- Select Layer A.
- Hold CTRL and select Box (which Should still be located under Layer B).
- Drag that selection onto Layer C.
Layer A keeps the structure, but BOX has become a direct child to Layer C. If a Parent layer and its children (including other layers and nodes) are all individually selected, all the layers structure will be broken when slid under the new layer.
- Select the object in the first layer (i.e. Layer A).
- Hold CTRL.
- Select the second layer (i.e. Layer B, where the object will be dragged to).
Note: This will break the structure of Layer A.
To break the structure of Layer A:
- Create Layer D and make it active.
- Dbl-click on Layer C (which selects PARENT AND CHILDREN, same thing as having "select children" ON).
- Drag onto Layer D an notice how everything has become a direct child to Layer D.