Layer Explorer is the version of Scene Explorer that opens when you use any of the following commands. In this mode you can view objects, layers, and layer hierarchies, but not object hierarchies or groups. Use Layer Explorer for creating and nesting layers and moving objects between layers.
Create a new layer:
- On the main toolbar, click Toggle Layer Explorer.
The Layer Explorer dialog opens, listing all layers and objects in the scene.
- Optionally, select any objects to add to the new layer. They will be added to the new layer automatically after you create it.
Note: If a layer is selected when you create a layer, the new layer becomes a child of that layer. If multiple layers are selected, the new layer is added to the most recently selected layer.
- On the Tools toolbar, click Create New Layer.
3ds Max creates a new layer in the list.
The new layer is active (
 ) so that any objects you create subsequently are automatically added to this layer.
When you create new layers, 3ds Max names them sequentially by default: Layer001, Layer002, and so on. You can rename a new layer immediately by typing, or later by slowly double-clicking the title and then typing. 3ds Max assigns a random color to all new layers. You can accept the default settings or specify other colors.
Make a layer active:
- On the Layer Explorer dialog, click an inactive layer icon (
 ) next to the name of the layer to activate.
The icon turns blue (
 ), indicating that the layer is active, so that any objects you create subsequently are automatically added to this layer.
The active layer receives all newly created objects. Only one layer can be active at a time.
Make a layer active (alternate method):
- On the
Layers toolbar
 Layer List, click a layer.
The selected layer becomes the current layer.
Move objects between layers:
- Use the Layer Explorer dialog to select the objects to move. You can select any objects in any layers.
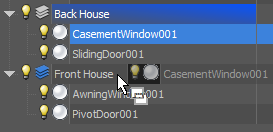
- Drag any selected object to a layer in the list. When mouse cursor icon resembles two overlapping rectangles, as in the following illustration, release the mouse button.

All of the dragged objects now belong to the target layer.
Nest layers:
- To nest multiple layers, first select the layers to move. If nesting a single layer, this isn't necessary.
- Drag a layer—one of the selected ones or any single layer—to another layer in the list. When the mouse cursor resembles two overlapping rectangles (see preceding illustration) release the mouse button.
The dragged layers are now nested within the target layer.
You can create layer hierarchies, called "nested" layers, simply by dragging layers into other layers. The parent layer controls the Hide/Freeze properties of any child layers, but other settings that can be inherited by layer members, such as Display and Rendering Controls, are controlled only by the immediate parent layer.
Remove layers from their hierarchy:
- Select one or more nested layers.
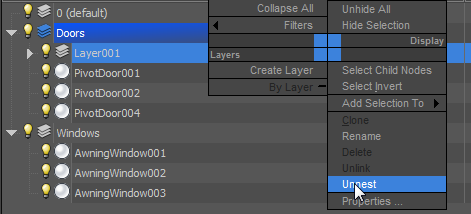
- Right-click and from the quad menu choose Unnest, or drag to an empty space on the left or below.

The selected layers move to the top level of the layer hierarchy.
Hide or unhide a layer:
- To hide or unhide multiple layers, first use the Layer Explorer dialog to select the layers to affect. If hiding or unhiding a single layer, this step is unnecessary.
- Click the
 or
or
 icon at the left side of any item to hide or unhide.
Hiding a layer also hides any member objects, as well as objects belonging to layers nested within the hidden layer.
A visible layer or object is signified with the
 icon; a hidden one uses the
 or
or
 icon.
icon.
Freeze or unfreeze a layer:
- To freeze or unfreeze multiple layers, first use the Layer Explorer dialog to select the layers to affect. When freezing or unfreezing a single layer, this step is unnecessary.
- In the Frozen column, click the
 or
or
 icon of any item to freeze or unfreeze.
The icon appearances toggle in the list.
Freezing a layer also hides any member objects, as well as objects belonging to layers nested within the frozen layer.
Freezing layers is useful when you want to edit objects associated with particular layers but also want to view, without editing, objects on other layers. You can't edit or select objects on a frozen layer; however, the objects are still visible if the layer is on. You can activate a frozen layer, and you can add new objects to the frozen layer.
An unfrozen layer or object is signified with the
 icon in the Frozen column; a frozen one uses the
 or
or
 icon.
icon.
Assign a color to a layer:
- On the main toolbar, click Toggle Layer Explorer.
- If necessary, add the Color column to the layout (see Scene Explorer Columns).
- Click the color swatch of the layer whose color you want to change, then use the Color Selector dialog to pick a new color.
This changes the layer color. For objects in the layer to inherit this color, their color must be set to By Layer. To do so, see the following procedure.
You can assign a color to a layer with the Layer Explorer. For example, you might assign the color red to a layer named HVAC to help identify the mechanical equipment in your scene.
Enable control of object properties by layer:
- In Layer Explorer, highlight the objects to adjust.
- Do either of the following:
- Right-click and from the Layers quadrant of the quad menu, choose By Layer. This toggles the By Layer option for all four property categories simultaneously.
- Right-click and choose Properties from the quad menu (bottom-right). Use the Object Properties dialog controls to toggle By Layer / By Object for each category individually.
You can set four different categories of object properties to be controlled by the containing layer: Wireframe Color, Display Properties, Rendering Control, and Motion Blur. You can toggle the By Layer option for all four categories at once, or you can toggle the categories individually.
Rename a layer:
- On the main toolbar, click Toggle Layer Explorer.
- On the Layer Explorer dialog, select a layer to rename.
- Click the layer’s name again to activate text-entry mode (or double-click to highlight the entire name) and enter a new name.
You might want to rename a layer to better define how its contents are used in your scene. You can rename any layer except Layer 0 at any time during a 3ds Max session.
Delete a layer:
- On the main toolbar, click Toggle Layer Explorer.
- In the Layer Explorer dialog list, select one or more layers, and then right-click and, from the quad menu, choose Delete.
You can delete an empty layer at any time during a 3ds Max session. You cannot delete the default layer (0 (default)) or a layer that contains objects. If you delete the active layer, it makes the default layer active.
Open the Layer Properties dialog for a layer selection:
- On the main toolbar, click Toggle Layer Explorer.
- Select one or more layers in the Layer Explorer dialog list.
- Right-click and, from the quad menu, choose Properties.