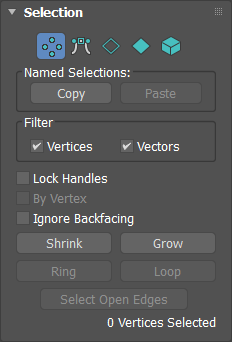
The Selection rollout provides buttons for selecting the sub-object level, working with named selections, display and filter settings, and displays information about selected entities.
Editable Patch has five levels of sub-object editing: Vertex, Handle, Edge, Patch, and Element. The selection you make at each level appears in the viewport as a component of the patch object. Each level maintains its own sub-object selection. When you return to a level, the selection reappears.
Clicking a sub-object level button here is the same as clicking a sub-object level in the modifier stack. Click the button again to turn it off and return to the object selection level.
Interface

-
 Vertex
 - Lets you select vertex control points and their vector handles on a patch object. At this level, vertices can be welded and deleted.
By default, a transform gizmo or axis tripod appears at the geometric center of the selected vertices. If you turn on Gizmo Preferences
 Allow Multiple Gizmos, however, gizmos or tripods appear at all selected vertices.
Vector handles appear as small green squares around selected vertices. Also, with certain objects you may see interior vertices represented as yellow squares.
-
 Handle
 - Lets you select vector handles associated with each vertex. This level lets you manipulate the handles without needing to deal with vertices.
A Transform gizmo or axis tripod appears at the geometric center of the selected handles.
At this level, vector handles appear as small green squares around all vertices. Also, with certain objects you may see interior vertices represented as yellow squares.
-
 Edge
Edge - Selects a bounding edge of the patch object. At this level, edges can be subdivided, and new patches added to open edges.
A Transform gizmo or axis tripod appears in the middle of a single selected edge. For multiple selected edges, the icon is at the selection center.
-
 Patch
Patch - Selects an entire patch. At this level, a patch can be detached, deleted, or its surface subdivided. When a patch is subdivided, the surface is broken into smaller patches, each with its own vertices and edges.
Tip: You can toggle highlighting of selected patches in a shaded viewport with the Shade Selected Faces switch on the Viewport Configuration dialog. To open the dialog, open the General viewport label menu ([+]) and choose Configure from the menu. You can also toggle this feature with the default keyboard shortcut, F2.
-
 Element
 - Select and edit an entire element. An element has contiguous faces.
Named Selections group
These functions work with named sub-object selection sets. To create a named sub-object selection, make the selection, and then enter a name in the Named Selection Sets field on the toolbar. For more information, see Named Selection Sets.
- Copy
- Places a named sub-object selection into the copy buffer. After clicking this button, choose the named sub-object selection from the Copy Named Selection dialog that appears.
- Paste
- Pastes the named sub-object selection from the copy buffer.
You can use Copy and Paste to copy sub-object selections between different objects.
Filter group
These two checkboxes, available only at the Vertex sub-object level, let you select and transform vertices, vectors (handles on the vertices), or both. When a checkbox is turned off, you can't select the corresponding element type. Thus, for example, if you turn off Vertices, you can manipulate vectors without accidentally moving a vertex.
You can't turn off both checkboxes. When you turn off either checkbox, the other one becomes unavailable. At that point, you can manipulate the element corresponding to the checkbox that's on, but you can't turn it off.
- Vertices
- When on, you can select and move vertices.
- Vectors
- When on, you can select and move vectors.
- Lock Handles
- Affects only Corner vertices. Locks the tangent vectors together so that when you move one, you move them all. Available only at the Vertex sub-object level.
- By Vertex
- When you click a vertex, any handles, edges, or patches that use that vertex, depending on the current sub-object level, are selected. Available only at the Handle, Edge, and Patch sub-object levels.
This also works with Region Select.
- Ignore Backfacing
- When on, selection of sub-objects selects only those sub-objects whose normals are visible in the viewport. When off (the default), selection includes all sub-objects, regardless of the direction of their normals. Use this on a complex patch model where you want to select only visible patches.
Note: The state of the Backface Cull setting in the Display panel does not affect sub-object selection. Thus, if Ignore Backfacing is off, you can still select sub-objects, even if you can't see them.
- Shrink
- Reduces the sub-object selection area by deselecting the outermost sub-objects. If the selection size can no longer be reduced, the remaining sub-objects are deselected. Unavailable at the Handle sub-object level.
- Grow
- Expands the selection area outward in all available directions. Unavailable at the Handle sub-object level.
- Ring
- Expands an edge selection by selecting all edges parallel to the selected edges. Available only at the Edge sub-object level.
- Loop
- Expands the selection as far as possible, in alignment with selected edges. Available only at the Edge sub-object level.
- Select Open Edges
- Selects all edges that are used by only one patch. Available only at the Edge sub-object level.
You can use this to troubleshoot a surface; open edges will be highlighted.
- [selection Information]
- At the bottom of the Selection rollout is a text display giving information about the current selection. If multiple sub-objects are selected, or none is selected, the text gives the number and type selected. If one sub-object is selected, the text gives the identification number and type of the selected item.