![]()
Rendering is multi-threaded and multi-processed on multiple-processor configurations. A two-processor or dual-core system can render in nearly half the time a single-processor system can.
Rendering can also take place on multiple systems by using a network.
The Render Setup dialog has multiple panels. The number and name of the panels can change, depending on the active renderer. These panels are always present:
- Common panel
Contains the general controls for rendering, such as whether to render a still image or an animation, setting the resolution of rendered output, and so on.
- Renderer panel
Contains the main controls for the active renderer.
Tip: Each renderer has different and unique capabilities. Based on these, you decide which renderer you want to use for each scene. It is a good idea to design materials with a particular renderer in mind.
Additional panels can appear, depending on which renderer is active. Renderer-specific controls are described in the section "Renderers." Additional renderers might be available as third-party plug-in components.
At the top of the Render Setup dialog are controls that, like those on the Common Parameters rollout, apply to all renderers. These are described below.
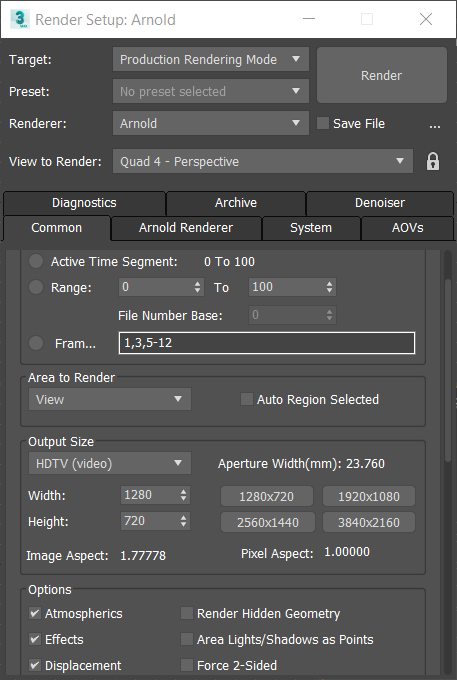
- Target drop-down list
- Lets you choose various rendering options.
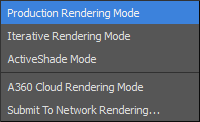
- Production Rendering Mode (The default.) While active, clicking Render uses production mode.
- Iterative Rendering Mode While active, clicking Render uses iterative mode.
- ActiveShade Mode While active, clicking Render uses ActiveShade.
- A360 Cloud Rendering Mode Opens the controls for Autodesk Rendering Cloud rendering.
-
Submit to Network Rendering Submits the current scene to network rendering. When you choose this option, 3ds Max opens the Network Job Assignment dialog.
This choice does not affect the state of the Render button itself, which you can still use to launch a Production, Iterative, or ActiveShade rendering.
Changing the render mode on this menu changes the comparable setting on the main toolbar
 Render flyout.
- Preset drop-down list
-
Lets you choose a set of preset rendering parameters, or load or save rendering parameter settings. See "Preset Rendering Options."
- Renderer drop-down list
- Lets you choose the active renderer.
This is an alternative to using the Assign Renderer rollout.
- Render / Render Iterative / ActiveShade button
- Click to render the scene using the current target mode (aside from Network Rendering).
When ActiveShade is chosen, the name of this button changes to ActiveShade, and clicking it opens a floating ActiveShade window.
If the scene you're rendering contains bitmaps that cannot be located, a Missing External Files dialog opens. This dialog lets you browse for the missing maps, or continue to render the scene without loading them.
- View to Render
- Shows the viewport that renders when you click the Render button. To specify a different viewport to render, choose it from the list or activate it in the main user interface.
The drop-down list contains all viewports available in all viewport layouts. Each viewport is listed with the layout name first, followed by a hyphen and then the viewport name. For example: "Row 1, Row 2 - Front." For this reason, to identify viewports easily, give your layouts meaningful names, such as Closeups.
Activating a different viewport in the main interface automatically updates this setting if Lock To Viewport (see following) is off.
Lock to Viewport: When on, locks the view to the one shown in the Viewport list. This enables you to adjust the scene in other viewports (which become active as you use them), and then click Render to render the viewport you originally chose. When off, Render always renders the active viewport.