This rollout has the texture-baking controls for the current scene. It lets you control automatic unwrapping of the baked textures, map size, render settings, and where texture renderings are saved.
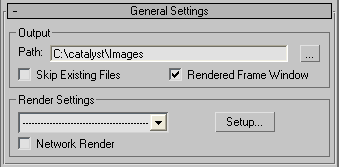
Output group
- Text field
- Specifies the folder where the rendered texture will be saved. You can enter a different folder name in this field. Default=the \images subfolder of the folder where you installed 3ds Max.
-
 (Browse)
- Click the Browse button to display a dialog that lets you browse to the directory where you want the rendered texture to be saved.
- Skip Existing Files
- Allows you to render only those maps that do not already exist.
- Rendered Frame Window
- When on, displays the complete map in a Rendered Frame Window as the elements are rendered. When off, does not open the Rendered Frame Window. Default=on.
Render Settings group
These controls let you choose and set up Render Presets as well as activate network rendering.
- [drop-down menu]
- Lets you choose Load Preset. A Render Presets Load dialog appears where you can select an RPS file.
- Setup
- Displays the Render dialog, where you can adjust production settings, draft settings, or both.
- Network Render
- When on, you can assign the rendering task to Server systems. If you click Render, the Network Job Assignment dialog displays where you can specify a server, or multiple servers, to take on the task. Default=off.
3ds Max can use the Split Scan Lines option when rendering to textures with a render farm. However, if you enable projection mapping and turn on Sub-Object Levels, this option is unavailable.