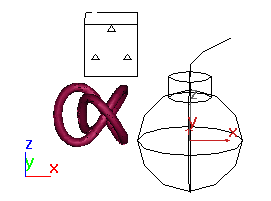
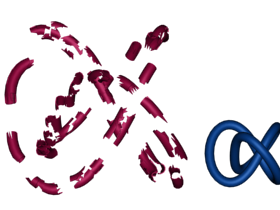
The PBomb space warp creates an impulse wave to blow up a particle system, as distinguished from the Bomb space warp, which blows up geometry. The PBomb is particularly well suited to the Particle Array (PArray) system with Particle Types set to Object Fragments.
The general usage is as follows:
- Create a particle system (recommended: a PArray system set to Object Fragments).
-
 Create a PBomb and use Bind to Space Warp to bind it to a non-event-driven particle system. Be sure to bind the PBomb to the particle system and not to the distribution object. Or, if using Particle Flow, use a Force operator to apply the space warp to the particle system.
 - Adjust the parameters of both the PBomb and the particle system.

Right: PBomb viewport icon
.Above: PArray particle system
Below: Torus knot used as the PArray's distribution object

Effect of blowing up the torus knot
Procedures
Example: To use PBomb with PArray:
- Create the object you want to blow up.
- Create a PArray and use Pick Object to assign the object to blow up as the PArray object-based emitter.
- In the Basic Parameters rollout
 Viewport Display group, choose Mesh to display the fragments as mesh objects in the viewports.
 - On the Particle Generation rollout of PArray, set Speed and Divergence to 0.0. This prevents PArray from moving the particles, letting PBomb do the work.
- On the Particle Generation rollout, set Life to the length of the active time segment, so that the fragments appear during the entire animation.
- In the Particle Type rollout
 Particle Types group, choose Object Fragments. In the Object Fragment Controls group, choose Number of Chunks, and set the Minimum to about 50, depending on your distribution object and the effect you want.
You can use the Particle Bomb bound to a Particle Array to blow an object into fragments. The following steps demonstrate the basic setup.
Begin by binding a particle array to an object, and setting parameters.
Now create a particle bomb, and bind it to the particle array.
- On the Create panel, activate
 (Space Warps). In the Forces category, click the PBomb button and drag in a viewport to create the PBomb icon.
 - Use Bind to Space Warp to bind the PArray icon to the PBomb icon. (Don't bind the distribution object by mistake.)
- Select the PBomb icon and move to the Modify panel.
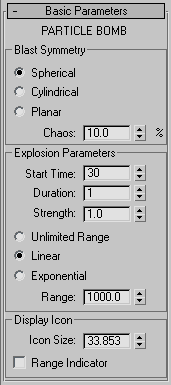
- In the Explosion Parameters group, set Blast Symmetry to Spherical, Start Time to 10, Duration to 1, and Strength to 1.0. Choose Linear, if it's not already chosen.
- Drag the time slider between frames 9 and 20 to see the effect.
- Go to frame 12 and try out various settings. Notice that increasing Strength expands the explosion effect at the current frame. If you decrease Range enough, the bomb no longer affects all or part of the object (depending on the placement of the PBomb icon). Test the three Blast Symmetry settings by placing the bomb in the center of the object and then seeing the different blast patterns.
Once you get an explosive effect you like, you can return to the PArray settings, add spin or thickness to the fragments, and so on.
Interface

Blast Symmetry group
These options specify the shape, or pattern of the blast effect.
- Spherical (The default) The blast force radiates outward from the PBomb icon in all directions. The icon looks like a spherical anarchist's bomb.
- Cylindrical The blast force radiates outward from and normal to the central axis, or core of the cylindrical icon. The icon looks like a stick of dynamite with a fuse.
- Planar The blast force radiates both up and down, perpendicular to the plane of the planar icon. The icon looks like a plane with arrows pointing up and down along the direction of the blast force.
- Chaos
- The blast forces vary for each particle or each frame, an effect similar to Brownian motion, with a rate of change in the direction of force equal to the rendering interval rate. Note: This setting is effective only when the Duration spinner is set to 0.
Explosion Parameters group
- Start Time
- The frame number at which the impulse forces are first applied to the particles.
- Duration
- The number of frames, beyond the first, over which the forces are applied. This value should typically be a small number, such as between 0 and 3.
- Strength
- The change in velocity along the blast vector, in units per frame. Increasing Strength increases the speed with which the particles are blown away from the bomb icon.
- Unlimited Range The effects of the bomb icon reach all bound particles throughout the scene. This option ignores the Range setting (which specifies the distance of the PBomb effect).
- Linear The impulse forces decay linearly between the full Strength setting to a value of 0 at the specified Range setting.
-
Exponential The impulse forces decay exponentially between the full Strength setting to a value of 0 at the specified Range setting.
Range The maximum distance, in units, over which the PBomb icon affects the bound particle system. If the Range is large enough to reach only a portion of the particle system, only that part of the system is affected.
If you turn on Range Indicator (see following), the extent of the range is indicated by a tri-hooped sphere. If you choose Unlimited Range, this parameter has no effect.
Display Icon group
These options affect the visual display of the PBomb icon.
- Icon Size
-
Alters the overall size of the PBomb icon.
- Range Indicator
-
Displays a wireframe sphere that indicates the volume of the particle bomb's influence. If you choose Unlimited Range, turning this on has no effect.