The Environment panel lets you assign and adjust environments such as the scene background and atmospheric effects. It also provides the exposure controls.
-
Rendered Frame Window >
 (Environment And Effects Dialog) > Environment panel
Use the Environment panel to:
- Set and animate the background color.
- Use an image in the background of the viewport and rendered scene (screen environment) or use texture maps as spherical, cylindrical, or shrink-wrap environments.
- Set and animate the tint and ambient light globally.
- Use atmospheric plug-ins, such as volumetric light, in the scene.
Atmospheres are plug-in components that create light effects such as fire, fog, volume fog, and volume light.
- Apply exposure controls to renderings.
Procedures
To access environment functions, do one of the following:
- Choose Rendering
 Environment.
 - On the Environment and Effects dialog, click the Environment tab.
To set the background color:
- Choose Rendering Environment.
The Environment panel appears.
- In the Background group, click the color swatch.
A Color Selector appears.
- Use the Color Selector to change the background color.
The Renderer now uses this color as a background.
To choose an environment map:
- Open the Material Editor (press M).
You adjust the map's parameters with the Material Editor.
- Choose Rendering Environment (or press 8).
- In the Background group on the Environment panel, do one of the following:
- Click the Environment Map button. The Material/Map Browser appears. Choose a map type from the list.
If you choose Bitmap as the map type, a file dialog appears so you can choose the image file.
- Drag a map to the Environment Map button. You can do this from a map displayed in one of the Compact Material Editor's sample slots, or from any map button that has been assigned, either in the Material Editor or from a projection light, and so on.
- Click the Environment Map button. The Material/Map Browser appears. Choose a map type from the list.
On the Environment panel, the name of the Environment Map button changes to show the type of map you chose, and Use Map turns on.
After setting up the map, you can test-render the scene without the mapped background by turning off Use Map.
You have set up the environment map, but to change the bitmap or adjust map parameters, you need to use the Material Editor.
You can also create a standalone map in the Material Editor first, and then choose it with the Material/Map Browser.
To put the map in the Material Editor:
- For the Compact Material Editor, drag the Environment Map button to a sample slot. For the Slate Material editor, drag the button to the active View.
A dialog asks whether to copy the map as a Copy or an Instance. Choose Instance.
The map is now in the Material Editor where you can adjust it by changing its parameters.
To change the color and tint of global lighting:
- Choose Rendering Environment.
- Click the color swatch labeled Tint.
A Color Selector appears.
- Use the color selector to set the tint applied to all lighting except ambient light.
- Use the Level spinner to multiply the overall lighting of the scene.
Shaded viewports update to show global lighting changes.
- Close the Environment dialog.
3ds Max uses the global lighting parameters when you render the scene.
To change the color of ambient light:
- Choose Rendering Environment.
- Click the color swatch labeled Ambient.
A Color Selector appears.
- Use the color selector to set the ambient color.
Shaded viewports update to show ambient color changes.
3ds Max also uses the new ambient color when you render the scene.
The color of ambient light tints the scene. For most renderings, the color of ambient light should be black.
- Close the Environment dialog.
To change the intensity of ambient light:
- Choose Rendering Environment.
- Click the color swatch labeled Ambient Light.
A Color Selector appears.
- Change the Value setting (the V component of the ambient light's HSV description) to increase or decrease intensity.
Shaded viewports update to show changes in the ambient light intensity.
- Close the Color Selector.
The intensity of ambient light affects contrast as well as overall illumination (the higher the intensity of ambient light, the lower the contrast). This is because ambient light is completely diffuse, so the angle of incidence is equal for all faces. Ambient light alone cannot show depth.
Note: 3ds Max has a default ambient light setting. You can change the default by using the Rendering panel of the Preference Settings dialog.
To add an atmospheric effect:
- Choose Rendering Environment.
The Environment and Effects dialog is displayed, with the Environment panel visible.
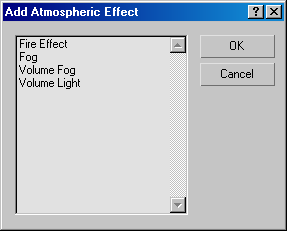
- Under Atmosphere on the Environment panel, click Add.
The Add Atmospheric Effect dialog appears.
- Choose the kind of effect you want to use, and then click OK.
The effect has now been added. Use the Atmosphere rollout to adjust parameters.
Interface
Common Parameters rollout
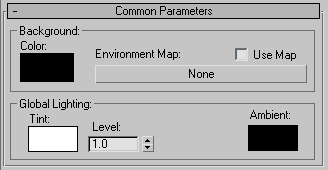
Background group
- Color
- Sets the color for the scene background. Click the color swatch, then select the color you want in the Color Selector. You can animate the color effect by changing the background color at a nonzero frame with the Auto Key button on.
- Environment Map
- The Environment Map button displays the name of the current environment map, or “None” if none has been assigned. The map must use Environmental mapping coordinates (spherical, cylindrical, shrink wrap, or screen).
To assign an environment map, click the button and use the Material/Map Browser to choose a map
You can also drag and drop a map from a Material Editor sample slot. If the Slate Material Editor is open, you can drag from a map node's output socket, then drop onto this button. You can also drag and drop from a map button in the Material Editor or anywhere else in the 3ds Max interface. When you drop a map onto the Environment Map button, a dialog asks if you want the environment map to be a copy (independent) or an instance of the source map.
The default Mapping mode for an environment map is Spherical Environment.
To adjust the environment map's parameters (for example, to assign a bitmap or change the coordinate settings), drag the Environment Map button to the Material Editor, and be sure to drop it as an instance. In the Compact Material Editor, drop the map over an unused sample slot. In the Slate Material Editor, drop it over the active View.
Note: If your scene includes animated bitmaps, including materials, projector lights, environments, and so on, the animation file is reloaded once per frame. Rendering performance slows down when your scene uses multiple animations, or the animations are themselves large files. - Use Map
- Uses a map for the background rather than the background color. Assigning a map turns on this checkbox. You can turn it off to revert to using the background color.
Global Lighting group
- Tint
- Tints all lights in the scene (except for ambient light) if this color is anything other than white. Click the color swatch to display the Color Selector, on which you can choose the tint color. You can animate the tint color by changing it at a nonzero frame with the Auto Key button on.
- Level
- Multiplies all lights in the scene. A Level of 1.0 preserves the original, individual light settings. Increasing the Level raises the lighting for the overall scene, and decreasing the Level lowers the overall lighting. This parameter is animatable. Default=1.0.
- Ambient
- Sets the color for the ambient light. Click the color swatch, and choose the color you want in the Color Selector. You can animate the light effect by changing the ambient light color at a nonzero frame with the Auto Key button on.
Atmosphere rollout
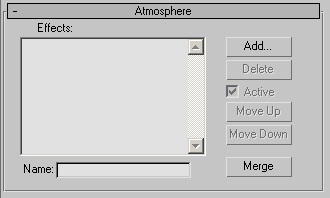
- Effects list
- Shows the queue of effects that were added. The effects are evaluated in linear order within the scene during rendering. Depending on the selected effect, the Environment dialog adds the appropriate rollout for the effect's parameters.
- Name field
- Gives a custom name to effects in the list.
For example, you might have different custom settings for different kinds of fire, that you could name Spark and Fireball.
- Add
- Displays the Add Atmospheric Effect dialog (all currently installed atmospheric effects). Select an effect and click OK to assign an effect to the list.
- Delete
- Deletes a selected atmospheric effect from the list.
- Active
- Sets the on/off state for the individual effects in the list. This is a convenient way to isolate effects within a list of complicated atmospheric functions.
- Move Up / Move Down
- Moves the selected item in the list up or down to change the order in which the atmospheric effects are applied.
- Merge
- Merges effects from other 3ds Max scene files.
When you click Merge, the Merge Atmospheric Effects dialog appears. Choose a 3ds Max scene, and then click Open. The Merge Atmospheric Effects dialog then lists the effects in the scene that can be merged. Select one or more of the effects, and then click OK to merge them into the scene.
The list shows the names of the atmospheric effects only, but when you merge an effect, the lights or gizmos bound to that effect are merged as well. If one of these objects you’re merging has the same name as one already in the scene, an alert appears giving you the following choices:
- You can rename the incoming object by changing its name in the editable field.
- You can Merge the incoming object without renaming, resulting in two objects in the scene with the same name.
- You can delete the existing object in the scene by selecting the Delete Old button.
- You can select Apply To All Duplicates, which performs the same action to all subsequent matching objects. Note: To control whether or not the renderer uses the environment map's alpha channel in creating the alpha for the rendered image, choose Customize Preferences Rendering, and then turn on Use Environment Alpha in the Background Antialiasing group.
If Use Environment Alpha is turned off (the default) the background receives an alpha of 0 (completely transparent). If Use Environment Alpha is turned on, the alpha of the resulting image is a combination of the scene and background image's alpha. Also, when writing TGA files with Pre-Multiplied Alpha set to off, turning on Use Environment Alpha prevents incorrect results. Note that only background images with alpha channels or black backgrounds are supported when compositing in other programs such as Photoshop®.
Note: To control whether or not a background image is affected by the renderer's antialiasing filter, choose Customize Preferences Rendering and then turn on Filter Background in the Background Antialiasing group. Default=off.