2D best practices
System Setup
- Use Alias-qualified hardware and graphics drivers.
- Use Alias-qualified tablet driver.
- Don’t update graphic drivers and tablet drivers without confirming that the newer drivers have been tested and approved by your internal testing or system department. Newer, untested software may not work as expected. If in doubt about appropriate driver versions, contact Autodesk support.
- Make sure that Enable overlay is turned off in your graphics card settings, for optimal performance. (Go to Start > Settings > Display, then Settings > Advanced > [graphics card name] > Performance and Quality Settings. Select Advanced Settings for Global driver settings. Scroll down to the bottom of the list. If Enable overlay is turned on, create a new profile by clicking Modify Profile and selecting Save as. Enter a new name for the profile, then turn off Enable overlay and click OK. Reboot your machine and relaunch Alias for the change to take effect.)
Startup
The first time you run Alias, you’ll be presented with a workflow selection.
Choose the Paint workflow if you want to work solely within a 2D environment. You can click the Do not show again check box so this window won’t appear every time you launch Alias.
If you have chosen a workflow setting and checked Do not show again, you can change the default workflow by choosing the workflow you want from Preferences > Workflows. Alias will launch the application in the same workflow that was active when you last exited the application.
Choosing the Paint workflow when Alias launches has the same effect as choosing Preferences > Workflow > Paint from the interface. It customizes palette, menus, shelves, marking menus, and control panel for a 2D (sketching) workflow. You can customize these further if you want, as described below).
The Palette window is closed by default in Paint mode. To open it, choose Windows > Palette.
The Paint mode also changes the behavior of File > New to behave like Canvas > New Canvas , creating a new canvas plane within its own Paint window
Customize your Alias workspace and environment
Simplify the Alias interface
Customize the tools you see in the Alias interface. For example, to customize the 2D tools,
- Choose Preferences > Workflows > Paint
 .
. - Now open Preferences > Interface > Hotkeys/Menus
 .
. - Turn off every menu item you don’t want to see in 2D paint mode.
This dramatically changes the way the product feels, because you no longer see the functionality you don’t use. The Autodesk Alias defaults should be viewed as a starting point to develop a custom setup.
Use the different short menu sets for different workflow tasks
For example, selecting Preferences > Workflows > Paint  switches you to a 2D paint interface, which removes all modeling, rendering and animation functionality and changes the default Alias colors to suit working on white paper. Switching to the paint interface also sets custom 2D marking menus and shelves.
Customize tool and menu options
Alias supports the ability to create default settings for every tool or menu item; this is very useful functionality if your requirements are different from the shipped defaults. Some designers like the Alias defaults for brushes; some prefer a different feel and appearance. Take the time to customize the product defaults to suit your own specific style of sketching.
Customize the tool shelf
Customize your shelf set to streamline common workflow practices. Painting and sketching is a very artistic occupation, so it’s important to spend the time to customize tools to meet your specific style and workflow.
You can create cascading menus on your shelves by adding tools above other tools. This enables you to create groupings of tools, and better organize your workflow. Cascading menus are indicated by a small yellow arrow.
Spacers enable you to create visual gaps or groupings on the shelf by using non-functional icons that further help you to organize your shelf.

For more information on using the spacers, see Preferences > Interface > Shelf Extras  .
.
Streamline your marking menus
Customize your marking menus to meet your specific workflow. Drag and drop any tool or menu item into the marking menu editor.
Streamline your hotkeys
Customize your hotkeys to meet your specific workflow. If you’re a 2D user, you may want Copy Image to be  +C instead of
  +
+  + C, and Paste Image to be
  + V instead of
  +
+  + V. Hotkeys can be customized using the hotkey editor.
The Special:Paint section in the Hotkeys/Menus editor also contains many brush modes, brush parameters (such as radius, opacity, etc) that can be mapped to hotkeys.
In particular, if you use high resolution canvases and want your brushes to keep the same appearance as on standard resolution canvas, you can scale several properties of your brush at once, by using the Size hotkey. By default it is mapped to the letter S. Choose a brush, press the S key, and drag the mouse to scale the Min/Max Radius, and Max Opacity of the brush at once.
Set your Wacom tablet buttons
The Wacom editor allows you to send hotkey events to the host application. Buttons 1 to 27 on the tablet can be used to quickly access common functionality like Canvas > New Canvas  by mapping the tablet buttons to Alias hotkeys.
Set your Wacom stylus buttons
The Wacom editor enables you to map the stylus switch buttons to left, middle and right mouse buttons. This is very important, because the defaults set by Wacom are not optimal for working with Alias.
Screen aspect ratio issues
If you define a hotkey (see Preferences > Interface > Hotkeys/Menus  ) for Windows > Control Panel, you can quickly toggle the Paint Panel on and off. This way, you have the screen aspect ratio suitable for side view sketches of long objects, like cars, and still have quick access to the paint tool options.
Paint panel shelf tabs
Take advantage of the Paint Panel shelf tabs. Click with the  on the Shelf Options menu, to create your own shelves. This gives you more window real estate by offering a compact alternative to the main shelf window. You can have and switch between color shelves, texture brush shelves, pencil shelves, and so on.
Remember the limitation that texture brushes saved on a default shelf will slow start-up. Consider creating your own texture brush shelf separate from your user defaults (see Customize the tool shelf), and only load the texture brushes when needed. Unload them before exiting if you have not saved your user_default.scm file, because the texture brushes will be saved automatically to your defaults when you exit if you don't have this file defined.
Application management
Try to minimize the number of running applications (for example, don’t run multiple sessions of Alias or have Alias, Photoshop, and Illustrator running at the same time). Automotive, Photoshop and Illustrator are memory and graphics card intensive applications, so be sensitive to this when working with lots of large canvas layers.
If you feel the application is sluggish after working for a while, monitor the memory used in the Task Manager and/or exit/restart Alias periodically and/or reboot the Windows machine.
Saving and file management
- Save often; use different file names through the day. For example, HotrodSUV_1pm and HotrodSUV_2pm.
- At the end of the day, clean up your disk and delete early file versions.
- Try to minimize the number of paint and shapes layers. As often as possible, merge layers into a logical design organization. For example, you may want different layers for different logical parts of a car: wheels, headlights, interior, exterior color, exterior highlights, and so on. Put related layers into a folder to improve canvas performance.
- Try to separate designs or themes into different files to keep file sizes down. Avoid cramming lots of data into one file, as this can push the software to the memory limits and it takes longer to save or open these files. Loading a file with 60 to 80 layers covering six design alternatives is not the best way of working. To evaluate many different design alternatives, export the images and use a tool such as Autodesk PortfolioWall.
- Set the canvas plane resolution before you start sketching. In Canvas > New Canvas
 options, you can set the width and height in pixels for new canvas planes. Alias has a preference for default canvas plane resolution (located in the Paint section of Preferences > General Preferences
  ); adjust the values for default canvas width and height to your specific requirements.Try to limit your maximum canvas size to 8 million pixels (for example width = 4000 and height = 2000).
 - Use Alias projects for different design projects. A project is a collection of folders used to store files. When you start a new design project, create a new Alias project and make the project current. From this point on, all import and export operations are specific to the project. Using an organized project system makes it easier to locate information in the future.
Tool management
Brush optimization
-
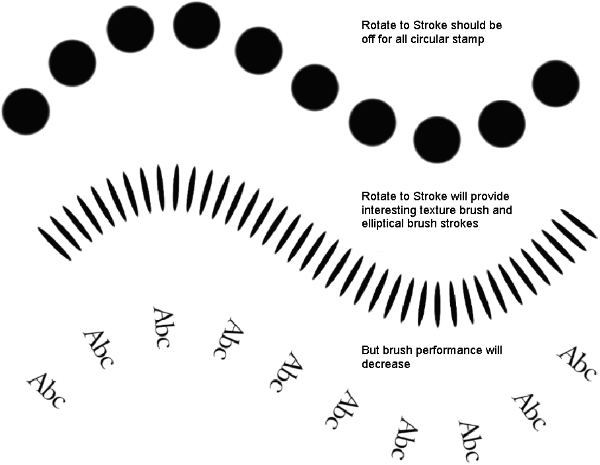
Only set a lower spacing bias (<1.0) and turn on Rotate to stroke when they are required for a specific brush effect. If non-optimal brush parameters are used, you may see performance degradation.
-
The brush parameter Rotate to stroke should only be used with texture brushes, shape brushes, or elliptical brush stamps because this requires extensive computation. With all other brush strokes, the rotation of a circular brush stamp is visually meaningless.
-
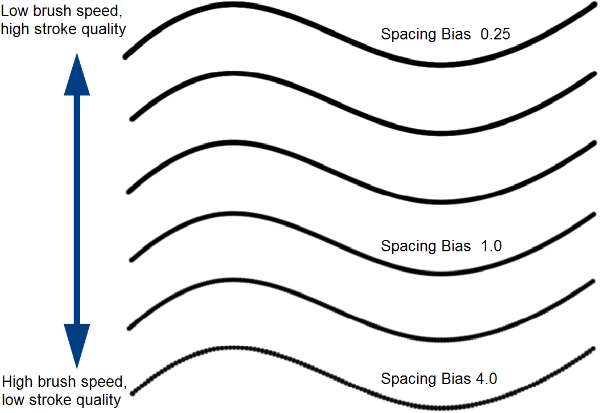
Reducing brush stamp spacing bias can dramatically improve brush stroke quality, but at a certain point reducing the spacing bias does not improve the stroke quality — it only reduces the performance. Increasing brush stamp spacing bias dramatically improves brush speed, but the visual appearance may not be a smooth stroke if the individual brush stamps are spaced too widely.
 Tip:
Tip:When sketching, find the balance between quality and speed. While a small brush stamp bias may improve the smoothness, it results in slower brush performance; using a large stamp bias provides additional speed, but may not provide the quality.
-
-
Texture brushes use a 64MB cache that pre-saves brush stamps in memory. This cache is dynamically saved and overwritten during the brush stroke. If the stroke varies in orientation and radius, the cache may be rewritten before the current stamp is required again along the stroke, causing the cache to be recalculated. What does this mean for you?
-
Texture brush strokes are slower when you first start using the brush until the texture stamp cache has pre-saved each texture size. If you notice a performance problem with a texture brush, select the texture brush and draw for a few seconds; undo, then use the brush normally. The initial strokes will pre-save the texture stamps in memory.
-
Large texture brushes with rotation and radius changes need to continually recalculate the texture stamp many times per second.
-
Smaller texture brushes or brushes with constant radius remain fast once the texture cache has been established.
Tip:Try to avoid big texture brushes that have variable brush radius or rotate to stroke turned on, as the combination slows performance.
-
-
Brush minimum radius size should be 1 pixel; settings lower than one pixel will affect brush quality.
Windows and brushes
- Turn off all unnecessary windows before you do brush strokes. The
 -Spacebar (Windows) key combination removes all floating windows, which improves brush speed and quality.
 - The automatic timer for hiding all the windows has a negative effect on brush quality at the start of the brush stroke. The timer can be set in the Paint section of Preferences > General Preferences
 . Setting the timer to 0 and using
  -Spacebar (Windows) to hide all floating windows provides the best result.
Geometry layers
- Manage NURBS curves with geometry layers when using curve snap with brush strokes. You will enhance performance when you assign logical curves sets to different geometry layers, and then use the layer visibility or layer state properties. Curve snap with many curves and geometries that can be snapped to will not provide real-time, smooth brush strokes.
- Layers > Set State > Pickable
 means a curve can be picked and be snapped to.
 - Layers > Set State > Reference
 means it cannot be picked but can be snapped to.
 - Layers > Set State > Inactive
 means it cannot be picked or snapped to.
- Layers > Set State > Pickable
Snapping
- Don’t click on the
 ,
,  , and
, and  snap buttons (to the right of the prompt line). Learn to use the modifier keys because you then know the snap state. It’s very easy to use the persistent buttons then spend time trying to understand why the brush is drawing strange strokes. Curve snap
  is computationally expensive, so use it only when required. Be aware that Alias attempts to snap to all invisible geometry.
Texture brush quality
- Always create new texture brushes with 0 rotation and 1 aspect ratio. If the texture is grabbed, rotated, and squashed, the brush quality will degrade slightly because every pixel in the brush stamp will be resampled.
Stroke quality using curve snap
-
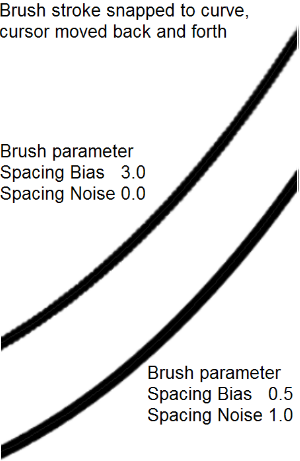
When brushing and using snap-to-curve functionality, the brush stamp is placed in the same relative position on the curve each time you move the cursor along the same region of the curve. This can cause the finished stroke to look rough or poorly aliased. If this is the case, add a little spacing noise to the brush stroke to ensure uneven stamp spacing and decrease the stamp spacing.
Picking and selecting
- To use Alias effectively, you must learn how to use the Pick tools. These tools, found in the tool palette or on the shelf, are dedicated selection tools, but they also set a selection mask that is used by the transformation tool. For example, if you want to move a CV on a curve, you should first choose Pick > Point Types > CV
 , then choose Transform > Move
  , and then select the CV you want to transform. From this moment on, any number of CVs can be moved until you change to another continuous tool.
 - The same workflow is repeated if you want to move a canvas or an image plane. Canvas planes can be picked with the Pick > Object
 tool, while image planes must be picked with Pick > Object Types > Image Plane
  . You then select a Transform tool. From now on, the system remembers the selection mask, so the transform tool will always attempt to pick either an object (including canvas planes) or an image plane.
 - To select a different type of object to transform, you must select a different Pick tool.
Shapes and multiple curve regions
-
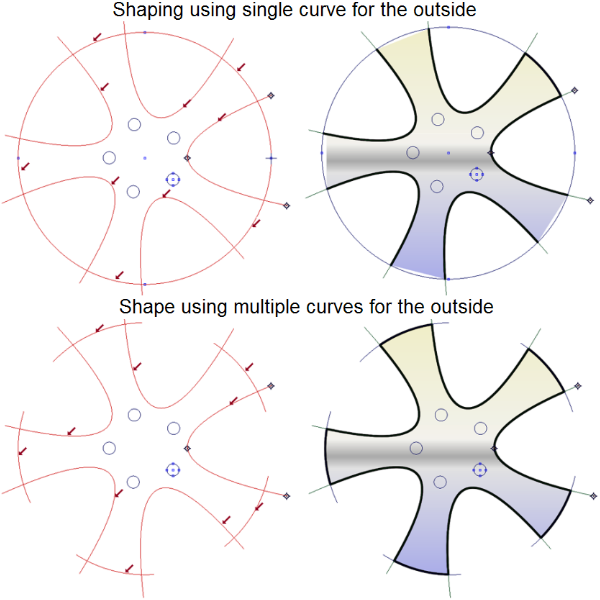
If you need to use two regions of the same curve to define a shape, click on each section while in the Paint > Shape tool, or choose Object Edit > Attach > Detach
 or Curve Edit > Curve Section
  to break the curve into separate segments.Note:
In the top image below, clicking once on the circle would work, but this might not always be the case for other configurations.
Re-use curves
-
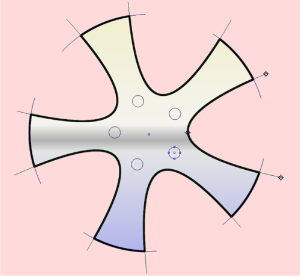
Each curve can be used any number of times to form different shapes. For example, the wheel example below shows how the curves have been used to define an image shape with a ramp fill and a mask shape.
Fast curve duplication
-
When repeating a design theme set Edit > Duplicate > Object
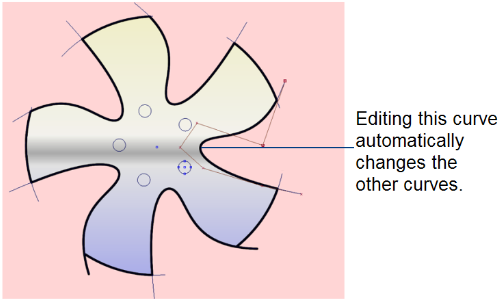
 options to create the copied geometry as instances. This will duplicate the curve as an instance, which means when you edit the original curve the instances will automatically reflect the design change. In this example, only one point on the original curve is moved; this automatically updates the other duplicated curves, which in turn automatically updates the shape object and the shape mask.
Curve creation
- Use blend curves whenever possible, because they automatically produce curves with good curvature properties and these curves support relationships to other curves.
- All curves drawn in Paint mode have their CVs, hulls and edit points turned off by default.
- Active curves are drawn in a turquoise blue color (light green for blend curves) while in Paint mode, to contrast with the default white canvas background.
Curve editing
Convenient curve editing tools in Paint mode are:
-
Transform CV
CVs are turned on when you click on a curve after choosing the Transform CV tool. See Control Panel > Transform CV.
-
Stretch
-
Transform curve
All of these tools can be accessed from the Shelf.
Curves with cusps
-
When you require a curve with a cusp (sharp change in direction), learn to use multiple curves. If you want a freehand brush stroke to be snapped to multiple curves, use Object Edit > Attach > Attach
 with the Type option set to Connect. When creating shapes (image, mask or invisibility mask) the software internally joins the curves.Note:
Attaching curves using the connect option is not a good modeling technique if you want to create surfaces using these curves.
Curve points: less is more
- Fewer points along a curve is an excellent technique to learn. A novice user will typically use up to twice as many points along a curve as an experienced user. Always try to minimize the number of points that define a curve.
Curve and surface fitting tolerances
- Use appropriate tolerances when modeling to suit the downstream CAD system. Don’t use extremely small tolerances thinking this will make the model more accurate: extremely small tolerances only create more complex geometry and make all modeling operations slower.
Fast shape and mask creation tools
-
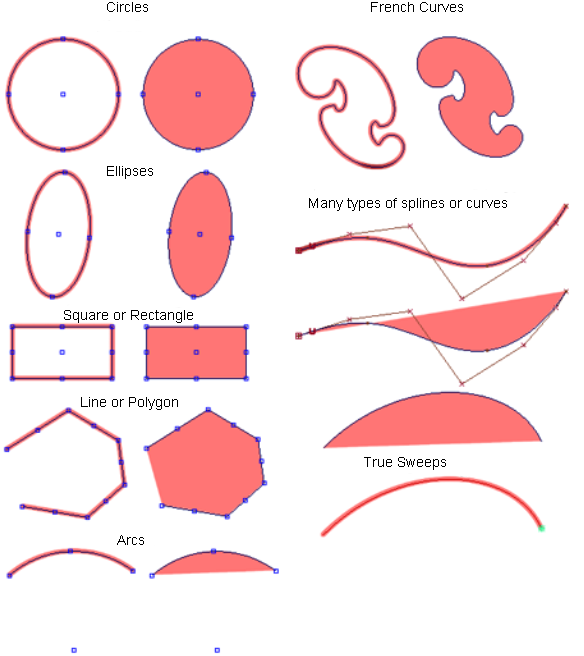
Use Auto-shapes. To quickly and easily create a simple image shape, mask shape, or invisibility mask shape, turn on Auto-Shapes in the paint panel. This will allow any Alias curve tool to automatically create shapes objects. Below is a small sample of the types of curves supported by Alias auto-shape functionality.
Symmetry
-
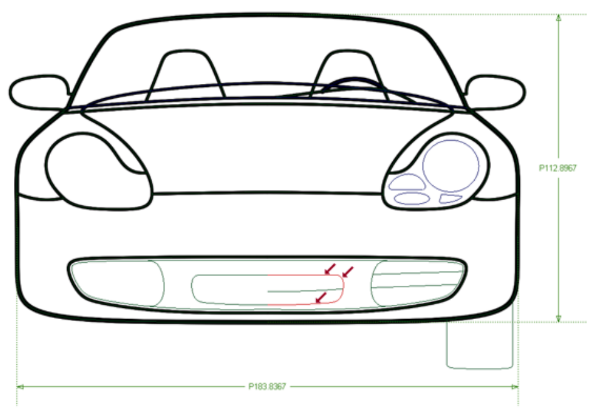
When an object is symmetric about an axis, use the geometry layer symmetry option. This option automatically creates symmetric curve and shape objects.
Curve evaluation
-
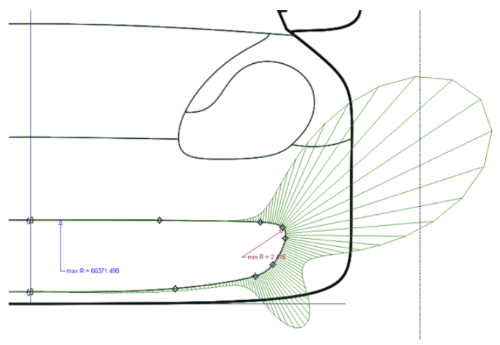
Use the Alias curve curvature tools to improve the line quality of your design.
Real world scale
-
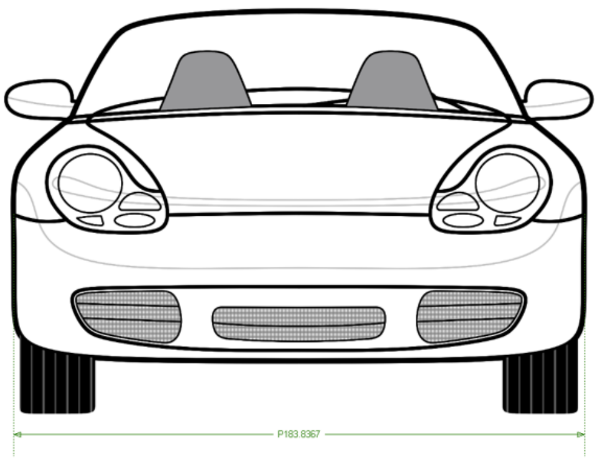
By using the curve tools and dimension tools, you can create elevation sketches or tape drawing at real world scale. Import 3D package constraints from the engineers and sketch over these constraints: don’t start sketching orthographic views without a concept of real world size or scale.
Printer color space versus RGB color space
-
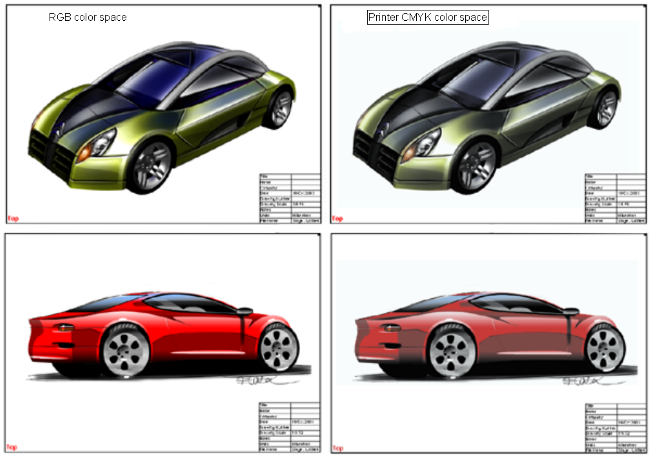
Learn what colors work well with your printer. Use the AliasPrint Preview window to get a better understanding of RGB and CMYK color spaces – they are different. Below is a simple example showing the difference between RGB and CMYK color spaces. Notice how switching from RGB to CMYK can make a dramatic sketch look flat and boring. Every printer in the world has a unique color space in how it deals with hue, saturation and value – learn what colors and saturations work well with your printer. Don’t spend time creating a fabulous sketch on the screen that prints out or electronically projects poorly.
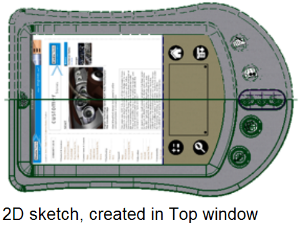
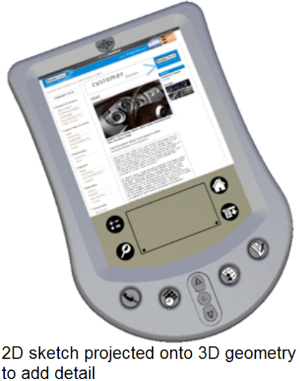
Add design detail to 3D models quickly
-
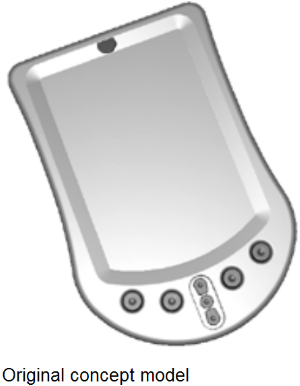
Use the sketch projection workflow to add detail to early 3D concept models.
Related Tasks
- Create custom tools and diagnostic shaders
- Customize shelves
- Create and edit hotkeys
- Reshape or position a curve to intersect other curves
- Project a sketch to quickly add design details