Use this procedure to create a custom wall or a wall component by defining its shape from a profile.
You can create the profile as you add it to a wall. However, if the shape you need is elaborate and has curved segments, you may find it easier to create the profile from a polyline first. You can then add the profile to the wall.

Adding a sweep profile to a wall
- Select the walls to sweep.
- Click
 .
. 
- Select the component to which to apply the sweep.
- Select the profile to use for the sweep.
If you want to define the sweep after you apply it to the component, select Start from scratch, and enter a name for the profile.
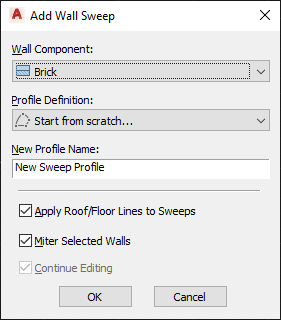
Specifying settings for a wall sweep
- Specify how the sweep is applied to the wall:
If you want to … Then … apply existing roof line or floor line conditions to the sweep select Apply Roof/Floor Lines to Sweeps. use the geometry of the sweep to define the roof line and the floor line clear Apply Roof/Floor Lines to Sweeps. miter the intersection of the wall containing the sweep and other walls select Miter Selected Walls. prevent mitering the intersection of the wall containing the sweep and other walls clear Miter Selected Walls. You can miter the walls later, if needed. You can also adjust the miter angles. change the geometry of the sweep when it is applied to the wall select Continue Editing. use the existing geometry of the profile to define the sweep clear Continue Editing. - Click OK. Tip: To create additional walls with the same sweep condition, select the wall with the sweep, and click.
