Uses command prompts to fill an enclosed area or selected objects with a hatch pattern, solid fill, or gradient fill.
The following prompts are displayed.
Internal Point
Determines a boundary from existing objects that form an enclosed area around the specified point.
- Pick Internal Point
-
While specifying internal points, you can right-click in the drawing area at any time to display a shortcut menu that contains several options.
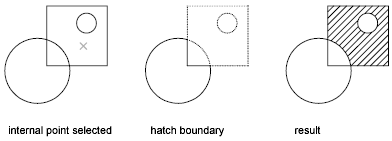
If you turn on Island Detection, objects that enclose areas within the outermost boundary are detected as islands. How HATCH detects objects using this option depends on which island detection method is specified.
Note: Red circles are displayed at unconnected endpoints of boundary objects to identify gaps in the hatch boundary. These circles are temporary and can be removed with REDRAW or REGEN.
Properties
Specifies new hatch pattern properties to apply.
- Pattern Name—Predefined or Custom
-
Specifies a predefined or custom pattern in the PAT file format such as acad.pat or acadlt.pat.
Enter the pattern name followed by an optional hatch style code. Precede the pattern name with an asterisk (*) to fill the area with individual lines instead of a hatch object.
- ?—List Pattern Names
-
Lists and describes the hatch patterns defined in the PAT file.
- Solid
-
Specifies a solid fill and redisplays the first HATCH prompt, where you can define a boundary.
- User Defined
-
Specifies a user-defined pattern. Enter u, followed by an optional hatch style code. Precede the u with an asterisk (*) to fill the area with individual lines instead of a hatch object.
- Double Hatch Area
-
Specifies a second set of lines to be drawn at 90 degrees to the original lines.
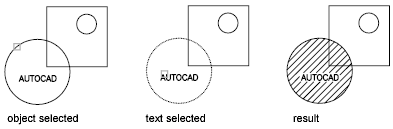
Select Objects
Determines a boundary from selected objects that form an enclosed area.
- Select Objects
-
Interior objects are not automatically detected. You must select the objects within the selected boundary to hatch or fill those objects according to the current island detection style.
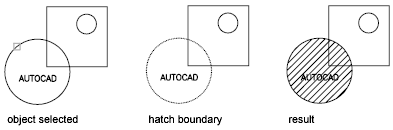
Each time you click Select Objects, HATCH clears the previous selection set.
While selecting objects, you can right-click at any time in the drawing area to display a shortcut menu. You can undo the last selection or all selections, change the selection method, change the island detection style, or preview the hatch or fill.
Draw Boundary
Uses specified points to define the boundary of a hatch or fill.
The options that are available as you specify points are also available in PLINE. When you complete the polyline boundary, press Enter. You can then create additional polyline boundaries, or press Enter to twice to apply the hatch.
To enclose an area completely, use the Close option. Do not make the first and last points coincident.
Remove Boundaries
Removes from the boundary definition any of the objects that were previously added.
- Select Objects
-
Removes objects from the boundary definition.
- Add Boundaries
-
Adds objects to the boundary definition.
Advanced
Sets the method used to create the hatch boundary.
Boundary Set
Specifies a limited set of objects, called a boundary set, for evaluation by the pick point of the hatch
- New
-
Creates a boundary set from the selected objects.
- Everything
-
Creates a boundary set from everything visible in the current viewport. Selecting this option discards any current boundary set and uses everything visible in the drawing or in the current viewport.
Retain Boundary
Creates an object that encloses each hatch object.
Island Detection
Specifies whether to use objects within the outermost boundary as boundary objects.
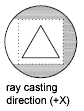
Specifying no island detection prompts for the ray casting method.
- Nearest
-
Runs a line from the point you specify to the nearest object and then traces the boundary in a counterclockwise direction.
- +X
-
Runs a line in the positive X direction from the point you specify to the first object encountered and then traces the boundary in a counterclockwise direction.
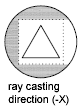
- -X
-
Runs a line in the negative X direction from the point you specify to the first object encountered and then traces the boundary in a counterclockwise direction.
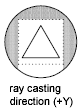
- +Y
-
Runs a line in the positive Y direction from the point you specify to the first object encountered and then traces the boundary in a counterclockwise direction.
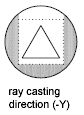
- -Y
-
Runs a line in the negative Y direction from the point you specify to the first object encountered and then traces the boundary in a counterclockwise direction.
- Angle
-
Runs a line at the specified angle from the point you specify to the first object encountered and then traces the boundary in a counterclockwise direction.
Style
Specifies the method used to hatch or fill objects within the outermost hatch boundary. If you have selected no internal objects, a hatching style has no effect. Because you can define a precise set of boundaries, it's often best to use the Normal style.
- Ignore
-
Ignores all internal objects and hatches or fills through them.

- Outer (Recommended)
-
Hatches or fills inward from the outer boundary. HATCH turns hatching or filling off if it encounters an internal island. This option hatches or fills only the outermost level of the structure and leaves the internal structure blank.

- Normal
-
Hatches or fills inward from the outer boundary. If HATCH encounters an internal island, it turns off hatching or filling until it encounters another island within the island.

Associativity
Specifies that the new hatch pattern is updated when its boundaries are modified.
A new hatch pattern's associativity is set by the HPASSOC system variable. Changing the associativity setting here also changes the setting in the HPASSOC system variable.
Gap Tolerance
Sets the maximum size of gaps that can be ignored when objects are used as a hatch boundary. The default value, 0, specifies that the objects must enclose the area with no gaps.
Any gaps equal to or smaller than the value you specify in the gap tolerance are ignored, and the boundary is treated as closed.
Separate Hatches
Controls whether the command creates a single hatch object or multiple hatch objects when several separate closed boundaries are specified.
Draw Order
Assigns the draw order to a hatch or fill. You can place a hatch or fill behind all other objects, in front of all other objects, behind the hatch boundary, or in front of the hatch boundary.
Origin
Controls the starting location of hatch pattern generation. Some hatches, such as brick patterns, are meant to be aligned with a point on the hatch boundary. By default, all hatch origins correspond to the current UCS origin.
- Use Current Origin
-
Sets the value of the HPORIGINMODE system variable. The last 5 options listed below correspond to the values 1-5.
- Set New Origin
-
Specifies the new hatch origin point directly.
- Default to Boundary Extents
-
Calculates a new origin based on the rectangular extents of the hatch. Choices include each of the four corners of the extents and its center. You can also store the value of the new hatch origin in the HPORIGIN system variable.
Annotative
Specifies that the hatch is annotative. This property automates the process of scaling annotations so that they plot or display at the correct size on the paper.
Hatch Color
Overrides the current color with a specified color for hatch patterns and solid fills. The color value is stored in the HPCOLOR system variable. When Hatch Type is set to Pattern, you can also specify a new background color. The background color value is stored in the HPBACKGROUNDCOLOR system variable.
To set the hatch color back to the current color for objects, enter “.” or Use Current. To turn off the background color, enter “.” or none.
- Default Object Color
-
Enter the color number (1 through 255) or the color name (the names for the first seven colors). For example, you can specify the color red by entering the ACI (AutoCAD Color Index) number 1 or the ACI name red. You can also set the hatch color to ByLayer or ByBlock.
- Truecolor
-
Specify an RGB color expressed as values from 0 to 255, such as 210,155,95.
- Colorbook
-
Specify a custom color from a color book installed on your system.
Layer
Assigns new hatch objects to the specified layer, overriding the current layer. Enter Use Current or “.” to use the current layer. (HPLAYER system variable)
Transparency
Sets the transparency level for new hatches or fills, overriding the current object transparency. Enter Use Current or “.” to use the current object transparency setting. (HPTRANSPARENCY system variable)