Create a drawing, add drawings to the project, and view drawings in Project Manager.
A single project file can have drawings located in many different directories. There is no limit to the number of drawings in a project. You can add drawings to your project at any time. When you create a drawing, using the New Drawing tool, it is automatically added to the active project.
Many of the drawing settings used by AutoCAD Electrical toolset are stored in a smart block on the drawing named WD_M.dwg. Each AutoCAD Electrical toolset drawing should contain only one copy of the WD_M block. If multiple WD_M blocks are present, the settings cannot be stored and read consistently.
Create a drawing
- In the Project Manager, click the New Drawing tool.

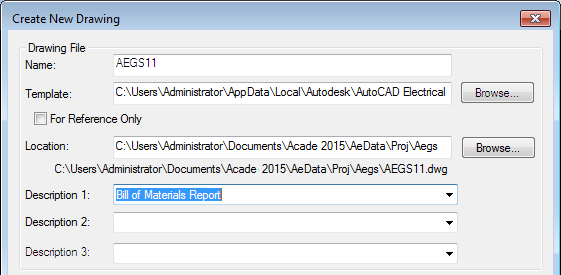
- In the Create New Drawing dialog box, specify:
Name: AEGS11
Description 1: Bill of Materials Report
- Click Browse next to the Template edit box.
A set of templates (*.dwt files) installed with AutoCAD Electrical toolset contain settings for various kinds of drawings, such as acad.dwt and ACAD_ELECTRICAL.dwt.
You can create your own templates, or use any drawing as a template. You can save a drawing at any stage of completion as a template file. When you use a drawing as a template, the settings in that drawing are used in the new drawing. The changes you make to a drawing that is based on a template do not affect the template file.
AutoCAD Electrical toolset fully supports the use of AutoCAD template files. To make an AutoCAD drawing compatible with AutoCAD Electrical toolset, select an AutoCAD Electrical toolset command to modify the drawing.
- In the Select template dialog box, select
ACAD_ELECTRICAL.dwt, and click Open.

- In the Create New Drawing dialog box, click OK.
Note: You could click OK-Properties to display the Drawing Properties dialog box. This dialog box has options like the options found in the Project Properties dialog box. It defines drawing-specific settings that are maintained inside the WD_M block of the drawing.
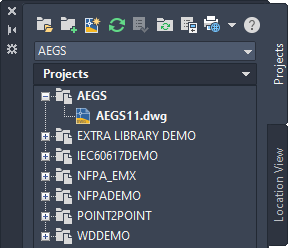
- In the Project Manager, double-click the project name (AEGS) to display the drawing files. AEGS11 is the only file in the list.

Add drawings to the project
- In the Project Manager, right-click AEGS, and select Add Drawings.
- In the Select Files to Add dialog box, select drawings AEGS01.dwg to AEGS10.dwg and click Add.
- When asked whether to apply the project default values to the drawing settings, click Yes.
The Project Manager lists the files under the AEGS folder. New drawings that you add from this point on are added at the end of the drawing order. You now have access to the files required for the exercises in this book.
Note: Two projects can reference the same drawing file. However, if both projects try to modify the same drawing with a project-wide tagging or cross-referencing function, it can lead to conflicts.The drawing order in the Project Manager determines how AutoCAD Electrical toolset processes the drawings during project-wide operations such as resequencing and wire numbering.
- Drag the drawings to put them in order, with AEGS11 at the end of the list.
Note: The active drawing displays in bold text in the project drawing list. You can easily see which file you are working in.

You can add descriptions for each drawing to the project file. You can reuse drawing descriptions in title block attributes and associate them with AutoCAD Electrical toolset reports.
Add the description of a drawing you add
- In the Project Manager, right-click
AEGS10.dwg, and select Properties
 Drawing Properties.
- In the Drawing Properties
 Drawing Settings dialog box, Drawing File section, specify:
Description 1: Connector Drawing
- Click OK.
- In the Project Manager, select AEGS10.dwg.
- In the Project Manager, Details section, review the drawing descriptions.
The drawing details update when you highlight a drawing file and remain visible until a new drawing file is selected. Displayed information includes the status, file name, file location, file size, last saved date, and the name of the last user who modified the file.
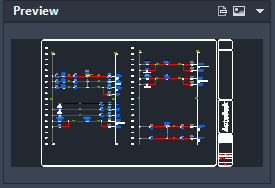
Use the Project Manager to preview drawings easily. Moving among drawings using the up and down keys does not open the drawing. It changes the preview or details display in the Project Manager.
View drawings in a project
- In the Project Manager, select AEGS04.dwg.
- In the Project Manager, Details section, click Preview.

- Continue to click the drawing name you want to preview or use the up and down arrow keys to scroll through the drawing files.
- When you finish viewing the drawings, click Details to return to the drawing details view.
If a project drawing is currently open and you want to move to the previous or next drawing in the list of the project, use the Previous Project Drawing and Next Project Drawing tools. When you move among drawings, any unsaved changes to the current drawing are saved, the drawing is closed, and the requested drawing is opened.
View project drawings when a drawing is open
- In the Project Manager, double-click AEGS04.dwg.
- To view the drawings, Click

 . Find
or Click

 . Find
A new window opens and the original window closes when you click the navigation tools unless you hold the Shift key while clicking the tools.