- Click the
Features
 step in the
Steps panel.
step in the
Steps panel.
This displays the New Feature wizard.
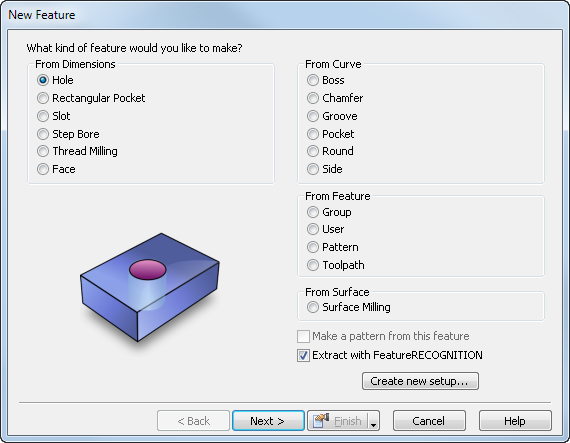
- Select
Rectangular Pocket
and click
Next to open the
New Feature - Dimensions page. Enter the following attributes:
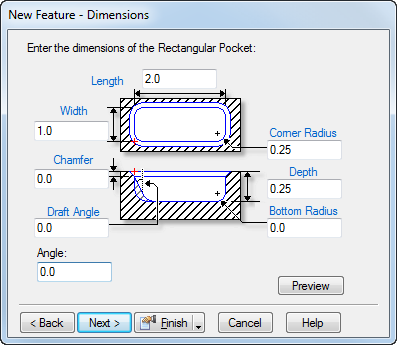
- Length — Enter the X dimension of the feature.
- Width — Enter the Y dimension of the feature.
- Depth — Enter the distance cut into the material in Z.
- Corner radius — Enter the radius for all four corners of the Rectangular Pocket.
-
Chamfer — Optionally enter the depth of a 45
 chamfer cut at the top edge of the feature. Leave this value at the default,
0, for no chamfer.
chamfer cut at the top edge of the feature. Leave this value at the default,
0, for no chamfer.
- Draft angle — Optionally set an angle for the feature wall. Use only positive numbers.
- Bottom Radius — Optionally set a bottom radius for the feature. The radius corresponds to the shape of the cutter. By default, the material is milled using a flat-bottomed mill, making stair-step passes when close to the radius. Then a rough and finishing pass is made with the radiused mill. The default value is 0, which cuts a square corner.
- Click Next to open the New Feature - Location page.
- Click Next to open the New Feature - Strategies page.
- Click Next to open the New Feature - Operations page.
- Click Next to open the New Feature - Default Tool page for the first operation.
- Click Next to open the New Feature - Feed/Speed page for the first operation.
- If you have more than one operation, clicking Next opens the New Feature - Default Tool page for the next operation. If you have no more operations, clicking Next opens the New Feature - Summary page.
- Click Finish to create the feature and exit the wizard or click Back to return to previous pages.
Tip: If a dimension field has a
blue label, you can click it and 'pick' the dimension from objects in the graphics window.
Note: You can
edit the feature later.
If you want the wall of your feature to have a special cross section:
- After you have created the feature, open the Feature Properties dialog and click the Dimensions tab.
- Click the X Section button to open the Select Side Curve dialog.
- Select the curve that matches your cross-section shape.
- Click OK.