This page helps you select the roughing stage. In this stage you remove the majority of the material.
- Enter the Tool Diameter. This is the diameter of the tool. The tool is a flat end tool for Z level rough and a ball end tool for all other operations.
- Enter the Finish Allowance. This is the amount of material left after a 3D roughing pass.
- Enter the Tolerance. This sets how close the milling is to the mathematically ideal surface. This does not guarantee that your feature is machined to this tolerance in all locations if the tool you select is incapable of cutting within that tolerance in constrained areas. If your part shows a faceted appearance, set the tolerance to a lower value.
- Select the roughing operation type from:
- Z Level Rough — You must set Classify slices as either 3D Pocket or 3D Boss.
-
Plunge — You must also decide if you want a
Honeycomb pattern.
Plunge roughing is performed in either a straight rectangular pattern, as shown below:
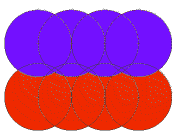
or a honeycomb pattern in which each row is offset horizontally by half the rough pass stepover amount:

The honeycomb pattern is usually preferable. The Honeycomb pattern attribute controls the pattern type.
- None — Select this option if you don't want a rough pass.