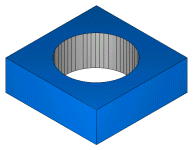
The 2-axis Die feature requires one or more closed curves. It is assumed that the region(s) outside of the curve(s) is the part that you keep, so the wire travels on the inside of the curve(s).
The thickness parameter is used to access the appropriate cutting data table.
The A parameter is used to rotate the feature around the Z-axis of the current Setup.
A 2-axis Die feature can create a number of cutting operations. These are specified on the Strategy tab.
A 2-axis Die feature can have a taper.
To create a 2-axis Die feature:
- Create the curve that defines the shape of the feature.
- Click the
Features
 step in the
Steps panel to open the
New Feature wizard.In the
2 Axis section, select
Die, then click
Next to open the
New Feature - Curves page. Select the curve(s) for the feature.
step in the
Steps panel to open the
New Feature wizard.In the
2 Axis section, select
Die, then click
Next to open the
New Feature - Curves page. Select the curve(s) for the feature.
- Click Next to open the New Feature - Location page.
- Click Next to open the New Feature - Dimensions page.
- Click Next to open the New Feature - Start page.
- Click Next to open the New Feature - Strategies page.
- Click Next to open the New Feature - Operations page.
- Click Next to open the New Feature - Cutting Data page for the first operation.
- If you have more than one operation, clicking Next opens the New Feature - Cutting Data page for the next operation. If you have no more operations, clicking Next opens the New Feature - Summary page.
- Click Finish to create the feature and exit the wizard or click Back to return to previous pages.
Note: You can
edit the feature later.