Inside/Outside grooves are side grooves machined using keyseat cutters, and include both a roughing and finishing pass.
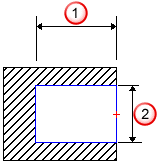
 — Depth
 — Width
They can:
- be of any non-intersecting shape that is open enough to allow a cutter to enter, operate, and exit;
- only cut to widths of tools you have available;
- and only cut to the tool's shape by default.
Tip: If you load special tools and create multiple grooves, you can achieve special effects.
For an ID/OD groove, FeatureCAM uses the following process:
- Determines what tool to use based on the width and depth of the groove, and from the current tool crib, picks a keyseat tool using the length and diameter as the tool selection criteria.
- Tool length is determined based on the depth of the groove. The tool must fit all the way into the depth of the groove. If multiple steps need to be taken to manufacture the groove, then those steps can be made to reach the full depth.
- Tool width is matched to the width of the groove within a small tolerance. If the groove is too big, then you get a tool selection error.
- Chooses feeds and speeds for milling using the customizable Feed/Speed database. Feeds and speeds are determined based on the stock material.
- Generates a roughing pass. The groove is first cut down the center of the groove, with subsequent passes alternating on either side of the center. Different allowances are possible on the walls and bottom of the groove.
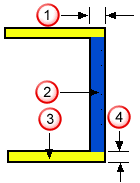 — Finish allowance
— Bottom
— Finish allowance
— Bottom
 — Wall
 — Wall finish allowance
The important aspects of roughing are as follows:
- Getting to depth — There are two aspects to getting the keyseat cutter to depth. The tool must first move down in Z, and then it must plunge into the metal. For the down move, the keyseat cutter simply plunges down. You must have air underneath the cutter for this move. You may set the pre-drill point to determine where the keyseat cutter is lowered in Z. Then the tool plunges into the material horizontally. There are no options to control the plunge into the material.
- Vertical step — No vertical steps are taken. You get a tool selection error if the tool width is not exactly as wide as the groove.
- Horizontal stepover — Rough pass stepover can override the horizontal stepover into the groove. Otherwise FeatureCAM automatically takes as many steps as it needs to cut to the full depth of the groove. The default is 33% of the tool diameter.
- Generate a finishing pass. The finishing pass is based on the
Finish walls and
Wall pass attributes.
- Tool selection — After roughing, the roughing tool is used to finish the groove. Use Finish Tool commands FeatureCAM to choose a separate finishing tool (that has the same characteristics unless you override them).
- Ramp on — This makes the finish pass ramps into the material with an arc equal to a percentage of the tool diameter (see Ramp diameter).
- Finish passes and overlap — The tool goes around the groove a number of times set by Finish passes, and overlaps the starting point by an amount controlled by Finish overlap.
- Ramp off — This uses another arc of the same size as the ramp on moves the tool away from the finished wall.
- Retract — This removes the tool from the stock area and sets up for the next operation.
You can edit this process in these places:
- To edit all instances of this type of feature in the current document, use the Machining Attributes dialog.
- To edit a single feature, use the Tools, Milling, Strategy, and Misc. tabs for the feature in the Feature Properties dialog.
The tooling database also has a large impact on how a feature is machined, and the feed/speed database helps to determine the feeds and speeds used.