Wind fan — Select this option to have a single point that is used as both the start and end point of the Finish path. This is useful for machines which require large lead moves to enable cutter compensation.
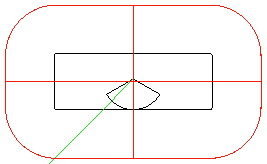
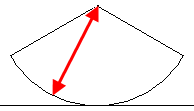
Wind fan radius — Enter the radius to use for the wind fan shape as a percentage of the thread-milling tool radius. Increasing the Wind fan radius moves the start point of the toolpath further from the feature boundary.
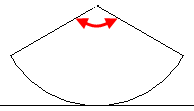
Wind fan angle — Enter the angle to use for the wind fan shape. The wind fan angle is a combination of the lead-in and lead-out arc angles.
Linear ramp distance — Enter the length of the linear approach move to a Thread feature.
Ramp diameter % — This attribute controls the diameter of the arc along which the tool ramps on and off the Thread Milling feature. Enter a percentage of the tool diameter.
Negative angles create a ramp on a clockwise arc. If set to a value greater than 1000, the tool moves in on a straight line tangent to the initial cutting move. If set to 0, the tool approaches perpendicular to the initial cutting move.
This angle controls the starting and ending points of the ramp moves of a Thread Milling feature. The tool starts ramping along the arc of radius Ramp diameter % using the Ramp angle offset to determine the start point of the ramping move. If positive, the arc is counter-clockwise.
Rough — Select this option to include a roughing operation when you create a thread milling feature. Enter a Stepover in % for the roughing operations. You can edit the attributes of the roughing operations using the Milling tab of the Thread Milling Properties dialog when the roughing operation is selected in the Tree View.
Finish — Select this option to include a finishing operation when you create a thread milling feature.Enter an Allowance and number of Spring passes for the finishing operations. You can edit the attributes of the finishing operations using the Milling tab of the Thread Milling Properties dialog when the finishing operation is selected in the Tree View.
Spring passes — A spring pass is a duplicate of the final threading pass. Spring passes indicates the number of spring passes that are to occur at the completion of the thread.
Starts — Enter a value greater than 1 for multiple start threads.
Start angle — Measured counter-clockwise, the Start angle determines the starting point of the thread.
Tooth overlap — Enter the number of threads that one revolution of a multi-thread tool overlaps the previous revolution. An overlap of at least one thread is recommended.
|
|
|
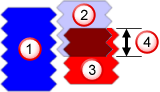
 Thread feature
 Tool revolution 1
 Tool revolution 2
 Tooth overlap
Tooth outside — Enter the number of teeth that are above (if feeding in negative Z) or below (if feeding in positive Z) the thread mill feature for the first pass.
Taper approx. angle — For tapered threads the toolpath is increasing in diameter as well as moving in Z. These moves are approximated with 3D arcs. The Taper approx. angle is the angle around the thread that will be approximated by a single arc. A 360 must be evenly divisible by the Taper approx. angle. For example, if set to 90, a single revolution of the tool is broken into 4 arcs.
OD Depth % — The default ratio of Pitch to Thread Height for OD Thread Milling features.
ID Depth % — The default ratio of Pitch to Thread Height for ID Thread Milling features.
Helical Ramping
Partline program — This is a particular kind of cutter compensation for milled features. If enabled, the drawing dimensions of the feature are output as the toolpath instead of the center line of the tool. The tool selected to cut the feature is still important even when using part line programming. If the same tool is used for roughing, be sure that the actual tool diameter does not deviate too far from the diameter of the tool used by FeatureCAM to ensure proper area coverage for the roughing passes. Also ensure that the diameter of the selected finishing tool is small enough to cut your entire feature. If you have selected a tool too large to fit into a tight corner, you cannot correct the toolpath with just cutter compensation.
FeatureCAM automatically calculates the entrance point of your finish pass and adds a linear move and a ramping move (based on the Ramp diameter attribute) to your finish pass to accommodate cutter compensation. If you receive a warning in the operations list such as "Can't find ramp in/out arc" or "Can't extend end of open profile" then correct the problem by decreasing the Ramp diameter attribute or changing the Pre-drill point.
Through — Select Through to increase the hole length by 10% of the hole diameter to account for the drill tip and prevent burring. If Through is deselected, the toolpaths are generated to ensure that the tool does not cut past the end of the thread.