Use the Strategy tab of the Milling Feature Properties dialog to edit the machining strategy of a Milling feature.
Climb mill — Select this option to have the tool on the left side of the machined edge (in the direction of tool travel). Disable it for conventional milling, with the tool on the right side of the machined edge.
Individual rough levels — Select this option to list each Z-level of the rough pass separately, which enables you to specify separate attributes and tools for each Z-level.
Depth first — Select this option to cut each region of a feature completely before moving on to another region. The toolpaths descend in Z.
Minimize tool retract — Select this option to reduce the amount of retracting that the tool does while milling a feature. Instead of retracting, the tool continues feeding to its next location.
Partline prog — Select this option to use the drawing dimensions of the feature for the toolpath instead of the centerline of the tool. You can only use this option when cutter compensation is enabled.
Finish Cutter comp — Select this option to use cutter compensation for the finish and semi-finish operations.
Operations
Pre-drill — Enable this option to add a pre-drill operation to the feature.
Pre-drill diameter — Enter the diameter for pre-drill holes. Ensure the diameter is large enough to allow the milling tool to enter the stock.
Roughing
Rough pass — Enable this option to add a Rough operation to the feature.
Stepover — Select the stepover type for the roughing operations.
Bi-directional rough — Select this option to machine the feature in both directions.
Rough cutter comp — Select this option to use cutter compensation for the rough operations.
Finishing
Finish pass — Enable this option to add a finish operation to the feature.
Finish bottom — Select this option to use a flat endmill to finish the bottom of the feature. When this is selected, use the Bottom finish allowance on the Milling tab to specify the amount of material to leave after the roughing pass.
Stepover — Select thestepover type for the finish passes.
Wall pass — Enable this option to finish the bottom of the feature up to the Finish allowance on the wall, then finish the walls in a separate pass.
NT toolpaths — Select this option to use NT toolpaths for the Finish pass.
Semi-finish pass — Enable this option to add a Semi-finish operation to the feature.
Use finish tool — Select this option to create a separate tool for the finish operation.
Ramp from top — Disable this option to avoid ramping to depth on the Finish and Semi-finish pass of a 2.5D feature. This saves machining time.
This example shows the Finish operation for a Side feature.
|
Ramp from top on:
|
Ramp from top off:
|

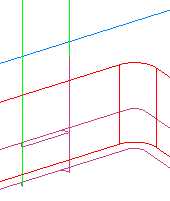
Select this option to ramp the tool to the cutting depth from the top of the feature.
Helical side finish — Enable this option to use a continuous spiral for the Finish pass. Enter a Pitch to control the tightness of the spiral.
Wind Fan — Click this button to open the Wind Fan Finish Options dialog.
Face features
Connect stepovers with arc — Select this option to use an arc to connect stepovers to prevent sharp direction changes.
Thread mill features
Feed Direction — Select from Negative or Positive. The direction depends on the handedness of the tool, the thread, and whether it is an OD or ID thread.
Simple Groove features (Engraving)
Reverse cut — Select this option to reverse the direction that the feature is cut. Engraving features are cut in a single pass.
Side Groove features
Plunge gouge check — Deselect to disable gouge checking on the plunge and retract moves. This is available only when Use new ID/OD groove toolpath is selected on the Milling page of the Machining Attributes dialog.