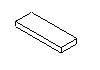
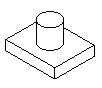
Extrude creates a solid design feature by pushing a curve in a straight line. Below are examples of an add extrude with a circle as the curve and a cut extrude with a rectangle as the curve.
To create a solid extrude design feature:
- Select Construct tab > Solids panel > From Curves > Extrude to display the Extruded Solid dialog.
- Optionally enter a Name for the solid, or leave the default name.
- Select the type As New Base Solid, As Add, or As Cut.
- Select the curve name in the
Curve list or click the
Pick Curve
 button and select the curve in the graphics window.
- Specify the parameters of the extrude. You can do this in one of two ways:
- Enter the specific Vector of the extrude.
- Enter the points to extrude From and To.
- If you want to draft the walls of the surface, enter a Draft Angle.
- Click the Preview button to see a line drawing of the feature.
- If you displayed this dialog from the Solid toolbar, you can click Apply to preview the feature as a solid. If the cut is on the wrong side of the curve, click Flip side to Cut and click Apply again to verify.
- Click OK.
You can use open curves for solid base extrudes or solid cut extrudes. You cannot use them for solid add extrudes. For base extrude solids, a sheet is created without any end caps.

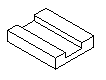
For cut extrude solids, you must ensure that the cut will divide the solid into two distinct pieces like in this figure.
When working with open curves, an additional option called Flip Side to Cut is displayed. After previewing your result, you can select this option if you want to keep the solid on the other side of the extrude.