UV Points settings are available for all surface shapes, except for flat.
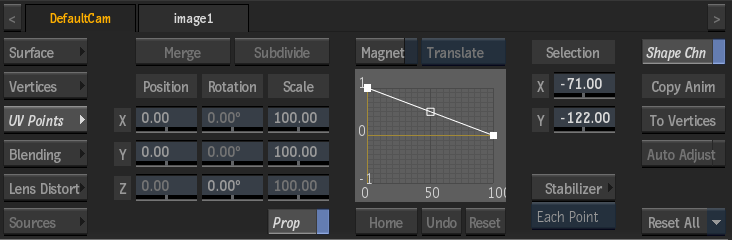
- Merge button
- Click to merge the extended bicubic surface sections (can be clicked multiple times).
- Subdivide button
- Click to subdivide the extended bicubic surface into more sections (can be clicked multiple times). See Subdividing an Extended Bicubic.
- X Position field
- Displays the position of the selected surface points along the X axis. Editable.
- Y Position field
- Displays the position of the selected surface points along the Y axis. Editable.
- Z Rotation field
- Displays the rotation of the selected surface points along the Z axis. Editable.
- X Scale field
- Displays the scale of the selected surface points along the X axis. Editable.
- Y Scale field
- Displays the scale of the selected surface points along the Y axis. Editable.
- Proportional Scale button
- Enable to scale the surface points proportionally.
- Magnet button
- Enable to transform a range of surface points. Use in conjunction with the Magnet Transformation box. See Transforming Multiple Points.
- Magnet Transformation box
- Select a transformation type to use when Magnet is enabled.
- Magnet Curve Editor
- Displays the weighted polarity from the centre to the edge of the magnet.
- Magnet Curve Home button
- Resets the position of the magnet curve after panning.
- Magnet Curve Undo button
- Undoes a change to the Magnet Curve Editor.
- Magnet Curve Reset button
- Resets the Magnet Curve Editor.
- UV Point Position X field
- Displays the position of the selected UV points along the X axis. Editable.
- UV Point Position Y field
- Displays the position of the selected UV points along the Y axis. Editable.
- Stabilizer button
- Opens the Stabilizer menu to apply stabilizing data to the selected UV points.
- Tracking Mode box
- Select wether to track each selected vertex or UV point individually (Each Point) or grouped via two proxy trackers, and from which parameters the proxy trackers extrapolate the movement (Pos/Scale, Pos/Rot, Pos/Rot/Scale). With Perspective tracking, you can further select whether to enter the Stabilizer with four trackers associated to the 4 Corners of the perspective surface (4 Corners), or use an unlimited number of trackers to track the Perspective transformation of the vertices or UV points (Perspective).
- Each Point: Perform the tracking using a tracker for each selected vertex or UV point.
- Pos/Rot: Perform the tracking using two proxy trackers that extrapolate the position of the selected vertices or UV points, based on the detected position and rotation motion.
- Pos/Scale: Perform the tracking using two proxy trackers that extrapolate the movement of the selected vertices or UV points, based on the detected position and scale motion.
- Pos/Rot/Scale: Perform the tracking using two proxy trackers that extrapolate the movement of the selected vertices or UV points, based on the detected position, scale and rotation motion.
- 4 Corners: Associates a tracker to each corner of your image (equivalent to a four-point track on a bilinear surface).
- Perspective: Allows you to add as many trackers as you want and position them in the same plane as your surface, to cover as much of the perspective transformation as possible.
- Shape Channel button
- Enable to use the Shape channel in the Channel Editor. Disable to use individual channels in the Channel Editor. See Reshaping Using the Channel Editor.
- Copy To Vertices button
- Click to copy UV point data to vertex animation channels.
- Auto Adjust button
- Enable to scale adjacent tangents automatically. Auto Adjust creates a smooth curve between points in the deformation. If you want to work on a specific area of the image without affecting other tangents, disable Auto Adjust.
Note: If you move a tangent explicitly, it is not affected by Auto Adjust. Click Reset Points or Reset Shape so that the tangents will be affected by the Auto Adjust mode.
- Reset Selection box
- Select whether to reset selected points, tracking data, or the shape of the surface. Click Reset All to reset all data.