Certain settings in this menu, such as the Resolution and Over Scan settings, are unavailable if you accessed Action from the timeline.
Resolution Settings
You can set the rendering resolution of clips that are output in Action. For example, if you are working in an NTSC 8-bit project, the default output is NTSC 8 bits. However, if you want to change the output resolution to HD (1920x1080), use the Resolution menu to change the values so the final outcome will be 1920x1080.
You can choose between progressive or interlaced when rendering at video resolution. Action media automatically adjust the rendering mode of each clip. This inherent awareness also makes it possible for Action to properly mix field-based HD / PAL with NTSC and not have dominance problems.
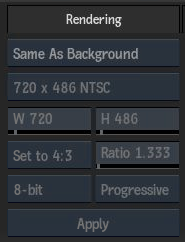
- Resolution Mode box
- Select whether to use the Action background resolution, or a user defined resolution. If you select User Defined, use the settings below to set the resolution. User defined rendering bit depth is limited to 8-bit or 16-bit FP, whereas Same As Background retains the bit depth of the background clip.
- Resolution Presets box
- Select a resolution for the new clip. Select Custom to specify a non-standard resolution.
Once you make a selection from the Apply and Scale box, the resolution is set for processing clips, and is remembered between Action sessions.
- Width field
- Displays the custom width resolution of the clip. Editable.
- Height field
- Displays the custom width resolution of the clip. Editable.
- Aspect Ratio Presets box
- Select a standard frame aspect ratio. Select the Set to w:h option to set the clip to use square pixels. Select Custom to define a custom frame aspect ratio in the Aspect Ratio field.
- Aspect Ratio field
- Displays the custom render/output aspect ratio. Editable
- Bit Depth box
- Select the render/output bit depth of clips.
- Scan Mode box
- Select the scan mode of clips.
- Apply and Scale box
- Select whether to apply or apply and scale the defined resolution settings. All subsequent processes will use the new render settings.
Select: To: Apply Specify the output resolution. Apply + Scale Specify the output resolution and scale a scene to the defined resolution. Use this option if you are working with a low resolution of an Action setup from a previous version of the software. The scaling is applied to geometries, axes, lights, and cameras, as well as their coordinates. Their positions are scaled accordingly. Flame automatically scales textures and images.
Colour Management Settings
Use these settings to colour manage Action-imported media. See Colour Management in Action.
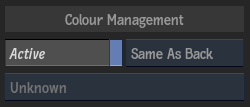
- Auto Convert button
- Automatically convert any media generated or imported by the node to the colour space selected in the Working Colour Space box.
- Working Colour Space box
- Select the colour space used to tag the Result output. If Auto Convert is enabled, the selected option also applies to media imported or generated by the node.
- User Defined Working Colour Space box
- Select a working colour space. Available when you set Working Colour Space box to User Defined.
Over Scan Settings
Use the over scan settings to render Action outputs in a larger canvas, without changing the active resolution (allowing you to easily fix a number of edge rendering issues, including AO, GMask Smoothing, Blooming, etc.).

- Over Scan Mode box
- Select whether the over scan settings are applied on an Action render, or only internally when working in Action.
- Over Scan Scale field
- Displays the size of the canvas to be included in the Action rendering output. The over scan border is displayed in the image window as a dotted line, if the Border button is enabled in the Grid settings. Editable.
Rendering Settings
Use the Rendering settings to improve the final output quality of your image.

- Z-Buffer box
- Select an option to determine whether the distance from the camera eye is considered to determine the order in which objects are rendered.
- Wireframe button
- Enable to display each surface and 3D model as a wireframe.
This is useful if interaction with Action becomes slow because of many surfaces and 3D models. Convert objects to wireframe when you want to speed up processing or rendering times. Because lighting and textures are not computed in wireframe mode, interaction time and rendering times are reduced.
- Clamp Colours button
- Enable to clamp colour and luminance in the 16-bit floating point processing pipeline.
- Clamp Divide button
- Enable to allow the Media list divide operation to handle floating-point values correctly (at the cost of losing some colour information).
Stereo Settings
- Reset To Stereo Mode button
- Enable to clear any previous stereo settings in Action, and reset all stereo settings to their defaults.
In the Stereo mode, these are the default settings when you enter Action with the Front/Back/Matte input option using stereo clips:
- A 3D camera (stereo camera) is created and the default camera is hidden.
- In the 3D Camera menu, the Result Camera is set to the stereo camera.
- In the Output menu, the Mode is set to Stereo and the Camera is set to Result Cam.
- A stereo object is created with the clips you selected.
Note: If you enter Action using mono clips, the default camera is automatically created. If you need a stereo camera, you must add it manually.
Shading Settings
Use the Shading settings to set default Action lighting behaviours.

- Active button
- Enable to light up the scene using added light sources. When disabled, no lighting effects appear in the scene; surfaces and 3D models appear flat. This same setting can be found in the Action Setup menu and the Light menu.
- Scene Ambient button
- Enable to have global ambient lighting in your Action scene. This same setting can be found in the Action Setup menu and the Light menu.
- Scene Ambient Intensity field
- Displays the intensity level of the default ambient lighting in the Action scene. Available when Scene Ambient is enabled. Editable.
- Scene Ambient Shading field
- Displays the shading level of the default ambient lighting in the Action scene. Available when Scene Ambient is enabled. Editable.
Software Anti-Aliasing Settings
You can also access Action hardware anti-aliasing settings in the Common tab when you access Action as a Timeline FX or from the Tools tab, or from Batch or Batch FX Prefs.

- Software Anti-Aliasing Sample box
- Select a software anti-aliasing sampling level. To set an arbitrary amount of animatable samples, select AA N Samples, then choose the number of samples in the Samples field that appears.
The jagged lines that often occur along the edges of diagonal or curved lines when processing high-frequency images such as text are the result of aliasing. You can increase or decrease the anti-aliasing sampling level. Higher values yield smoother results at the expense of processing time.
- Anti-Aliasing Softness field
- Displays the softness value of the software anti-aliasing sample. Editable.
- Samples field
- Available when AA N Samples is selected in the Software Anti-Aliasing Sample box. Displays the number of software anti-aliasing samples to consider. Editable and animatable.
Accumulation Settings
Use the Accumulation settings to define motion blur properties.

- Global Motion Blur button
- Enable to use motion blur. Once enabled, specific Action object Motion Blur buttons can be enabled or disabled. See About Motion Blur for specific examples of creating motion blurs.
- Samples field
- Displays the quality of motion blur and the depth of field produced by the number of samples taken at each frame. Editable.
Increasing this value causes the processing time to increase linearly and affects the quality of the depth of field. The number of motion blur samples is multiplied by the number of anti-aliasing samples. To reduce the total number of passes made for each frame, reduce the level of anti-aliasing when motion blur is enabled.
- Phase field
- Displays the frame that motion blur is based on (before or after the current frame). Editable.
A value of -100 places the motion blur before while a value of 100 places the motion blur after. A value of 0 is centred, which evenly distributes the motion blur. The default value is 0.
- Shutter field
- Displays the duration of motion blur at each frame (essentially the number of frames that the shutter is open). Increasing this value does not increase the processing time. Editable
Tip: You can animate the Global Motion blur button, as well as the Phase, Shutter, and Samples fields. They can be found in the Channel Editor under the motion_blur folder.
- Depth of Field button
- Enable to use the camera's depth of field.
- Depth of Field Softness field
- Defines the softness of the depth of field. A low value yields a sharp falloff between focused and unfocused regions. Editable.
- Motion Blur curve
- Controls the sample weight over the scope of the motion blur.
- Home button
- Resets the position of the motion blur curve after panning.
- Reset button
- Resets the motion blur curve.