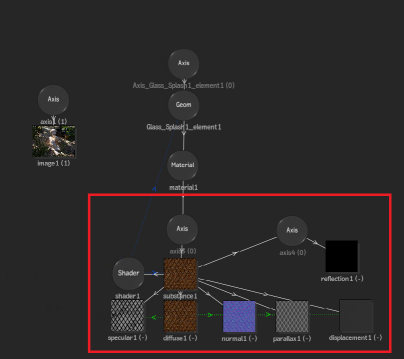
You can collapse any collection of nodes in the schematic into a group to reduce clutter. The result is a cleaner schematic, but you can also quickly edit the contents of the group, or even add nodes inside the group.
To create a group:
- Select objects in the Action schematic. You can press
Ctrl and drag to multi-select. Press
Ctrl+Shift and click to add or remove items from a multi-selection.
 Note: Objects selected for a group do not need to be in the same schematic branch.
 - Click Group, or right-click the selection, and choose Group to collapse the selected objects into a group.
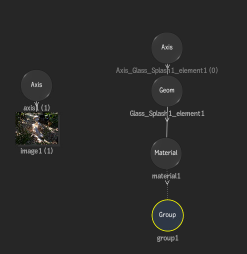
A blue group node appears in the schematic to represent the entire group, and connections are maintained outside of the group.
- To uncollapse the group, click Ungroup in the Group node menu, or right-click the Group node and select Ungroup.
Note: You can not create a group within a group, and groups created in the Schematic view are not related to groups created in the Priority Editor.
Tip: Set the Icons box to Group Off to hide the icons of objects contained within Group nodes. This can help unclutter the Action schematic. The Icons box is displayed below the Action viewports.
Editing Action Groups
You can easily edit an Action group using the Group Schematic view.
You can access the Group Schematic view using one of these three methods:
- Right-click on a Group node and select Edit Group from the contextual menu.
- Double-click a Group node.
- With the Group node selected, press F8 or select from the View box.
The Group Schematic view displays the contents of the group framed in the image window, with all other nodes dimmed.

Once you in Group Schematic view, you can edit or move any node (even the dimmed nodes). You can add nodes to the Group Schematic, and they then become part of the group. You can also add nodes into the regular Action schematic, and see them "live" as dimmed nodes in the Group Schematic.
Tip: Use a 2-up view with the regular Action schematic in one view and the Group Schematic in the other. In this case, you can see how adding nodes inside or outside of the group affects your Action scene.
You can perform certain connections to a Group node which are automatically done on all compatible nodes found inside of it. Supported connection are:
- Parent Axis: Connects to all top Axis.
- Lighting link: Connects to all Geometry, Surface, 3D Text, and 3D Shape objects.
- GMask link: Connects to all Geometry, Surface, 3D Text, and 3D Shape objects.
- Child Material: Connects to all Geometry, Surface, 3D Text, and 3D Shape objects.
- Child Texture map: Connects to all Geometry, Surface, 3D Text, and 3D Shape objects.
- Child Substance: On initial creation, does a lighting link and a Material connection to all Geometry, Surface, 3D Text, and 3D Shape objects.
Note: These connections are made based on the logic of the hierarchy of the group structure. In some cases, you may need to manually create connections or break connections.