In Action Schematic view, a node exists for all objects in the scene, for example, shadows, lights, and texture maps.
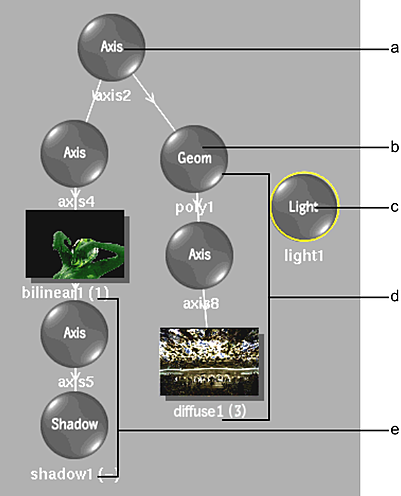
(a) Axis object is the parent of axis 4 and poly1 (b) 3D model (c) Light source (d) Diffuse texture applied to the 3D model (e) Drop shadow of bilinear1
Here are some hints when working in the schematic with some of the various node types.
- Surface Nodes
- When you add a surface node to the schematic, the node name is displayed with a number in parentheses. The number indicates the media applied to the surface. For example, a bilinear object labeled (1) shows that the bilinear uses the clips from Media 1.
When the resolution and colour space information of the surface is blue, that surface's colour space doesn't match Action's colour space. See Colour Management in Action.
For more information on the relationship between media and surfaces, see Adding Surfaces .
- Camera Node
- The camera node appears in Schematic view by default and you can link it to any image. Use the camera node to rotate the camera about its own axis, and parent other nodes including shadow, texture, and geometry nodes.
- Shadow and Texture Nodes
- Shadow and texture nodes each display a single number in parentheses beside the name that indicates the media used for the shadow or texture. For example, a shadow labeled (2) shows that the shadow uses the matte from Media 2.
- Source Nodes
- Source nodes are used as part of an advanced schematic structure that separates the media's matte and front so that each clip can be animated individually. You can also use sources to create complex compositing effects such as nesting.
You add nodes by dragging them from the Node Bins, or through the contextual menu in the Action Schematic.