MasterGrade is a Matchbox shader for colour correction. It is also the default colour tool in the Image node, but is available in Action and Batch or Batch FX. MasterGrade is inspired by the grading algorithms in Autodesk Lustre, but extended and refined to meet the demands of floating-point media and HDR displays.
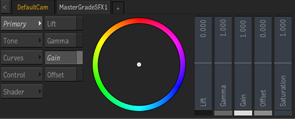 |
MasterGrade in Action or Image |
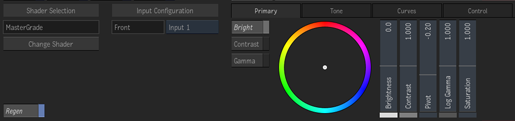 |
MasterGrade in Batch or Batch FX |
MasterGrade provides three modes optimized for grading the three types of colour spaces: video, logarithmic, and scene-linear. This controls the default grading toolset in the Primary tab and the scaling and response of the tools in the Tone tab.
Scene-linear mode:
- The units of the Exposure control are in F-stops of change in illumination to the scene.
- The Pivot control for Contrast defaults to middle grey (0.18 relative scene reflectance) and is in units of F-stops relative to grey.
- The Offset control is in normalized linear units and is equivalent to adding or subtracting non-imagewise veiling glare.
Logarithmic mode:
- The Brightness adjustment is equivalent to printing a film negative lighter or darker. This control is in units of "Lustre points" (which by default is half a B&H or Kodak printer point, although keep in mind that many camera-log encodings have deviated substantially from the classic Cineon printing density or Academy ADX10 encoding that this notion is based on.) In more concrete terms, a one unit change of Brightness adds or subtracts 6.25 from a 10-bit value.
- The Pivot control for Contrast varies from the bottom of the logarithmic encoding at -1, to the top of the encoding at +1. The default is -0.2 which is equal to about 409 as a 10-bit value and is thus near middle grey (although this varies somewhat between different log encodings).
- The Log Gamma control is simply a power function. (In a logarithmic space, a power function does not behave like either Contrast or a traditional Gamma in a video space.)
Video mode:
- Adheres to modern conventions for video colour grading.
- Differs somewhat from the video-oriented toolset in Lustre.
- Range controls allow the Video mode to better handle colour encodings that differ from traditional SDR video.
By default, MasterGrade uses the project's working colour space to set its grading mode to use. But you can set the mode manually, or set a preference to set a specific mode for every new MasterGrade.
To set the mode manually:
- In MasterGrade, click Control.
- Set Image Type to one of the three modes.
To set a specific default mode:
- In the TimelineFX /
Batch /
Batch FX preferences, in the
MasterGrade section, set
Default Image Type menu to the default mode.
Select Project Working Space to configure automatically based on the Working Colour Space set in the Colour Management Preferences. Otherwise manually specify that you will be using a Video, Scene-linear, or Logarithmic type of colour space.
Using MasterGrade Primary and Tone Controls
When in the Primary and Tone controls, every mode has a set of vertical sliders on the right, and a set of tabs and colour wheel on the left.
The sliders:
- Show at a glance what the primary grade is doing.
- Can increase or decrease the control past the top or bottom of the slider.
- Are adjusted by clicking the slider and dragging the cursor left or right, in addition to up and down. This allows for a greater range of motion. The controls only respond to one type of motion: if you start to drag vertically the control will not respond to horizontal movements, and vice versa.
| Video Mode | Scene-Linear Mode | Logarithmic Mode |
|---|---|---|
| Lift | Exposure | Brightness |
| Gamma | Contrast | Contrast |
| Gain | Offset | Log Gamma |
| Offset |
The colour wheel:
- Switch to the various controls using the tabs on the left.
- Display a line from the center to a dot, showing the current setting.
- Displays ghosts dots to show where the other controls are set. The coloured rectangle under the Master sliders define the colour for each control. The dots in the Colour Wheel match the corresponding Master control.
- Works similarly to the Look tool.
- Click & drag in the wheel to move the adjustment in the drag direction.
- Click and drag the dot of a previous adjustment to modify the strength of the adjustment without modifying the relative RGB ratios.
- Control+click in the colour wheel to reset the control.
- Can increase even after the dot has reached the edge of the wheel. In this case, the dot turns into an arrow to indicate that the adjustment lies outside the diameter of the wheel.
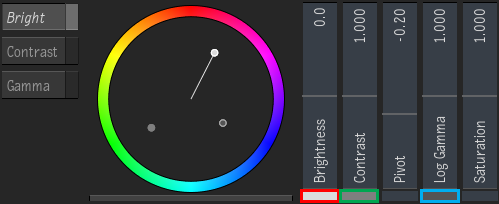 |
Because
Bright is the select control, the white line points to the dot marking the value of the colour wheel's Brightness control. The dot is white because the Brightness slider's box is white (highlighted in red on the left).
Then, you can see at glance the colour wheel values for Contrast and Gamma by matching their master slider's box (highlighted in green for Contrast and in blue for Gamma) to the dots in the colour wheel. |
The gearing of both the colour wheel and the sliders is set to allow very precise adjustments. However, Alt+Space+click speeds up the slider's response.
Primary Controls
The Primary Grade controls available depend on the mode selected for MasterGrade.
Video Mode Primaries
- Lift slider
- The Master component of the Lift tool. Lift adjusts blacks while preserving whites. The white pivot for Lift may be adjusted in the Controls tab.
- Gamma slider
- The Master component of the Gamma tool. Gamma adjusts midtones while preserving blacks and whites. The black and white pivots for Gamma may be adjusted in the Controls tab.
- Gain slider
- The Master component of the Gain tool. Gain adjusts whites while preserving blacks. The black pivot for Gain may be adjusted in the Controls tab.
- Offset slider
- The Master component of the Offset tool. Offset shifts the entire tonal range lighter or darker.
- Saturation slider
- Controls the colour saturation.
Log Primaries
- Brightness slider
- The Master component of the Brightness tool. Brightness shifts the entire tonal range lighter or darker. Two units of Brightness adjustment are equivalent to one photographic printer point when working in Academy ADX10 colour space (and a similar amount for many other log spaces).
- Contrast slider
- The Master component of the Contrast tool. The effect of the Contrast tool is modified by the adjacent Pivot control. A Pivot near grey will preserve midtones while adjusting Contrast. With a Pivot near white, Contrast will behave similarly to Video Gamma.
- Pivot slider
- Adjusts the Pivot for the Contrast tool. The Pivot sets the point where Contrast adjustments have no effect. A Pivot of -1 corresponds to the minimum value of the logarithmic colour space and a Pivot of +1 corresponds to the maximum value.
- Log Gamma slider
- The Master component of the Log Gamma tool. Log Gamma applies a power-law adjustment to the logarithmic colour values. (This gives a different effect than traditional Gamma in video colour spaces.) The black and white pivots for Log Gamma may be adjusted in the Controls tab.
- Saturation slider
- Controls the colour saturation.
Scene Linear Primaries
- Exposure slider
- The Master component of the Exposure tool. Exposure shifts the entire tonal range lighter or darker. The units are in photographic F-stops.
- Contrast slider
- The Master component of the Contrast tool. The effect of the Contrast tool is modified by the adjacent Pivot tool. A Pivot near grey will preserve midtones while adjusting Contrast. With a Pivot near white, Contrast will behave similarly to Video Gamma.
- Pivot slider
- Drag either horizontally or vertically to adjust the Pivot for the Contrast tool. The Pivot sets the point where Contrast adjustments have no effect. The units are photographic F-stops with 18% grey at 0.
- Offset slider
- The Master component of the Offset tool. Offset adjusts blacks while preserving whites. The Offset adjustment is optically equivalent to adding or subtracting non-imagewise veiling glare. It may also be used to correct the zero-point of digital camera data.
- Saturation slider
- Drag either horizontally or vertically to adjust the Saturation.
Tone Controls
The Tone menu provides targeted adjustments of precise ranges of tonality from shadows, through midtones, to highlights.
Five main tonal controls are provided. Each control has both a Master slider for neutral adjustments and a colour wheel for modifying colour balance.
Each of the five main tonal ranges also has two additional dedicated sliders to fine tune the range of tones that it will affect. Click the buttons left of the colour-wheel to show the range control sliders for that tonal range.
- Blacks slider
- The Master component of the Blacks tool. This tool is useful for fogging or crushing black tones. The range of this tool may be adjusted using the
Start and
Width
sliders to the right.
- Start sets the lightest tone that will be affected.
- Width controls how quickly the tool's response kicks in.
- Shadows slider
- The Master component of the Shadows tool. This tool is useful for lightening or darkening shadows while not moving the black point. The range of this tool may be adjusted using the
Start and
Pivot
sliders to the right.
- Start sets the lightest tone that will be affected.
- Pivot sets the black point.
- Midtones slider
- The Master component of the Midtones tool. This tool is useful for adjusting a targeted range of middle tones. The range of this tool may be adjusted using the
Centre and
Width
sliders to the right.
- Centre specifies the tonal value that will receive the biggest effect.
- Width determines the range of tones that will be affected.
- Highlights slider
- The Master component of the Highlights tool. This tool is useful for lightening or darkening highlights while not moving the white point. The range of this tool may be adjusted using the
Start and
Pivot
sliders to the right.
- Start sets the darkest tone that will be affected.
- Pivot sets the white point.
- Whites slider
- The Master component of the Whites tool. This tool is useful for burning or darkening white tones. It is also useful for controlling whites between SDR and HDR. The range of this tool may be adjusted using the
Start
and
Width
sliders to the right.
- Start sets the darkest tone that will be affected.
- Width controls how quickly the tool's response kicks in.
- S-contrast slider
- Controls the S-contrast tool. This tool is useful for modifying the contrast while preserving black and white, by pivoting around both black and white. Increasing the contrast creates an S-shaped response.
The operation of the Tone controls changes based on the Image Type selected in the Controls tab (Scene-linear, Logarithmic, Video).
- The default settings for each set of Width and Start/Center sliders are different for each Image Type.
- For the Log and Video Image Types, the units of the Width and Start/Center sliders are 0 to 1, where 0 and 1 correspond to the minimum and maximum values for the given colour encoding.
- For the Scene-linear Image Type, the units of the Width and Start/Center sliders are in F-stops. A Start/Center value of 0 corresponds to 18% grey.
Curves
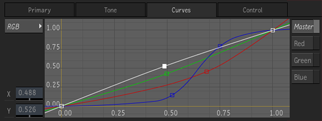
The Curves are applied after the Primary and Tone controls of a MasterGrade.
Every mode has four curves available: Red, Green, Blue, and Master. The Master curve is applied to R, G, and B equally and after the channel-wise red, green, and blue individual curves.
The curves possess a number of properties peculiar to meet the requirements of a solid grading tool:
- The curves are constrained to be non-decreasing. This prevents solarization/reversal-type artifacts in the image and ensures that the curves are invertible.
- The curves are always continuous in value and first derivative which helps avoid banding artifacts in the image.
- Points may be placed close together to obtain very rapid changes in the curve, however there is a lower limit of 0.02 imposed on how closely the points may be spaced.
- The slope of the curve at the control points is determined by Flame—there are no Bezier-type handles.
- The curves are floating-point and extrapolate linearly beyond the outermost control points.
To display a pixel's colour values in the curves display:
- Open the Colour Sampler (Alt+Space+C). The RGB values of the sampled pixel are now shown as matching red, green, and blue vertical lines on the graph.
- Drag the colour sampler in the image over the tones that you want to adjust: see where those tones fall on the graph.
- If you see a tone you want to adjust and are wondering where on the graph to add points, but you already have some amount of Primary or Tone adjustments in place, set the viewport to the F1 (Front) view.
You want to be in F1 view because the curves happen before the Primary and Tone, and you are trying to locate the incoming values on the graph.
- If you are trying to move control points to hit a certain target (for example to neutralize the RGBs) then you want to be in F4 (Result) view.
In this case, you're interested in the cumulative effect of the grade visible from the F4 view.
To add a control point to a curve:
- Click the curve selector to select a curve (Master, Red, Green, Blue).
- Holding A, click the curve to add a control point.
- Release
A.
Note: There is a limit of 30 control points in total.
To delete a control point from a curve:
- Click the curve selector to select a curve (Master, Red, Green, Blue).
- Holding D, click the control point to remove.
- Release
D.
Note: You cannot delete the last two control points of a curve.
To precisely move control points:
- Dragging in the X and Y fields provides an easy way to precisely adjust only the horizontal or vertical position of a control point or group of points.
- Holding Shift+Meta while pressing an arrow key allows you to make precise, repeatable movements of control points or groups of control points. The increment is set to 0.01 in Video and Log modes, and 0.05 (1/20th of a stop) in Scene-linear mode.
- Right-click the graph and select Translate X or Translate Y. In the calculator that appears, enter an offset.
- To constrain movement to one axis:
- Pressing Shift, drag a control point.
To zoom in an out of the graph:
- Ctrl+Space and drag the cursor in the graph.
To pan the graph:
- Space and drag the cursor in the graph.
To reset the view:
- Right-click the graph and select Home.
To reset the graph:
- Right-click the graph and select Reset All.
Control Menu
The Control menu contains controls for Image Type, Clamping, Pivot points, and RGB Controls.
- Image Type
- Controls which type of grading controls are presented: Scene-linear, Logarithmic, or Video.
You can set the default setting in the TimelineFX / Batch / Batch FX preferences, in the MasterGrade section.
Important: Changing the Image Type resets the Primary, Tone, and Curves settings. You may use Undo to recover the previous values. - Clamping
- Allows independent specification of a black and white clamp point and may be individually enabled or disabled. By default there is no clamping.
- Pivot
- Sets a White and Black pivot point that modify the behavior of certain Primary grading controls. These grading controls pivot around 0 and/or 1 (in floating-point) by default. Setting different pivot points is useful when dealing with media where
black and
white fall somewhere other than 0 and 1. Examples of this are most logarithmic colour spaces and HDR video colour spaces.
- Video toolset: Lift, Gamma, and Gain are affected by the pivot points.
- Log toolset: The Log Gamma control is affected by the pivot points.
- RGB Controls
- You may switch the Colour Wheel to an RGB Sliders representation.
To switch between the two, you can:
-
Use the RGB Control Mode button in the Control menu.
-
Alt+Downward-swipe in the wheel area.
You can also set your preferred default in the In the TimelineFX / Batch / Batch FX preferences, in the MasterGrade section.
-