Printer Lights are measurements or settings used by colour labs to operate the optical printer that produces the film copy. This method is used in Lustre to grade shots according to printer lights and fstops, affecting the red, green, and blue content in printer lights..
You can use a similar Printer Lights grading style in MasterGrade. Using the keypad you affect a specific grading control, based on the Image Type setting of MasterGrade.
| Image Type Setting | Controls Affected by the Printer Lights |
|---|---|
| Log mode | Brightness |
| Video mode | Offset |
| Scene-linear mode | Exposure |
To use the printer lights grading style:
- Holding down a modifier key, press a key on the keypad to modify the RGB channels.
So Ctrl+8 in Log mode decreases the brightness in the Green by 1 step. Ctrl+Alt+8 in the same mode decreases the brightness in the Green by 1/8th of a step.
The size of a single step is intended to allow you to quickly arrive at roughly the desired grade. At that point the fractional steps may be used to refine your adjustment.
The size of a step depends on the MasterGrade Image Type setting:
| Image Type Setting | One Printer Lights Step Equals... |
|---|---|
| Log mode | 1.0 Brightness units |
| Video mode | 0.02 Offset units |
| Scene-linear mode | 0.1 Exposure units, equivalent to 1/10th of a stop |
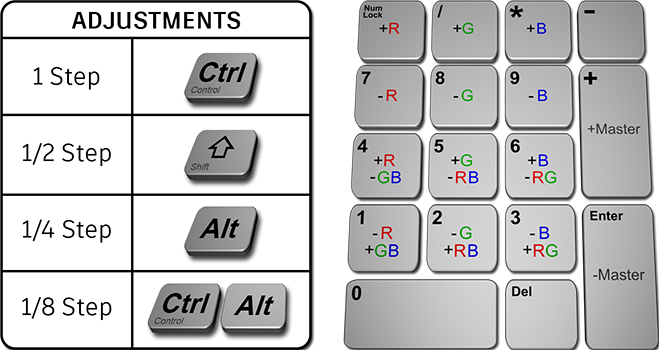
Within the Printer Lights grading style, there are two methods to control the RGB channels: the Lustre style, and the Flame style.
Lustre Style
- RGB adjustments only affect a single channel, independent of the other 2 channels.
- Results in a shift in brightness along with the balance change.
- Uses the top 6 keys of the keypad: Num Lock, /, *, 7, 8, 9
Flame Style
- Colour balance adjustments are better decoupled from Master adjustments.
- An increase in one channel is balanced by a decrease in the other channels to minimize the brightness shift.
- The Flame style uses the same method of colour balance adjustment as the one used in the Colour Wheels.
- Uses keypad keys 1 through 6.
Finally, you can affect all three channels simultaneously with the master adjustment.
Master adjustments move all three RGB channels in sync.
- +: +Master
- Enter: -Master
Printer Lights on Tangent Panels
Printer Lights grading style is available on the Tangent Arc panel.
In the MasterGrade in Image context:
- Primary: Function module (pages 1-2)
- Selective: Function module (pages 3-4)