Inventor provides an optional heads-up display (HUD) that helps you keep your focus in the sketching area when using the many of the 2D sketch geometry tools.
The HUD lets you enter values in floating input boxes that stay near the cursor as it moves; values update dynamically as the cursor moves. 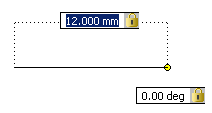
Enable Dynamic Input
- Click Tools tab > Options panel > Application Options.
- In the Sketch tab of the Application Options dialog box, select Heads-Up Display (HUD).
- (Optional) Click Settings to customize HUD options:
- Enable Pointer Input. When selected, the starting point for a sketch element displays as Cartesian or polar coordinates, whichever you select, in a floating input box near the cursor. The default for subsequent points is relative polar coordinates (length and angle).
 Disabling Pointer Input turns off the coordinate display of the starting point of a sketch element, but subsequent points still display in the value input fields.
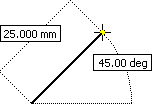
- Enable Dimension Input Where Possible. If selected, when a command prompts for a second point, the floating input fields display Cartesian or polar coordinates, whichever you select. The dimensional values change as you move the cursor.
- Enable Pointer Input. When selected, the starting point for a sketch element displays as Cartesian or polar coordinates, whichever you select, in a floating input box near the cursor.
- Click OK to enable Heads-Up Display.
Draw 2D Geometry Using Dynamic Input
- In an active 2D sketch, click Sketch tab
 Create panel and one of the following tools:
 - Line

- Center Point Circle

- Three Point Arc

- Tangent Arc

- Center Point Arc

- Two Point Rectangle

- Three Point Rectangle

- Line
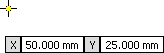
- Move the cursor into the graphics window, where the X and Y values of the cursor’s position appear in the HUD.
- At the desired coordinates, click to set the first point of the geometry.
- In the highlighted input box, enter a value — a length or angle, diameter, radius, and so on, depending on the geometry.
- Press Tab to move to the next input box.
The field displays a lock icon to indicate that the value you entered constrains the cursor.
- Enter another value — a distance, angle, or specific coordinate, depending on the geometry — in the next input box.
- Press Tab and continue to enter values as required. When the geometry is complete, press Enter.
The shape is drawn and dimensioned using the values you entered.
- Continue drawing shapes or press Esc to quit.
Draw Points Using Dynamic Input
- In an active 2D sketch, clickSketch tab Draw panel, click Point
 .
. - Move the cursor into the graphics window, where the X and Y values of the cursor’s position appear in the HUD.
- Press Tab, enter the value for the X coordinate, and press Tab again. The field displays a lock icon to indicate that the value that you entered constrained the cursor.
- In the second input box, enter a value for the Y coordinate and press Enter. The point is drawn at the X and Y coordinates you entered.
- Continue drawing points or press Esc to quit.