Use Find Errors to check the body for quality and serious errors. If errors are found, use Heal Errors to repair the geometry with a specified tolerance value.
Find Errors
- In the part browser, double-click the repair node to enter the repair environment. Alternatively, you can right-click the repair node and select Repair Bodies.
- Select solids or surfaces to examine, using one of the following methods:
- On the ribbon, click Repair tab
 Repair panel Find Errors.
 - In the browser, right-click a body and select Find Errors.
- On the ribbon, click Repair tab
- In the browser or graphics screen, select bodies to check, or choose Select All.
- Select OK to check the data.
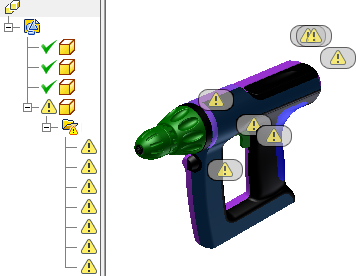
- If errors are detected, they are listed by type in the browser.
- Click an error in the browser to show the error location glyph in the graphics window.
- Click an error glyph in the graphics window to start the error repair mini-toolbar.
Note: To enable an error glyph to persist in the graphics window, right-click an error folder or individual error in the browser and select Error Glyph Visibility. A check mark appears next to the selected errors in the browser. To cancel the visibility toggle, right-click and select Cancel or press the Esc key.
Geometry errors can cause downstream modeling operations to fail or prevent the bodies from being solidified. Find Errors lists curves, bodies or surfaces with geometry errors and groups them by error type in the browser. Use Heal Errors before you repair topology errors.
Heal Errors
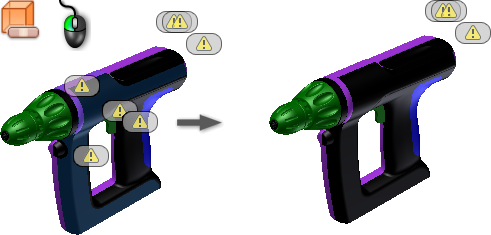
- Use the Find Errors command to check the geometry. If errors are detected, the Heal Errors command is available.
- Select solids or surfaces to examine, using one of the following methods:
- On the ribbon, click Repair tab Repair panel Heal Errors.
- In the browser, right-click a body and select Heal Errors.
- On the ribbon, click Repair tab
- Select bodies to heal in the browser or graphics screen or choose Select All.
- Set Allowable Change (the allowable tolerance between free edges).
- Click Analyze Selected Bodies to obtain a report of how many errors are fixed at this tolerance. The errors that are fixed highlight in the graphics screen. Note: We recommend that you use a small tolerance value. If errors are not repaired, then slowly increase the tolerance value and click Analyze Selected Bodies to obtain a new report. This action ensures that the original integrity of the surface is maintained.
- Click OK to apply the tolerance and heal the errors or click Cancel to exit the command without fixing errors.