Undershoots are objects that come within the specified tolerance radius of each other, but do not meet. Undershoots can occur due to inaccurate digitizing or when converting scanned data. Use the Extend Undershoots cleanup action to locate and correct undershoots.
If possible, one object is extended to cross the other. It maintains the same direction and snaps to a point on the object. If no node exists, the operation creates one at the intersection.
Two objects that pass within the specified tolerance snap together, as long as the snap does not change their direction. If no node exists at that point, the operation creates one.
To extend undershoots
- If the Street_Centerlines.dwg is not still open, reopen it.
- Click
 . Find
- In the Drawing Cleanup - Select Objects dialog box, do the following:
- Under Objects to Include In Drawing Cleanup, choose Select All.
- Make sure there is an asterisk (*) in the Layers box.
- Click Next.
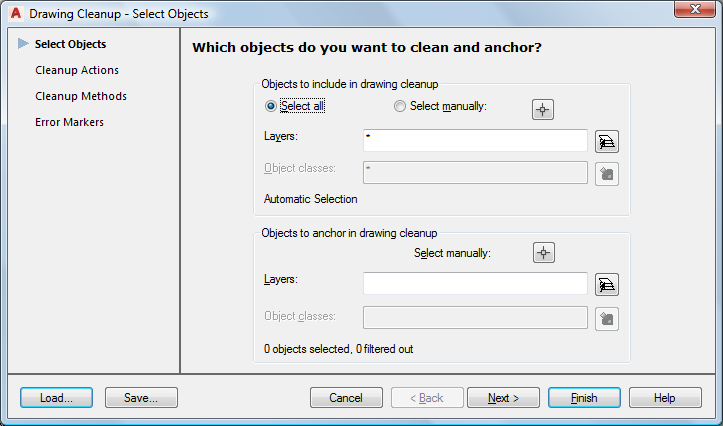
Select all objects to include in the cleanup operation.
- In the Drawing Cleanup - Select Actions dialog box, do the following:
- Select Extend Undershoots and click Add.
- In the Selected Actions list, select Extend Undershoots and enter 10 for the Tolerance.
- Under Options, select Interactive to review errors one by one.
- Click Next.
- In the Drawing Cleanup - Cleanup Methods dialog box, do the following:
- Under Cleanup Method, choose Modify Original Objects.
- Click Finish.
- In the Drawing Cleanup Errors dialog box, Extend Undershoots is highlighted. Do the following:
- Expand Extend Undershoots to see how many short objects were detected.
- With Extend Undershoots still highlighted, click Mark All to place markers on all detected short objects.
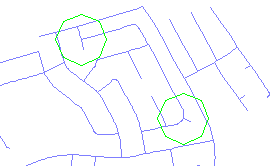
The errors are not corrected, but they are marked. You can find them later to review them more closely.
- Zoom from within the Drawing Cleanup Errors dialog box to examine errors without leaving the interactive drawing cleanup process. Do the following:
- Click Error 1 of 2.
- Clear the Auto Zoom check box.
- Under Zoom %, enter a higher value, such as 400. Click Zoom.
- Click Next to zoom to Error 2 of 2.
- When you are finished examining the errors, restore the Zoom % to 100.
- Click Zoom.
- Select the Auto Zoom check box again.
Zooming helps you see other markers that are farther apart.
- Close the Drawing Cleanup dialog box and save the drawing.
To continue this tutorial, go to Exercise 3: Use Cleanup profiles (optional).