Open Shading Language (OSL) Support
Overview
3ds Max supports the Open Shading Language (OSL), in 3ds Max 2019 and higher. OSL is implemented as an "OSL Map", which is an execution environment for OSL shaders inside of 3d Max, and is exposed to the API as a regular C++ 3d Max shader (that is, it is a subclass of Texmap and implements EvalColor(), EvalNormal() and EvalNormalPerturb() methods).
OSL works in any renderer that supports the 3ds Max shader API, such as Scanline, vRay, Corona, and so on. It can also work with renderers that support OSL natively, such as Arnold. In this case, the renderer rather than 3ds Max executes the OSL code.
OSL also works outside of renderers, anywhere in 3ds Max where a regular map is requested, such as in the Displacement modifier.
OSL is a simple to understand shading language, and writing a shader in OSL is orders of magnitude less effort than developing the equivalent functionality as a 3ds Max C++ shader. Instead of dealing with complex plug-ins, building the UI manually, and working with "validity intervals" and other details of the 3ds Max APIs, you simply type some OSL code in a text file.
OSL also benefits from JIT compilation and optimization of entire shade trees at once, as long as all the shaders in the shade tree are OSL shaders.
New in 3ds Max 2021
Several things were added for OSL in 3ds Max 2021, mostly around UI refinement. The default layout engine was improved to right-justify parameter headings and have some more user control of the layout, but it now also has the ability to load a .ui file that completely defines the user interface of an OSL shader.
There are also several new options for shader metadata; not only can the shader itself can be versioned with the version attribute, but parameters appearance and behavior can be tweaked with the new attributes autopop, connectable, step, packName, widgetWidth and worldunits.
We now correctly support the widget type "null", as well as a few custom UI widgets "max:actionButton" and "max:ramp0".
Also, parameter support was extended. The new "semi-types" vector2, vector4, color2, color4 and matrix33 can now be used. These types are not built-in OSL types, but defined in header files. Including these header files and using these types is now supported (see the section about include files). Also, parameters of type array are supported in certain cases (see the ramp widget).
Support was added for adding OSL shaders from a 3ds Max "Package". This is the preferred method to distribute sets of OSL shaders.
Finally, the support for OSL in the viewport has been vastly improved. The majority of OSL language functions are automatically converted to HLSL code and will display correctly in the viewport in 'Realistic' material display mode. You can now effectively develop OSL shaders without ever launching an actual rendering! Not everything is supported (for example, shaders passing string values to each other, or doing operations on string values) but the confidence level is displayed at the bottom of the OSL map as a percentage value. If this reads 100%, the shader will most likely display in the viewport identically to in the final render.
Developing OSL Maps
There are two fundamental workflows for the OSL Map, using OSL Maps in the Material Browser, and developing (editing, changing, or writing) OSL Maps. We will discuss the development workflow here. See the 3ds Max User Guide for general usage information.
OSL shaders that populate the material browser come from two places.
The first way to load OSL shaders is from a package defined in a PackageContents.xml file. The component description must be "osl shaders parts". For more information, see Packaging Plug-ins. This is the preferred method for third parties to introduce OSL shaders to 3ds Max.
The second way is from subfolders named "OSL" inside plug-in directories, both the standard 3ds Max plug-in directories, and third-party plug-in directories added on the Customize > Configure System Paths dialog. There is also a "system" OSL folder which contains basic shaders shipped directly by Autodesk, where things like the OSL basic headers reside. Shaders are loaded from:
- <3dsmax>\OSL (do not touch files in this folder)
- <3dsmax>\StdPlugs\OSL
- <3dsmax>\Plugins\OSL
\OSL
Tip: If the OSL source file is put in a subfolder of one of these OSL folders, it will show up in the Map Browser in a subcategory named after the folder.
In this workflow, all shaders are hosted in files in the plug-in folders or in packages, and the code in the file is what is being used at render time. Add a parameter to the code in the file, and the shader will update with the new parameter. Change the algorithm, and the rendering result will change. (See Shader Versioning below.)
There are two ways you can work with OSL Map source files, in memory or on disk. When the OSL Map is linked to the file on disk, changes to that file are detected and re-loaded and re-evaluated. This is true whether the file is loaded in the OSL source editor, or in another external editor.
When OSL source files are "unlinked" from the source file on disk, they are held in memory, and persist in the scene file across save/load operations. Changes are not saved to the original OSL file, unless you re-link or save under another file name. The scene can be rendered on other machines, since there are no external file dependencies. To make the shader available to other scenes, the map can be saved to one of the OSL directories as a new file, and will then appear in the OSL section of the Material Map Browser.
You can also start with an OSL Map template, which contains skeleton code for creating a new OSL shader from scratch. This shader is in the General maps section named "OSL Map". This is an empty OSL shader that is in "unlinked" mode by default.
You can switch between linked and unlinked mode during the shader development process, depending on how you want to manage the OSL source. In general, operating in unlinked mode allows you to iterate and test changes as you progress, without altering the original source. You can re-link to either save as a new shader or update the original source, and to make the shader available to other scenes.
Shader Versioning
When a scene is loaded containing shaders in "linked" mode, the shaders will find their corresponding source on disk, and "update" themselves from there. But when moving such a scene to a different older 3ds Max installation, there is a risk of an older version on disk accidentaly overwriting a newer version embedded in the scene.
The big risk with getting shaders "downgraded" is if the newer shader contans a parameter the older does not. This parameter value (or any connections to it) will then be lost forever.
To avoid this, there is a version metadata attribute (new in 3ds Max 2021) that give some additional control over this process. If the OSL shader stored in the scene is newer than the one on disk, it will not be updated. The newer shader in the scene will continue to be used.
In general, when making new versions of shaders, make sure your newer version works when loading older scenes, by defaulting any new parameters such a way that the result is compatible with the old version. If your newer version is different, simply name the shader something different. Shaders are considered linked if both the filename and the name of the shader in the file is the same. If you make a new variant of a shader that is not at all compatible with the old one, renaming it with something like "V2" at the end will not ever confuse your new version with the old. Files containing the old shader will still work, since it will use the old copy of the shader embedded in the file.
Writing an OSL shader for 3ds Max
A complete description of the latest version of OSL is available in the Open Shading Language Specification.
General points about OSL in 3ds Max:
- A shader looks very similar to a C/C++ function definition.
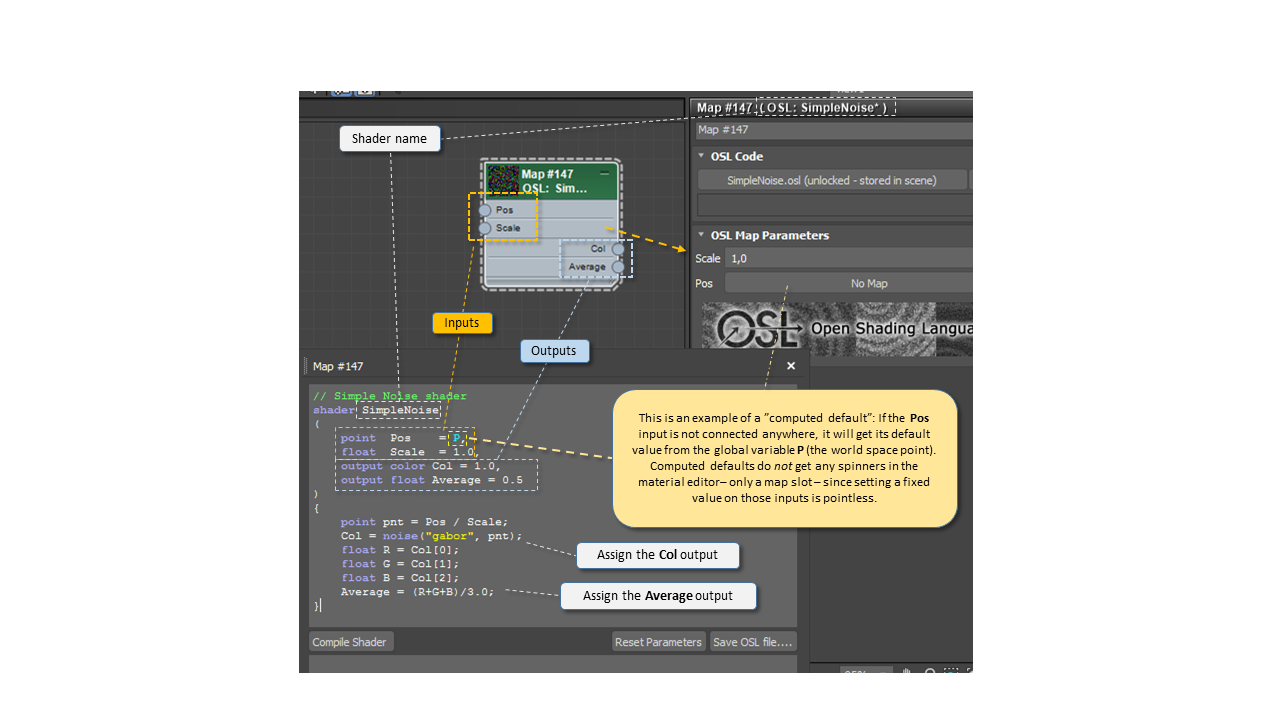
- Shaders have inputs and outputs. Both inputs and outputs always have to have a default value assigned, without which an error is emitted when compiling.
- Inputs can sometimes have computed defaults. This is the value the input gets if it is not connected to anything. Most procedural texture shaders have an input for the coordinate for which it is texturing, but also uses a computed default so that the shader does something reasonable without being forced to connect, for example a UV generating shader to its input.
- Since computed defaults are used for parameters that are inherently varying across the texture, having "fixed value" inputs for them is meaningless. Hence, no value spinners are shown for these in the UI, but only the slot for connecting them to some other shader.
OSL Specifics in 3ds Max
This section covers some of the specifics about how OSL is supported in 3ds Max, including some of its limitations.
OSL Closures Not Supported
Most importantly, it can only be used for procedural texturing. OSL Closures are not supported in this version which means it is useful for texturing, but not for making materials.
There are several reasons for this, mostly technical, but one of them is that while the OSL language is well specified in its feature-set, the set of closures supported is renderer dependent, and can shift from renderer to renderer. We at Autodesk have a vision of making textures and materials interchangeable, and before a standard for closures is established, that is hard to accomplish.
Therefore, the recommended workflow is to build your procedural texture maps in OSL, but connect the outputs to a standardized, well defined, renderer-independent material, such as the 3ds Max Physical Material.
Parameter Type Support
A second limitation is that only base types are supported for parameters. This means integers, floats, strings, and point/vector/normal data types. Complex types like structs or arrays are not generally supported. However, OSL has some "special" types that actually are defined as structs with operators, and these are supported. These types are vector2, vector4, color2, color4 and matrix33. Also, arrays can exist as parameters but have no automatic UI, with the exception of the specific "max:ramp0" widget described in the UI section.
Note that this limitation only applies to parameters, any kind of structs and arrays can be used inside the shader code itself.
Limited use of OSL Include Directive
Finally, due to the mode of embedding the OSL code into the OSL Map itself, file inclusion is discouraged. The standard OSL include file "stdosl.h" is implicitly included automatically by the compiler, you do not need to include it explicitly. If you have this line in your source, you can delete it:
#include <stdosl.h>
Including other files will only work if those files are in the 3ds Max system OSL folder. So the "system" includes will work (e.g. vector2.h, vector4.h, color2.h, color4.h and matrix33.h).
If you write a shader that uses custom include files, the safest and most portable way is to copy the relevant content from that file into the OSL source itself.
Global Variables and Attributes
OSL by default works in a "common" coordinate space that can (in theory) be different from renderer to renderer. In practice, most renderers use world space for this coordinate space, and this is true also for the OSL Map.
This means that the OSL global parameter P is in world space. Many shaders use the above mentioned feature of a computed default so that the shader works immediately, by having a line such as
vector Input = PThis will make the Input parameter have the world space point as a default. Since texturing things in world space may not be what a user expects (since moving the object would drag it "through" the texture space, it is probably more useful to most users to instead use object space, which would look like this:
vector Input = transform("object", P),Or, if it is a 2D texture, use the default UV space since 3d Max populates the global OSL variables u and v with the default 3d Max UVW map channel 1:
vector Input = vector(u, v, 0),Also, since in theory (according to the OSL specification) P is in "common" space, and you actually want it in world space, the correct way of transforming it is:
vector Input = transform("world", P),However, in the OSL Map's execution environment, this does nothing, since P is already in world space.
Scene Attributes
The OSL rendering state is filled in before 3d Max executes the shader. The standard variables such as P, N, and I are filled in, where the u and v variables gets pre-populated with map channel 1's UV coordinate.
OSL also allows the generic getattribute() function to get a named attribute from the scene. It is up to the renderer executing the OSL code to populate these named attributes, which means it is outside the control of the OSL Map itself to guarantee whether these attributes are defined.
This is the set of attributes the OSL Map itself uses, that can be guaranteed to exist when rendering inside of 3ds Max and using the OSL Map as the execution environment:
| Attribute Name | Data type | Description |
|---|---|---|
UVxx |
point | The 3D UVW coordinate for map channel xx (UV0 to UV99), for example UV1. |
mtlID |
int | The material ID of a face, or particle ID of a particle. |
gBufID |
int | The Object ID in the 3d Max object properties dialog. |
nodeName |
string | The name of the instance in 3d Max. OSL has a built-in attribute geom:name, but that will be what the renderer calls the object, which isn't necessarily the same thing. |
nodeID |
int | What NodeID() in the ShadeContext returns. |
nodeRenderID |
int | What INode::GetRenderID() returns. |
nodeHandle |
int | What INode::GetHandle() returns. |
wireColor |
color | The instances wireframe color. |
paLife |
float | Normalized particle age (0.0-1.0 over the age of the particle) |
usr_xxxxx |
int float string float,float,float |
Any value from the 3d Max Object Properties User Defined page, as an integer, float, string, or three comma-separated floats. For example, Hello=3.0"`, will allow you to get the float attribute usr_Hello from the OSL code to retrieve the value 3.0. |
Remember this list is defined by the renderer, and is only guaranteed when run inside the OSL Map. For example, Arnold uses a slightly different naming to store UV coordinates. Therefore we recommend you do not deal with UV channels directly in your OSL code. Instead, add an input for the coordinates, defaulting it to vector(u, v, 0), which is guaranteed to yield a meaningful default value for 2D textures. Then, let the user connect the Autodesk-supplied UVW Channel shader, which has code in it to understand the different UV attribute formats for the supported renderers.
Shader Metadata
In OSL metadata can be assigned to whole shaders, or individual parameters. 3ds Max supports a subset of those metadata settings, as well as some of its own.
For the shader, the following metadata are supported
| Name | Meaning |
|---|---|
| label | The "display name" of the shader. This is what is displayed the Material Browser, as well as the title in the Material Editor and on the node in Slate Material Editor. |
| help | A short help text displayed the top of the material editor. This can contain a subset of HTML formatting. |
| URL | A link to a more extensive help page about the shader. |
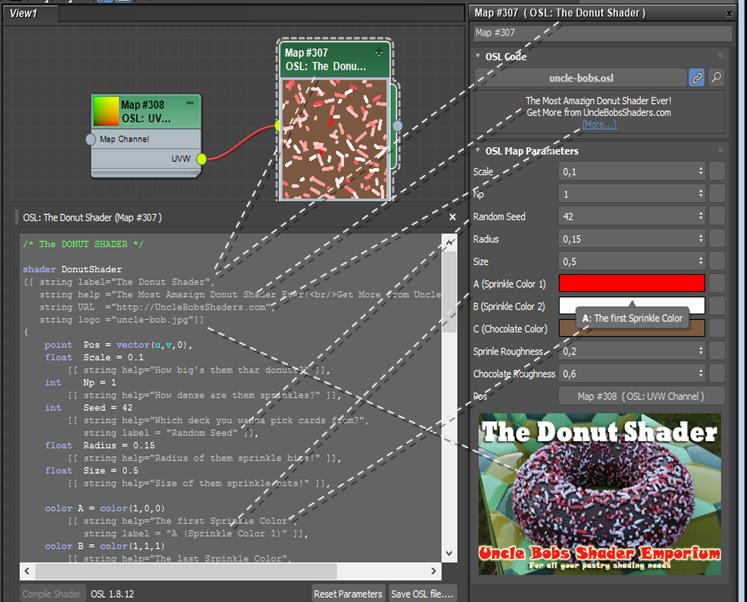
| logo | An image loaded from the same folder as the OSL shader, and displayed at the bottom of the material editor in place of the default logo. This Allows you to personalize the look of your shaders, or even include a sample image of what it does directly in the UI. If the file cannot be found, the default logo is displayed. |
| category | Sorts this shader in a particular category in the 3d Max Map browser. By default, categories are determined by the subdirectory the shader is in, but this can be overridden by a specific category metadata value. It allows nested categories separated by a backslash, for example "Math\Color" puts the in the "Math" category, with a sub-category of "Color". |
| version | The version number of the shader. It should be a string of up to three dotted numbers (e.g. "1.3.11") to encode the version of the shader, although a float or integer version number also works. A shader with no version metadata is considered as version zero. |
For individual parameters, the following metadata are supported:
| Name | Description |
|---|---|
| label | The "display name" of the parameter. The parameter name displayed in the Material Editor. |
| help | The tooltip of the control. This can contain a subset of HTML formatting. |
| min, max | The minimum and maximum value of the parameter. |
| step | The step size for spinners. |
| connectable | If 1 (the default), the parameter will have a corresponding map input. If 0, there will be no map input. I.e. the parameter can not be connected to, only set by the widget. |
| widget | The kind of UI control to use for the parameter. Supports the following OSL widget types:
See the OSL Specification for details |
| timeValue | If enabled (set to 1), any integer parameter this metadata is assigned to automatically gets populated with the current frame number, and any float parameter gets automatically populated with the current scene time, in seconds. |
| worldunits | If enabled (set to 1), any float parameter this metadata is assigned to will be displayed using display units, seen by the shader in system units, and the default value will always be in meters. |
| autopop | If the parameter has a widget of type "filename", a file browser will automatically pop up when creating the shader, similar to how the classic Bitmap behaves. If this is not desired, you can set autpop to 0 and disable the behavior. The default is 1. |
| packName | Allows grouping parameters on the same row. Any parameters with the same packName will show up on the same row in the UI, headed by that name. The regular parameter labels are ignored. |
| widgetWidth | Adjusts the width of the widget (measured in pixels at 100% UI scaling). |
Metadata Example
Here is a visual example of how metadata shows up in an OSL shader:
Advanced User Interface (3ds Max 2021-)
Several improvements have been made to the UI engine for OSL, adding some components that are not strictly standard. However, care has been taken so these additions are only extensions. Meaning, the shader itself will work "as is" in any standard compliant OSL host - or an earlier 3ds Max version - it's just that the UI will be less "fancy" than what it is starting from 3ds Max 2021.
Metadata-driven UI
Additional metadata can be used to make more complex UIs.
- The widget type "null" will make the parameter invisible (although it is still acessible through maxscript, and controllers can be assigned to it).
- The metadata
connectable, when set to 0, will remove the map input for the parameter. The parameter itself still exists, but it can't be connected to by another shader. This reduces clutter and makes the node smaller in SME, and can be used for parameters where it's unlikly it will ever be useful to connect it to another shader (like a mode switch). - The metadata
worldunits, when set to 1, will make the parameter type aTYPE_WORLD, which means it will be displayed in the currently selected display unit, its value (as seen by the shader) will always be in scene units, and the default value will always be given in meters.
Row Packing
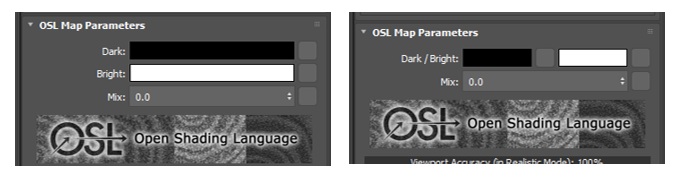
By default, one parameter per row is displayed. This tends to make the UI very "tall" with a lot of scrolling around for shaders with lots of parameters. But sometimes parameters are related to each other (e.g. a multiplier and a color) which makes it desirable to be able to put multiple controls on the same row.
To facilitate this, use the metadata packName. It decides which parmeters to "pack" into the same row. Any two or more parameters that have the same "packName" will show up on the same row, with that "packName" as the row header. To additionally size the columns as needed, the metadata widgetWidth allows some amount of adjustment of the relative size of the widgets, to keep the layout looking balanced.
In the below example, on the left, the Dark and Bright parameters are on separate rows. But on the right, both of them have been given the packName of "Dark / Bright", putting both on the same row, with that heading:
Custom Widgets
Two custom widgets are supported, max:ramp0 and max:actionButton.
max:ActionButton
The widget type "max:actionButton" must be applied to a string parameter. This will replace the normal string input field with a push button control with the string's value as the label. The additional actionID string metadata denotes the ID of a helper script that is run when the button is clicked.
For security reasons, only predefined scripts are allowed (see the file OSLHelpers.ms), and most available functions are specific to some of the included shaders. However, there is a generic way to make dynamid multi-input shaders using this method, explained below.
max:ramp0
The widget type "max:ramp0" uses the same UI code as the Arnold ramp widget. This widget requires some additional metadata to work. There are three required string metadata items:
interpolationshould give the name of an integer array of interpolation types. 0 = Constant, 1 = Linear, 2 = Catmull-Rom and 3 = Monotone Cubic.valuesshould give the name of an array of either float or color values (the type will determine the kind of ramp).positionshould give the name of a float array giving the position along the ramp of each item.
Each metadata is a string containing the name of another parameter which in turn must be an array of the appropriate type. Each array must be initialized, and all three arrays must have the same length. The "max:ramp0" widget type should be applied to the the interpolation array, and the widget type of the other two arrays should be "null" and have connectable=0 to hide the widget (although there are no widgets for arrays currently, other than these ramps) and disable connectivity respectively.
See the source code of the Curves (color) shader for an example.
Dynamic UI
With the help of the "max:actionButton" shown above, a few helper scripts have been introduced that makes shaders dynamic - as in - the shader is actually modifying its own sourcecode!
Most of the available actions are specific to some of the shipping shaders, but there is one generic action usable for any kind of shader you want to have a variable number of inputs. This action is named "UpdateGenericLayering". It works as follows:
- The shader must have an integer parameter named exactly
Layers, that is set to widget type "null" andconnectable=0. The parameter must exist, even if the shader code never actually needs to use the parameter value itself. - Two controls of widget type "max:actionButton" with the actions set to "UpdateGenericLayering(1)" to add a layer, and "UpdateGenericLayering(-1)" to remove a layer.
- Special
LAYER(x)macros in the OSL shader code, and "marker" comments before (//====LAYER-BEGIN====) and after (//====LAYER-END====) the use of these macros. - Between the begin and end markers, only a line that reads
LAYER(x)must exist, expanding the macro, where x is the number, starting from 1 for the first layer and so on. - Whatever the default value of the
Layersparameter, exactly that many copies of theLAYER(x)macro should exist in the default version of the shader
When the user pushes one of the two action buttons, the "UpdateGenericLayering" action will actually perform the following actions:
- Increase or decrease the parameter named
Layers. It will never be allowed to be less than 1 or more than 99. - "Unlink" the shader if linked, and modify the source code of the shader. It will find the begin / end marker lines, and insert as many copies of the
LAYER(x)macro as theLayersparameter says. So ifLayers = 3, it will insertLAYER(1) LAYER(2) LAYER(3)in the code.
The rest is up to the shader code, and clever use of preprocessing macros (OSL uses the same preprocessor syntax as C/C++). Understanding preprocessing macros is beyond the scope of this documentation, but you have as many layer sections as you want by defining the LAYER macro before and undefining it after.
A simple use case of the generic layering can be studied in the source of the switcher shader 1-of-N (color). A more complex use case is in the HDRI Lights shader.
Fully Custom UI via QT
The user interface for OSL now allows a custom layout to be provided in the form of a .ui file.
HDRI Environment shader with no custom UI (left) and the custom UI (right):
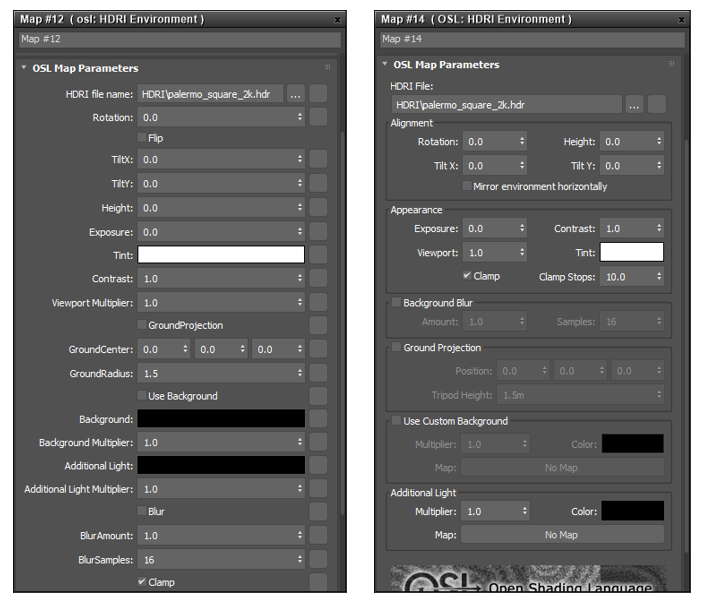
If there is no .ui file, or if the shader was loaded into an earlier version of 3ds Max (or even another software entirely) it would look like on the left. But by supplying the file HDRIEnviron.ui in the same folder as HDRIEnviron.osl, we get the result on the right.
To design custom UI, use the free Qt Designer app (downloadable from https://www.qt.io/download).
Parmeter binding is by name, so by giving the widget in the .ui file the same exact name as the parameter in the OSL shader, the value is automatically connected.
3ds Max uses some custom Qt widget classes, and it is very important to use the proper class names when designing the UI. The following Qt widget class names must be used:
| Parameter type | Qt class name |
|---|---|
int |
In the general case MaxSDK::QMaxSpinBox but if widget = "checkBox" any checkable Qt widget (e.g. QCheckBox or a QGroupBox with the attribute checkable = true). |
float |
In the general case a MaxSDK::QMaxDoubleSpinBox but if worldunits = 1 then a MaxSDK::QMaxWorldSpinBox |
color |
MaxSDK::QMaxColorSwatch |
point, vector, normal |
MaxSDK::QMaxPoint3Spinner |
string |
In the general case a MaxSDK::UI::QmaxDeferredLineEdit but if widget = "filename" a MaxSDK::UI::QmaxFileChooser, and if widget = "max:actionButton", a Qt button control (e.g. QPushButton or QToolButton). |
| - any - | Regardless of type, if the widget = "popup" or widget = "mapper", use a QComboBox. If widget = "max:ramp0", a QWidget |
Every parameter (that does not have connectable = 0) also comes with a matching parameter with "_map" added at the end. The widget for this is either a plain QPushButton or MaxSDK::UI::QmaxTexmapToolbutton for the smaller "mini" buttons that only display an M when populated.
Any paramater that exists in the shader but is not represented in the .ui file will be automatically added below the Custom UI. This assures that all parameters are visible even if they are missing from the .ui file. If this is not desirable widget = "null" (for parameters) or connectable = 0 (for map inputs) can be used to hide them.
Tip: The simplest case to get all these widget types "right", is to simply open up a few of the .ui files shipping with 3ds Max and cutting and pasting the widgets into your own layout and simply renaming the controls to match the parameters of your shader.
3ds Max OSL Shaders on GitHub
There is a public GitHub for exchange of 3ds Max OSL shaders on the ADN Dev Tech Repository.
OSL SDK for Renderer Developers
As a developer of a renderer you have a few choices when it comes to supporting OSL. If your renderer can call the classic EvalColor, EvalMono and EvalNormalPerturb funtions on a Texmap, you effectively have OSL support for free.
But if your renderer translates the scene to another format, or comes with its own OSL support, or you want to implement your own raytracing for the OSL trace() call, there is a helper SDK available in the MAXOSLInterface.h header. This allows interrogating the OSL shaders for various things, reading the per-node data cache, and contains callbacks for trace().