When you stretch or shrink a clip on a track, it creates a linear time warp; the clip is sped up or slowed down. For example, shrink a clip on a track to half its size and it plays at double the speed, stretch a clip to twice its length and the animation plays back twice as slow.
However, when you do not want the same playback speed for the duration of a clip, you need a non-linear time warp so you can have a different time multiplier for each part of your clip. The Time Editor lets you do this with the Time Warp and Speed Curve functions.
For overall linear retiming, simply scale the clip on the Time Editor track. To tweak the clip timing in a more detailed way, use Speed Curve, and when you need more precision, or to make the clip to go backward, use Time Warp.
Clip Scaling
To slow down/speed up an animation clip in the Time Editor, select Scale from the Edit Mode menu in the Time Editor. The cursor changes to the Scale Cursor and the scale percentage appears at the top of the clip as you resize it

Time Warp
While a Speed Curve changes the playback speed of a clip in a non-linear way, a Time Warp provides frame-to-frame mapping. Whatever you do with the warp curve, it will not modify the length of the clip. If you speed up one part, it will slow down another part because it is frame to frame mapping. To change the speed, stretch or shrink the clip in the Time Editor.
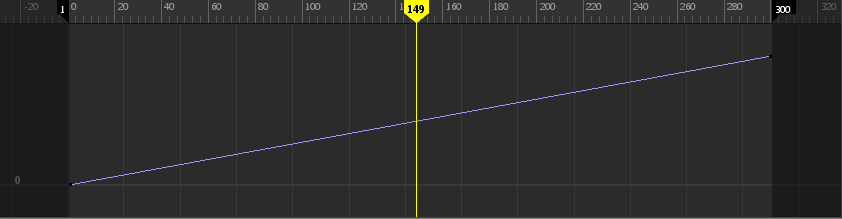
For example, a normal clip will show key 17 playing back at frame 17, which would be linear, but you could create a Time Warp to let you play key 17 at frame 50, creating a speed increase.
Speed Curve
Speed curves lets you modify the playback speed of different parts of a clip and are found in most editing applications such as Adobe Premiere. Use a speed curve when you want to alter the speed in an area of an animation by setting keys to mark the areas to define the area you want to adjust.
Changing the speed curve changes the duration of the clip. If you make the clip twice as fast, the clip appears twice as short in the Time Editor.