The Playback options, located next to the Range Slider, let you change settings regarding animation playback, such as frame rate, looping, and Auto keying.
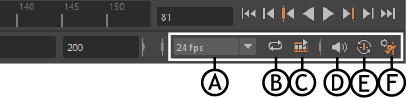
A. Framerate menu B. Loop C. Cached Playback D. Volume E. Auto Key F. Animation Preferences
- Framerate
- The Framerate menu lets you set the scene frame rate in frames per second (fps). It displays the current frame rate.
-
- When you change the Framerate, it updates once the animation has completed a cycle or you restart it.
- Loop
- Click this icon to cycle through 3 animation playback states:
-
-
Continuous Loop

-
- Repeats the play range on playback.
-
Play once

-

- Plays the play range once.
-
Oscillating Loop

-
- Loops the play range forward and backward.
Tip: You can set looping so it either loops the play range or the entire animation using the Loop Play range when stepping frames and keys option in the Time Slider Preferences. -
Continuous Loop
-
Cached Playback

-

- Click this icon to turn Cached Playback on and off.
- Cached Playback lets you preview and work on your animation in real time by re-computing only what has been changed in the background of your scene. See Use Cached Playback to increase playback speed for more.
- Right-click the
Cached Playback
icon for options to switch Caching modes, flush the cache, open the
Animation or
Time Slider settings Preferences, where you can set the direction of the cache fill or configure the appearance of the
Cached Playback status line on the
Time Slider, or open the
Cached Playback section of the
Color settings.
-
When Cached Playback encounters an unsupported node, it enters Safe Mode. When Cached Playback is in Safe Mode, the Cached Playback status line turns yellow and a warning symbol appears on the Cached Playback
 icon. When this happens, see the
Script Editor for an explanation of the causes of Safe Mode. For a list of currently unsupported nodes, see
Cached Playback unsupported nodes.
icon. When this happens, see the
Script Editor for an explanation of the causes of Safe Mode. For a list of currently unsupported nodes, see
Cached Playback unsupported nodes.
- Volume

- Click the Volume icon to show a slider where you can adjust the sound level of the current scene.
- Double-click this icon to turn off the sound. The icon changes
 to indicate that the sound is muted.
- Right-click the icon to access the Audio menu, where you can import or delete audio into the scene, as well as choose how the audio waveform is displayed on the Time Slider.
- Auto Key

- This icon lets you turn on Auto key mode. Autokey lets you automatically set keys on attributes as you change the current time and attribute value. See Use Auto Key for more.
- Time Slider Preferences

- This icon is a shortcut to Time Slider preferences, which let you set how you want key ticks, and time to show on the Time Slider.