| Platform | Audio file format |
|---|---|
|
Linux® |
.aiff, .wav, .bwav |
|
Microsoft® Windows® |
.aiff, .wav, .bwav |
|
Apple® Mac OS® X |
.aiff, .wav, .bwav, .mp3 |
- Play audio
-
To play an audio file
- Do one of the following:
- Select Import Audio... from the Audio menu in the Animation menu set (F4).
- Right-click the Volume icon
 in the
Playback options and select
Import Audio....
in the
Playback options and select
Import Audio....
- Select File > Import from the main menu bar. A file browser lets you select the name of the sound file(s) to import.
- Drag the file(s) from a file browser into one of the Maya modeling views, or onto the Time Slider.
The peaks of the sound waves are visible in the Time Slider, and the Time Slider is ready to play or scrub the sound.
- Press Play in the
Playback Controls or drag your mouse across the waveform to scrub the audio.
Important: To hear sound during the playback of an animation, the playback speed must be set to a constant rate so that Maya can determine how slowly or quickly to play the soundtrack. Make sure that the Playback Speed is set to 24 fps x 1 or you can't hear the audio. (To check this, click the Animation Preferences icon
 in the
Playback Options to open the Playback Preferences.)
in the
Playback Options to open the Playback Preferences.)

- Set the Playback Speed to Real-time (24 fps) to play the soundtrack (and the animation) in real-time.
- Do one of the following:
- Scrub audio
-
Scrubbing is useful when you need to locatr a specific time at which a particular sound begins. For example, if your soundtrack includes, “Hi Dave,” you may need to locate the exact frame at which the “D” sound begins to synchronize your character’s mouth forming a “D” sound with the soundtrack.
To scrub sound
- Drag in the Time Slider. The soundtrack plays as you drag it.
Tip:It can be easier to find the beginning of a sound by having the sound repeat until you drag the Current Time Indicator to the next time in the Time Slider. To use this feature, open the Preferences window and turn on the Repeat Sound option.
- Play multiple audio files
-
You can play more than one audio file in a Maya scene using Audio menu or the Volume icon
in the
Playback options. If you want to have your sounds
overlap, you can use the
Time Editor. Both procedures are included below.
- Right-click the volume icon
or open the
Audio menu (in the Animation menu set
F4), and select
Import Audio... to add your audio file to the scene.
Note: Maya supports the following file formats:
Platform Audio file format Linux®
.aiff, .wav, .bwav
Microsoft® Windows®
.aiff, .wav, .bwav
Apple® Mac OS® X
.aiff, .wav, .bwav, .mp3
- Repeat this for every audio file you want to import. The audio files appear in the
Audio menu that appears in the Animation menu set or when you right-click the
Volume icon.
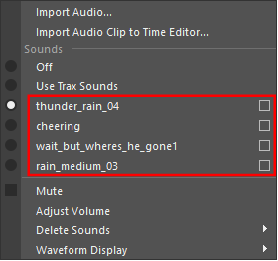
Audio files appear in the Sounds section with an Option box
 next to themNote: Whenever there is more that one audio file in the scene. the waveform on the Time Slider changes to a solid line.
- Do one of the following:
- To use only one sound, click the option next to the audio file on the list. The waveform of the sound appears on the Time Slider.
- To play all the sounds in the scene, select Use Trax Sounds. The waveform becomes a solid line. To offset the files so they play back at different times, see Create Audio offsets, below.
- Right-click the volume icon
- Create audio offsets
-
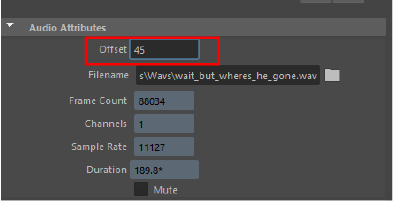
If you want audio file(s) to start playing at a time different from the default of Frame 0 in your scene, click the option box
next to the file. The
Attribute Editor opens with the settings for the selected audio file.
Note: If you want to layer multiple audio files and stagger them so they start at different times, see Offset multiple audio tracks in the Time Editor, below. You can also see the Audio Offset settings in the Import Options for instruction on importing audio with offsets.
- Offset multiple audio tracks in the Time Editor
-
To offset an audio clip in the Time Editor
- Import the audio by right-clicking the
Volume icon () in the Time Slider Playback Options and selecting
Import Audio clip to Time Editor. Each audio file becomes an audio clip in the Time Editor.
- Position each file with the offset you want, or double-click the clip to access the Attribute Editor tab for it and change the Offset setting.
- Import the audio by right-clicking the
Volume icon (
- See Add audio to the Time Editor for more.