 See also: Adjusting an object's pivot (video)
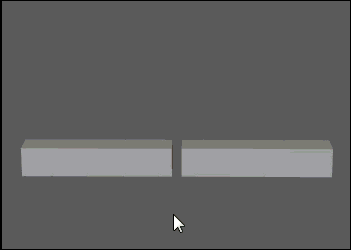
The pivot point defines the position around which objects or components are rotated and scaled. By default, the pivot point of an object or group of objects/components is located at its center. If you want to rotate an around a specific point, like a forearm rotates from an elbow, you need to adjust the pivot's position. Custom Pivot mode is the default method for setting object and component pivot points.
| Transformation | Relationship to Pivot |
|---|---|
|
Move |
Moves the pivot point (and the object travels along with it). |
|
Scale |
Scales object out from or in toward the pivot point. 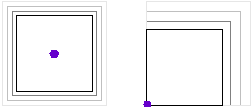 |
|
Rotation |
Rotates object around the pivot point. 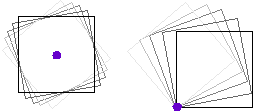 |
|
Tip: You can change the pivot size by pressing + or - on the keyboard.
|
|
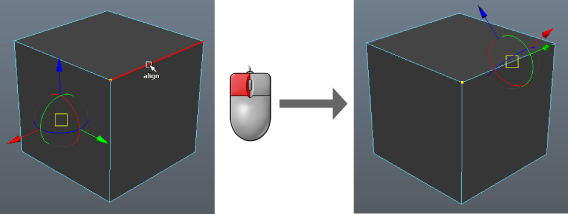
To change the pivot point
- Select the object(s) or component(s) to be transformed.
- Select a transform tool.
- Enter
Custom Pivot mode by doing one of the following:
- Press D (or hold it) or Insert.
- Click Edit Pivot in the Tool Settings.
The custom pivot manipulator (the translate and rotate manipulators combined) appears. If you're modeling in component mode, multi-component selection mode activates.
Tip: Use the Pivot Manipulator options in the Manipulator preferences to hide or adjust the orientation handle of the custom pivot manipulator. - Drag or
snap the custom pivot manipulator to move or rotate the pivot.
You can also use the following workflows:
- Click a component to snap and align the pivot to the selected component.
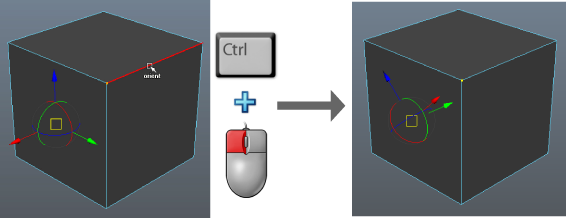
- Ctrl + click a component to snap its axis orientation to the selected component.
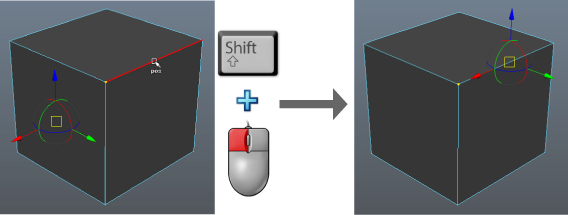
- Shift + click to place the pivot at the cursor. If you Shift + click a component, the pivot will snap to that component.
 Tip: As with standard modeling, you can constrain movement to a particular direction by clicking its axis handle in the Pivot Manipulator.
 - Ctrl + Shift + click within the object to aim the pivot at the mouse cursor. If you Ctrl + Shift + click a particular pivot, the following happens:
- If the center handle or X-axis handle is selected, the custom pivot aims its X-axis at the selected component.
- If the Y-axis handle is selected, the custom pivot aims its Y-axis at the selected component.
- If the Z-axis handle is selected, the custom pivot aims its Z-axis at the selected component.
-
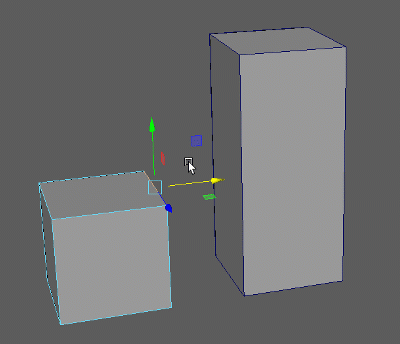
 Hold C or V and middle-drag over another object to snap the pivot to that object's edges or vertices respectively. This is useful if you want to quickly line up components from one object to the other.
- Click a component to snap and align the pivot to the selected component.
- Exit Custom Pivot mode by repeating step 4.
You can reset a modified pivot's position/orientation at any time by right-clicking the scene and selecting any of the Reset Pivot options (only in Custom Pivot mode).
To reposition an object's pivot using exact values
- Open the Attribute Editor and click the transform node’s tab.
- In the Pivots section, turn on the pivot display options so you can see the effects of editing the pivot values.
- Do one of the following:
- In the Local Space section, type X, Y, and Z coordinates for the Rotate Pivot and Scale Pivot relative to the object’s origin.
- In the World Space section, type X, Y, and Z coordinates for the Rotate Pivot and Scale Pivot relative to the world origin.