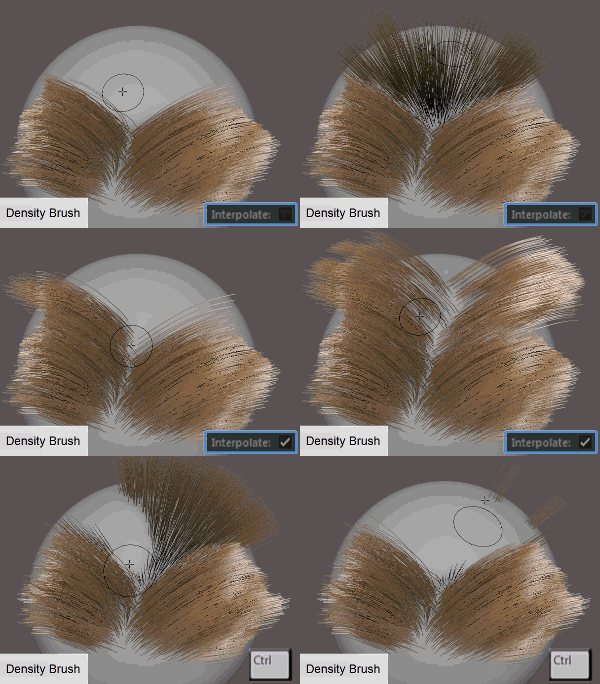

- Paint Operation
- Specific to the
Density Brush. Updates the density of hairs in the brush radius as you drag across the surface of the mesh. The actual density values applied by the brush strokes is based on a combination of the
Paint Operation and
Value settings.
In a typical workflow, set the maximum value you want to achieve with the Value attribute, then adjust the Strength to decrease or increase the effect of the Paint Operation.
Hotkey: Pressing Ctrl toggles between Increase and Decrease. Press N to toggles between the Paint Operation settings
- Set
- Sets the density of hairs in the brush radius to the set Value. Remove hairs by setting theValue to 0.
- Increase
-
Increases the density of hairs in the brush radius by the set Value.
- Descrease
- Decreases the density of hairs in the brush radius by the set Value.
- Smooth
- Blends the different density values of hairs in the brush radius by calculating an average density value.
- Value
- Specific to the Density Brush. The brush applies this value based on the set Paint Operation. The Value setting is multiplied by the Strength value before it is applied to the hairs.
- Max Density
- Specific to the Density Brush. Clamps the number of hairs per-face when the Paint Operation is set to Increase.
- Remove
- Specific to the
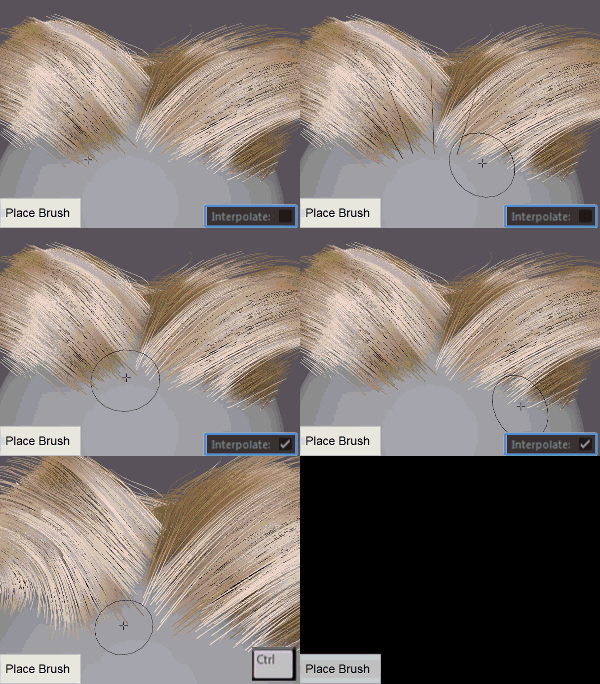
Place Brush. When on, you can remove previously placed hairs by clicking them. The brush removes all placed hairs within its radius. This option is off by default.
Hotkey: Ctrl toggles between Add and Remove.
Tip: You can display the hairs added by the Place brush in a specified color to distinguish them from hairs added by another method, such as by the Density brush. To do this, turn on Highlight Placed Hairs in the Preview Settings section of the descriptionShape node attributes. See XGen interactive grooming description node attributes. - Clear All
- Specific to the Place Brush. Removes all the hairs placed on the surface by the brush.
- Interpolate
- When on, the new hairs match the length and shape of the surrounding hairs. When off, the new hairs use the
Initial Length value and have no defined shape (they follow the surface normal). The width of new hairs is 1.0 multiplied by the
Width Scale value of the description node.
Interpolate is off by default.
This option is not available when Paint Operation is set to Decrease.
- Interpolate From
- Lets you specify the source that shapes the new hairs.
- Current Description
- Interpolates the shape, length, and width of the hairs from the description the Density brush is currently modifying.
- Interpolation Source
- Interpolates the shape, length, and width of the hairs from another description in the scene.
To do this, in the Node Editor, connect the Output Spline Data port of the source descriptionShape node to the Interp Source port of the target's description_base node.
- Initial Length
- Sets the length of the hairs added to the mesh as you paint density or place individual hairs. When Interpolate is on, these settings have no effect.
- Smoothness
-
Improves the interpolation results when the Density and Place brushes generate new hairs. Higher values increase the amount of neighboring hairs that influence the shape of the new hairs. For the Density brush, Smoothness is available only when Paint Operation is set to Smooth.
Increase Smoothness if you see unwanted hair clumping or other unsatisfactory results with the newly added hairs.
- Flood
- When set to
All, hairs are added to all of the faces on the mesh surface based on the the final density setting, meaning the combination of
Paint Operation and
Value. When set to
Selection, the density setting is applied to selected faces of the mesh only. Click
Flood
to apply the density.
Hotkey: Shift + MMB.