
- Rename Character
- Opens the Rename Character dialog box, letting you rename the current character.
- Edit Skeleton
- Create a skeleton definition for an existing skeleton. See Define an existing skeleton for HumanIK.
- In Maya 2016, this option is called Define > Skeleton.
-
- Create Skeleton
- Create a new HumanIK character with a valid skeleton definition. By default, the new character is named Charactern, where n is a sequential number. See Create and define a HumanIK skeleton.
- Reset
- Resets the fields in the Skeleton setup area to their default values.
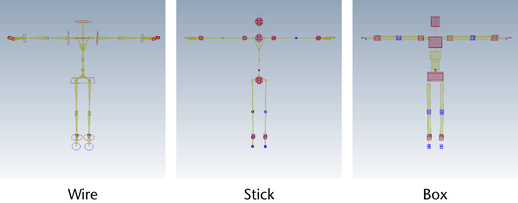
- Show Labels
-
Lets you toggle the display of each component of the selected character. Enable or disable the display of the following items:
- Skeleton (joint and bone objects)
- IK effectors
- FK effectors
- Labels
- In Maya 2016, this option is called Show/Hide.
- Import Skeleton Template
-
Opens the Import Template window and loads an HIK skeleton template file you exported earlier.
- In Maya 2016, this option is called Import Template.
- Export Skeleton Template
-
Opens the Export Template window, letting you save an HIK skeleton template file. This saves the skeletal structure information and the joint translation information of the current skeleton as a text file. You can then reload that information to apply to other skeletons using the Import Template option. See Import or export a HumanIK skeleton template.
- Edit Character Definition
-
- Edit Character Definition
- Opens the character node definition in the Attribute Editor.
- In Maya 2016, this option is called HIK Definition.
- Edit HIK Properties
- Selects the retargeting HIKProperties node and displays advanced retargeting attributes in the Attribute Editor. These settings are for advanced users who want to adjust specific HIK solver parameters.
- Reset HIK Properties
-
Resets any adjusted retargeting properties in the HIKPropertyState node to default values.
- Configure Mirror Matching
- Opens the Configure Mirror Matching window, which lets you add new pairs of strings to the list that the Definition tab checks for mirror matching bone names. If you use a different substring in your bone naming conventions to indicate the left and right sides of the body, select this option to add your substrings. See Activate and configure mirror matching.
- Load Character Definition Template
- Lets you map bones by applying a naming template of your own. Opens the Load Skeleton Definition window.
- In Maya 2016, this option is called Load Skeleton Definition.
- Save Character Definition Template
- Opens the Save Skeleton Definition window. See Save Skeleton Definition window.
- In Maya 2016, this option is called Save Skeleton Definition.
- Export Character Definition
- Opens a dialog box that lets you export your bone mappings in an .hikc format.
Note: If you are exporting .hikc files from recent Maya versions while running the 2017 HIK runtime, use the following environment variable MAYA_WRITE_HIK_V1 if you have character definition files that need to be compatible with the legacy HumanIK Gameware. See the MAYA_WRITE_HIK_V1 option in the General Environment Variables topic for more information.
- In Maya 2016, this option is called Export Definition.
- Edit Control Rig
-
- Rig Look
-
Lets you select what style of Control rig effectors to work with.
- Align/Synchronize Control Rig
-
When on, the IK and FK effectors of the Control rig always appear synchronized, even if they interpolate differently between keyframes. Disable this option if you want to view separate interpolation paths for the IK and FK solutions.
When using Full Body or Body Part modes, this feature gives you synchronization for manipulating and keying of the Control rig. Note that this feature does not apply to Selection mode.
- Delete Control Rig
- Deletes the Control rig of the current character.
- Load UI Configuration
- Opens the Import UI Configuration File dialog box, letting you select a custom configuration file to be used as the new default layout for the Controls tab. See Load a new layout.
- Save UI Configuration...
- Refreshes the Controls tab layout. Use this option to view changes you make to your configuration file after it is loaded using the Load UI Configuration command.
- In Maya 2016, this option is called Update UI Configuration.
- Edit Custom Rig Mapping
- Create a Custom rig mapping for the current character. The character must have a Custom rig and a valid skeleton definition before you can define the Custom rig. See
Create a Custom rig mapping.
Note:
- If the skeleton definition is valid and locked, selecting this option opens the Custom Rig tab in the HumanIK window.
- If the skeleton definition is valid and unlocked, selecting this option automatically locks the definition before opening the Custom Rig tab.
- If the skeleton definition is not valid and unlocked, selecting this option will prompt the Lock Characterization dialog box to appear. Clicking Ok will bring the Definition tab into focus, where you can properly define your skeleton.
- In Maya 2016, this option is called Custom Rig.
-
- Import Custom Rig Mapping
- Click to open the Import Rig Mappings window and load a Custom rig mapping XML file you exported earlier.
- In Maya 2016, this option is called Import Mapping.
- Export Custom Rig Mapping
- Opens the Save Rig Mappings window, letting you save a Custom rig mapping in an XML file.
- In Maya 2016, this option is called Export Mapping.
- Load UI Configuration
- Opens the Import UI Configuration File dialog box, letting you select a custom configuration file to be used as the new default layout for the Custom Rig tab. See Load a new layout.
- Save UI Configuration
- Refreshes the Controls tab layout. Use this option to view changes you make to your configuration file after it is loaded using the Load UI Configuration command.
- In Maya 2016, this option is called Update UI Configuration.
- Bake
-
The Bake menu displays options that let you bake animation to a skeleton, Control rig, or Custom rig. These options update based upon input in the HumanIK window including the target character, source, and manipulation and keying mode. See Bake options in the HumanIK window for a full list of options.Note: HumanIK baking must be initiated from the HumanIK window. Selecting Edit > Keys > Bake Simulation to bake HumanIK characters is not recommended.
- Add to Selection
-
- Skeleton
- Adds all joint objects to your selection.
- IK
- Adds all IK effectors to your selection.
- FK
- Adds all FK effectors to your selection.